# How to Solve
This file documents the techniques that I use to solve multiverse star battles.
This is intended as a guide for new players, documentation for my hint system,
and as a place for me to ramble about difficulty.
Many of these techniques will be familiar to folks who are already familiar with
Star Battle, but some should be brand new thanks to the multiverse concept.
## Philosophy
All of the "books" of puzzles that I publish were created in the same way:
1. Generate many more puzzles than I need
2. Rank them by difficulty
3. Filter the big set down to a smaller set
The goal of my ranking system is to estimate how hard a human will find each
puzzle. It does this by solving like a human would. Humans look for patterns
that let them place dots/stars, and tend to notice simpler patterns before
complex ones. Similarly, my ranking system is built around a big list of
techniques, sorted by my opinion about their complexity. The computer solver
iterates down the list and checks whether each technique can apply to the
current state of the puzzle. If so, it adds some dots/stars, and jumps back to
the top of the list.
At the end, I have a trace of a possible path through the puzzle, and I can ask
questions like "what was the hardest technique that was required?" and "how many
total techniques were applied?".
This is not an original idea. Before starting this project, I was vaguely aware
that this is how Sudoku is ranked. I was also directly inspired by KrazyDad's
video series, linked from the readme.
## The hint system is the ranking system
As I built my list of techniques, I needed to constantly ask myself - "is there
a simpler move that the one the computer chose here?". I sometimes found the
text descriptions difficult to visualize, so I used AI to re-implement the
solver in javascript, and integrated it into the gui. This turned into the
"hint" feature.
## Techniques
### The rules of the puzzle
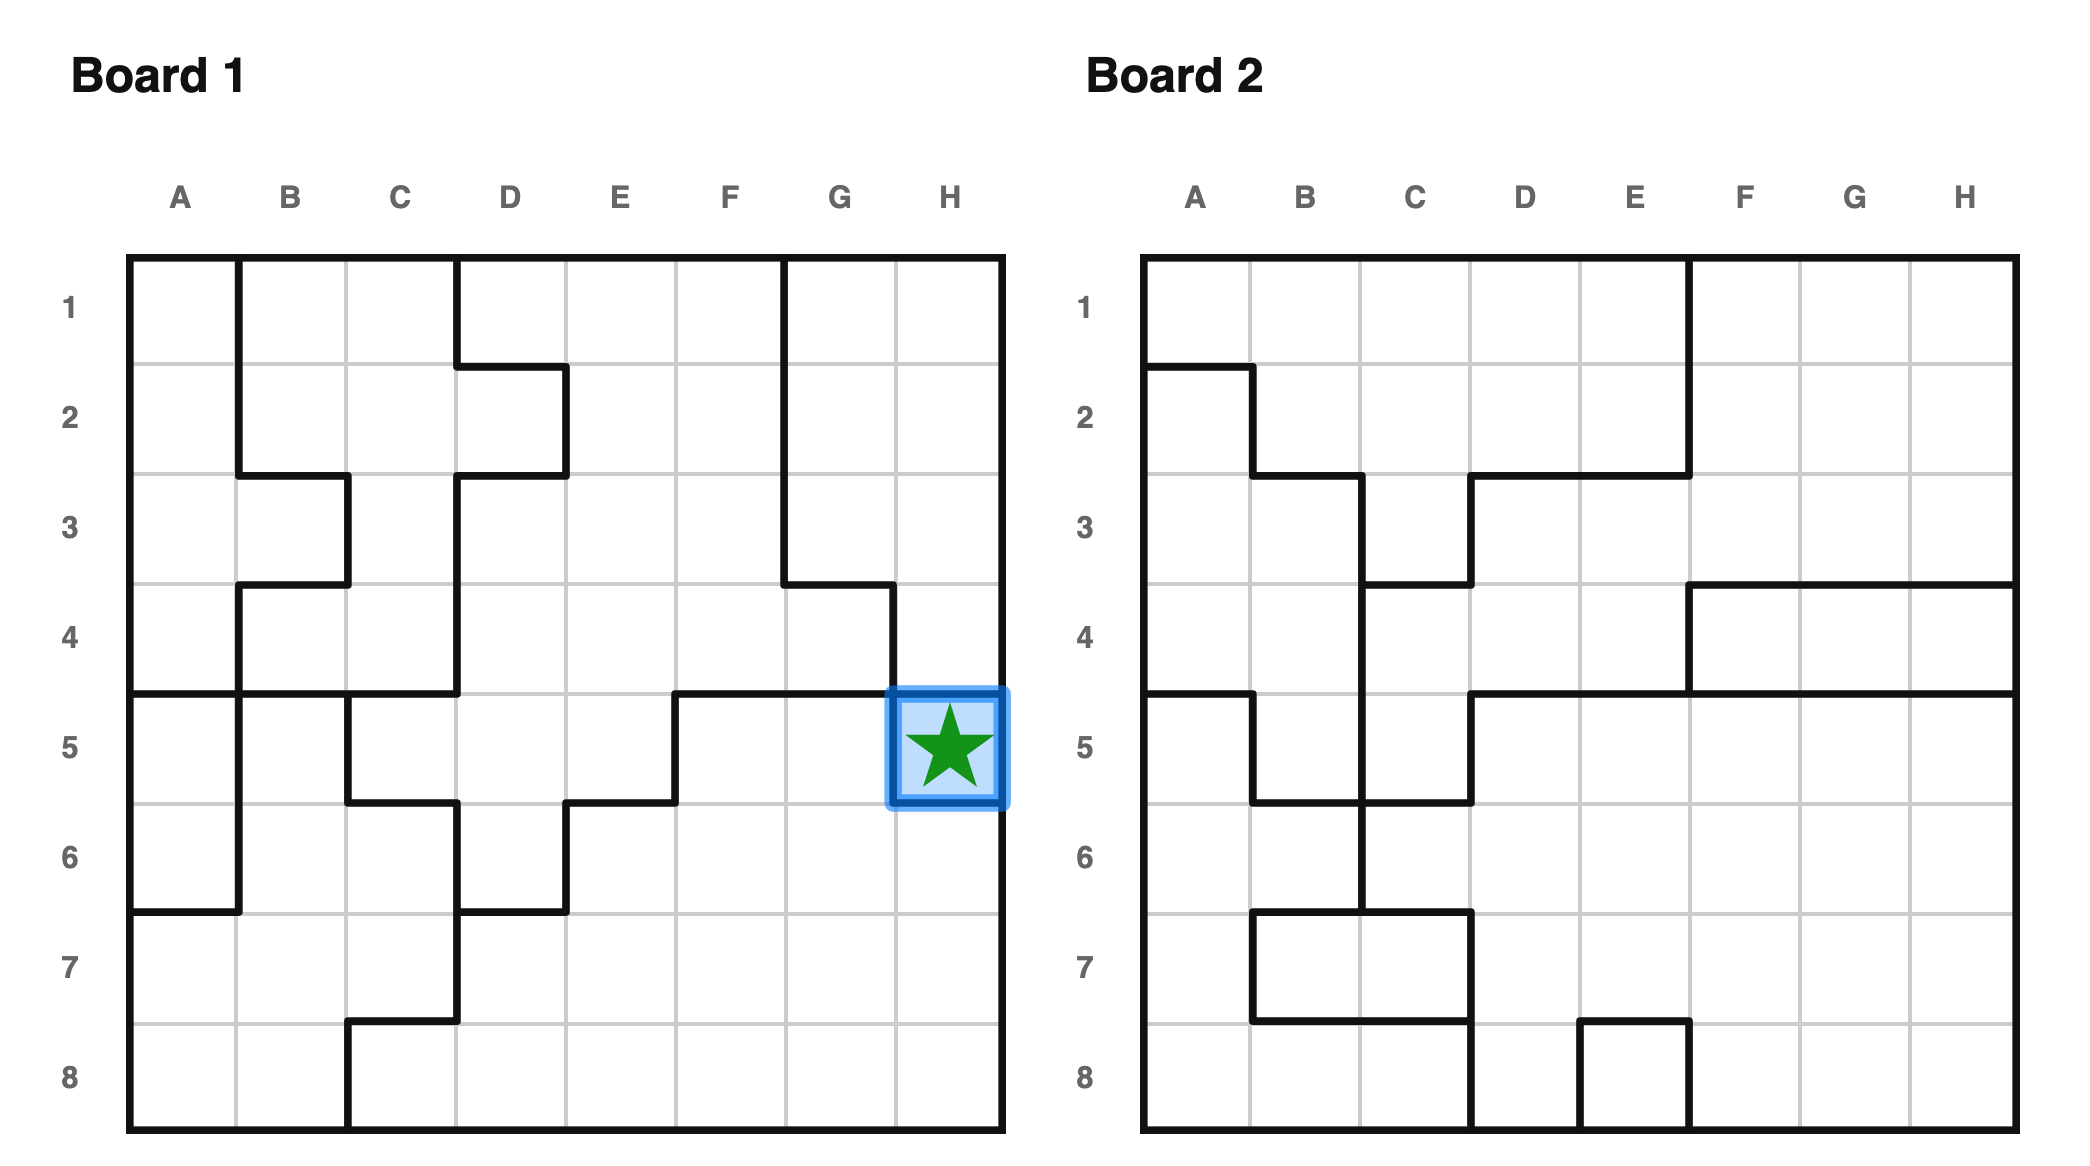 The rules of the puzzle say that very region must contain a star. So, if a
region has no star, and has only one empty square left, that square must be a
star.
---
The rules of the puzzle say that very region must contain a star. So, if a
region has no star, and has only one empty square left, that square must be a
star.
---
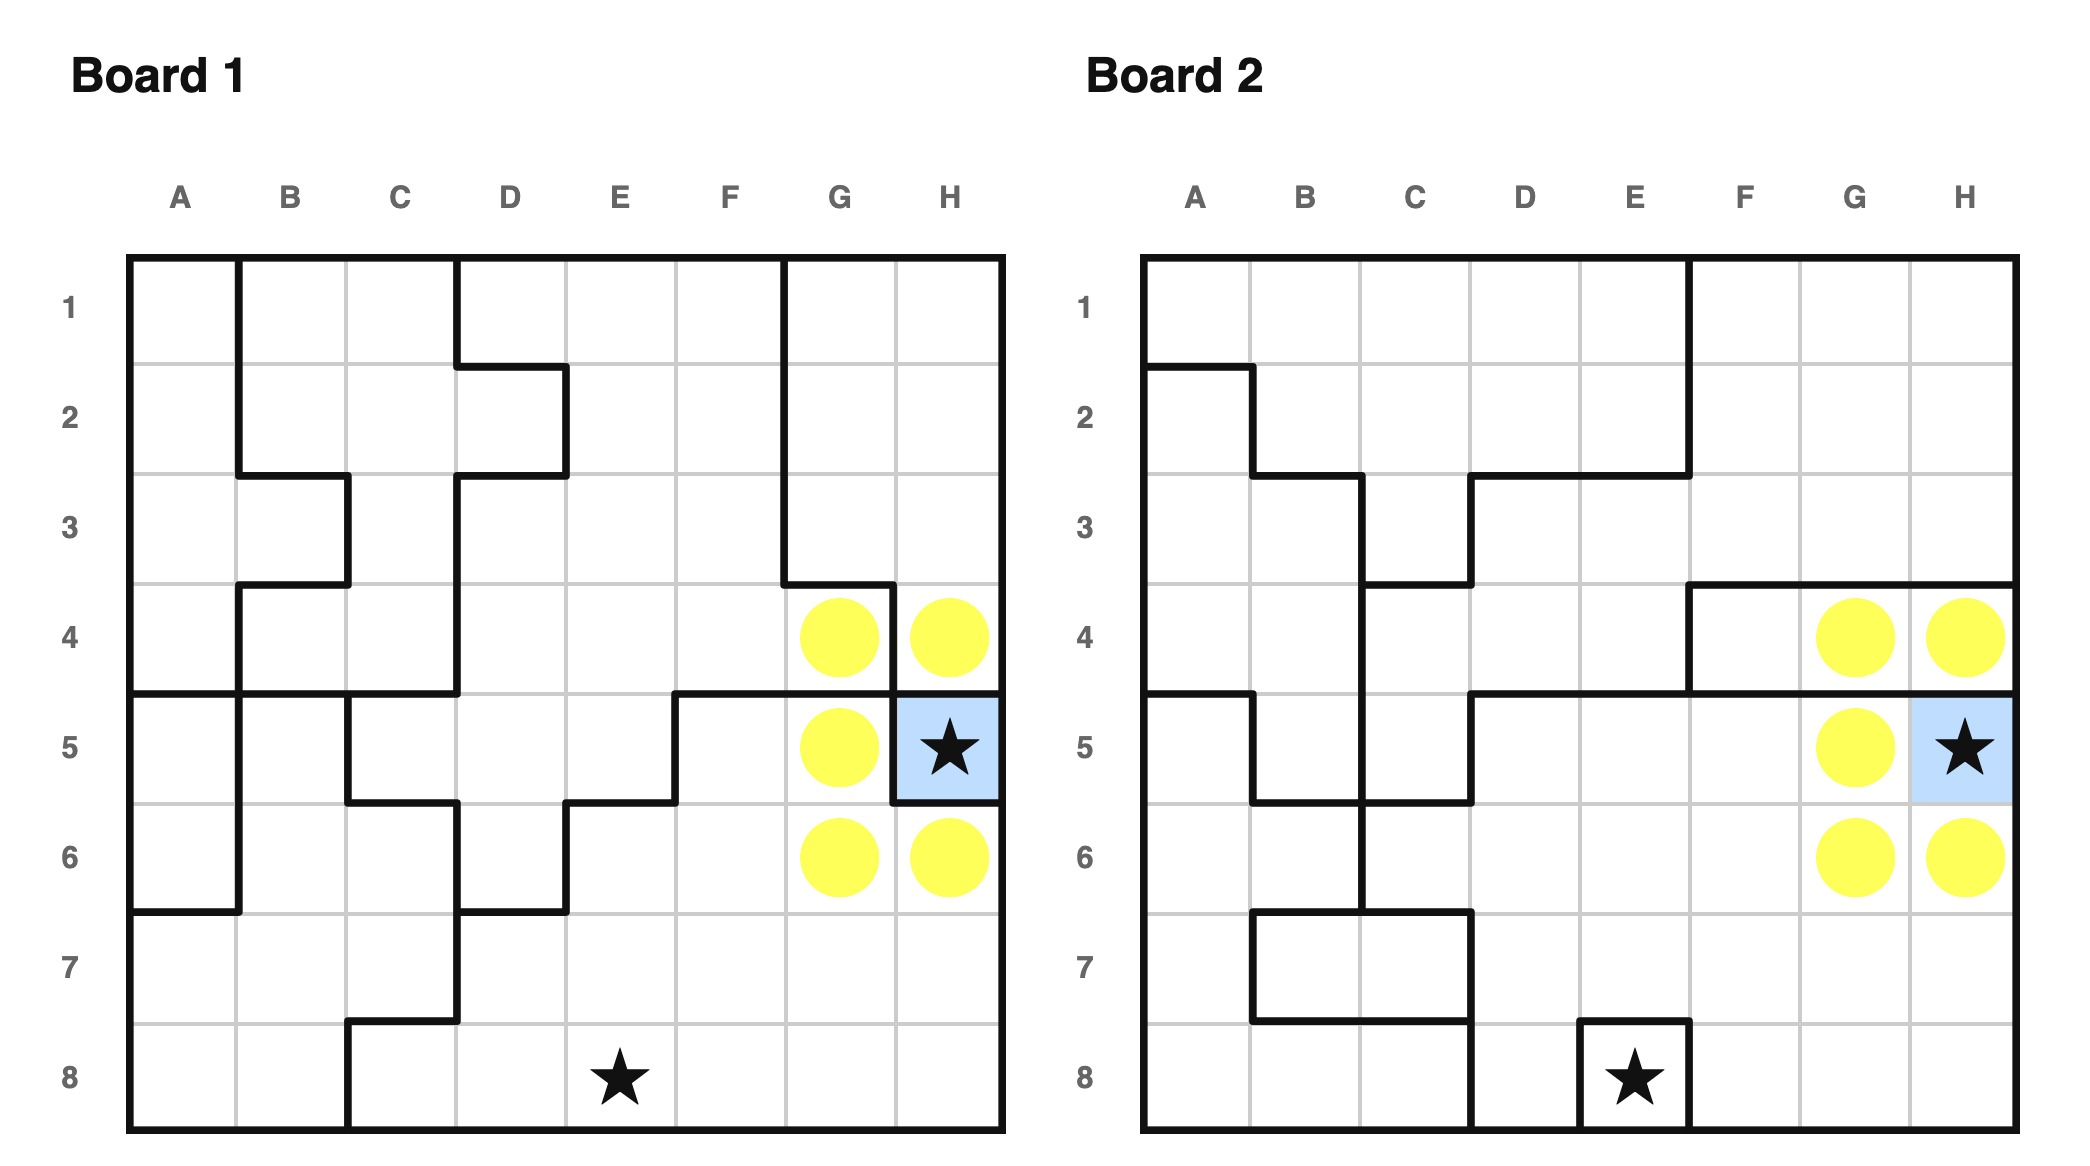 TODO(jmerm): better image here.
The rules also say that there is exactly one star per row, column, and region,
and that stars cannot touch, even diagonally. So after we place a star, we can
mark all cells in its row, col, regions (on both boards), and the 8 cells around
it as not containing stars.
Fun fact - this puzzle is solvable using only these two techniques. You can
click the image above, or any of the other images in this doc, to load an
interactive version of these puzzles.
### Notable shapes
There are a bunch of shapes which let you place dots. I usually start each solve
by scanning for them.
---
TODO(jmerm): better image here.
The rules also say that there is exactly one star per row, column, and region,
and that stars cannot touch, even diagonally. So after we place a star, we can
mark all cells in its row, col, regions (on both boards), and the 8 cells around
it as not containing stars.
Fun fact - this puzzle is solvable using only these two techniques. You can
click the image above, or any of the other images in this doc, to load an
interactive version of these puzzles.
### Notable shapes
There are a bunch of shapes which let you place dots. I usually start each solve
by scanning for them.
---
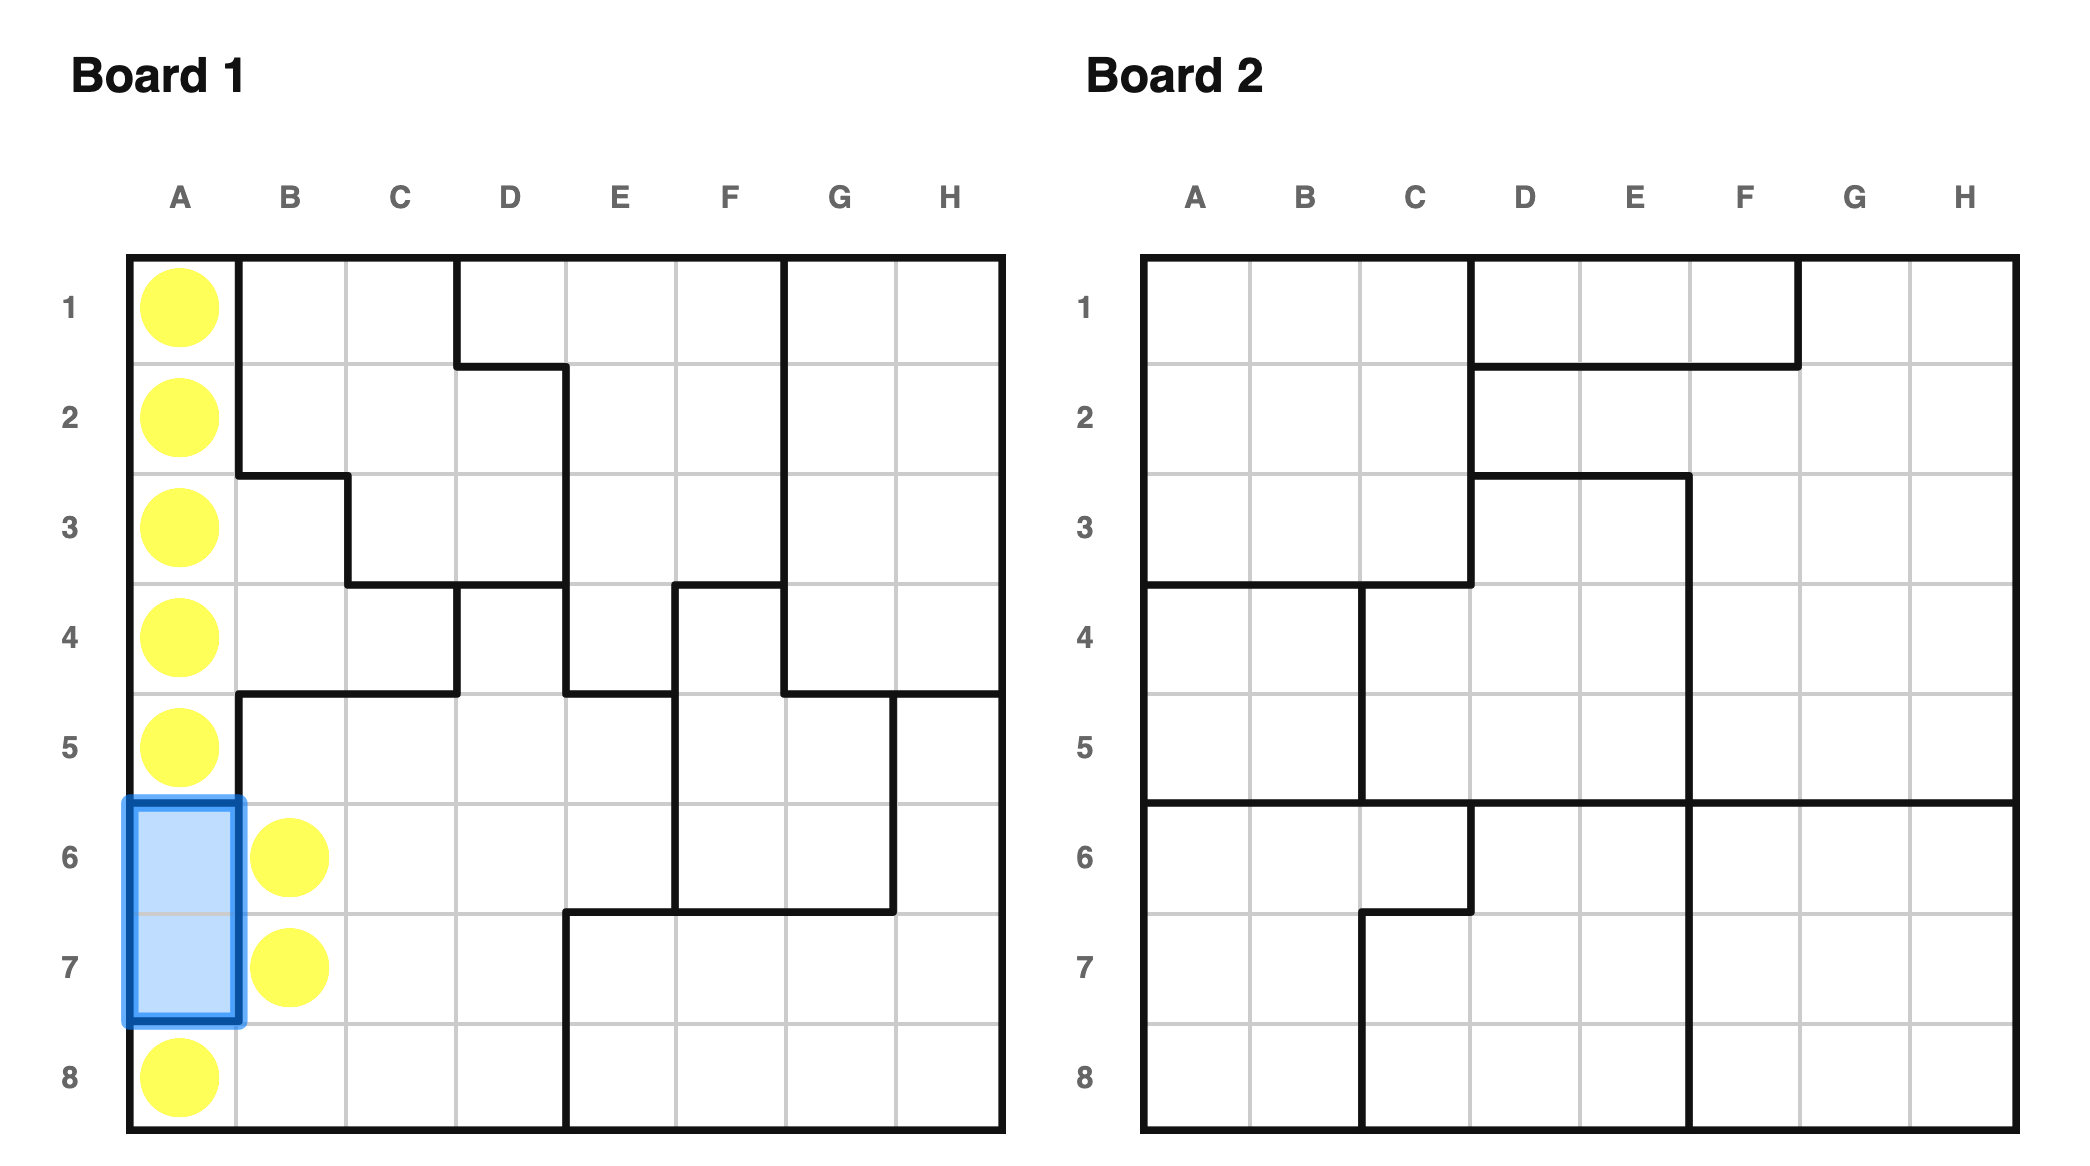 In this case, A6 and A7 form a domino, so there cannot be a star in the rest of
the A column, or in B6/B7.
---
In this case, A6 and A7 form a domino, so there cannot be a star in the rest of
the A column, or in B6/B7.
---
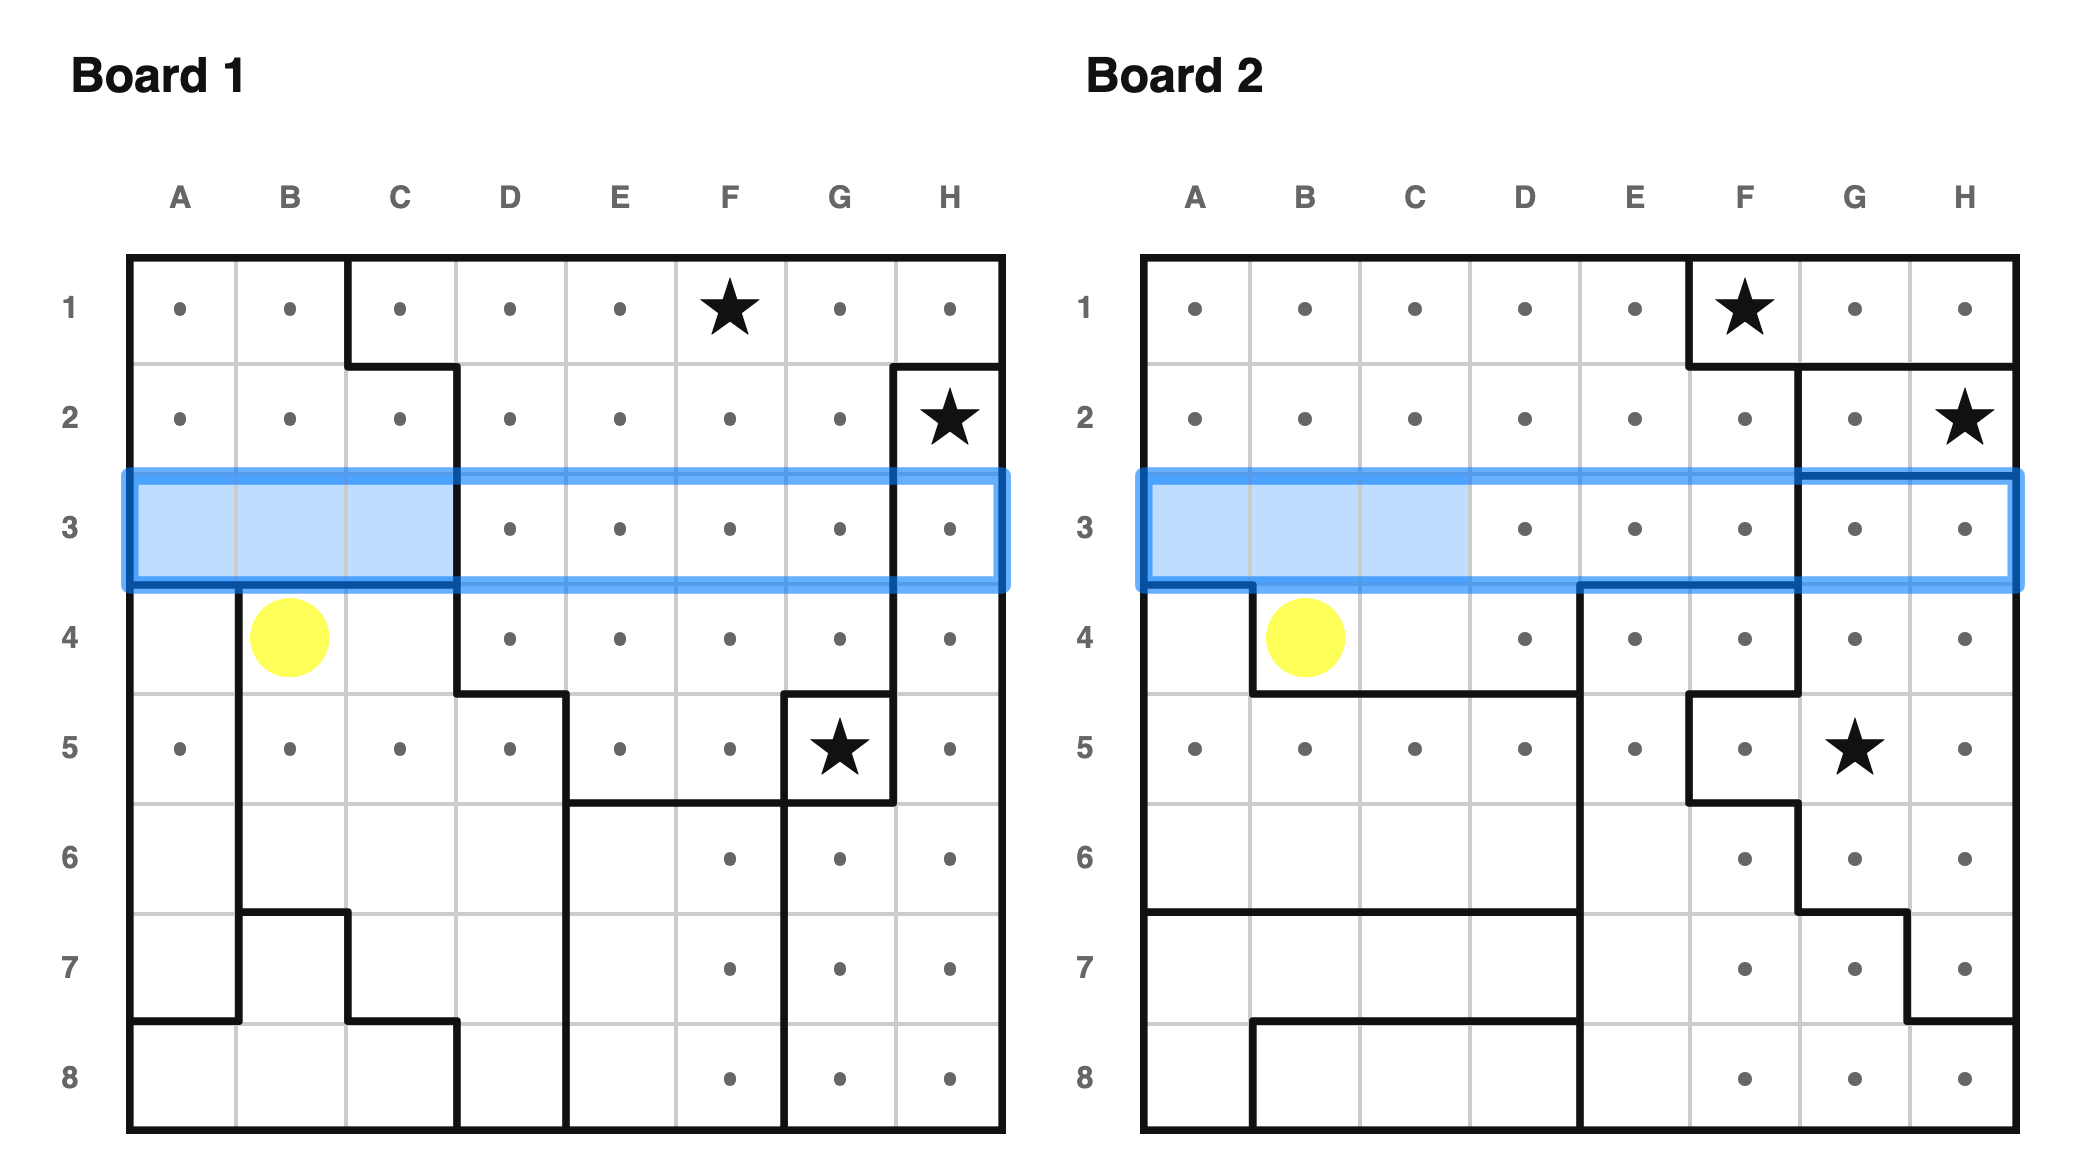 There must be a star in {A3, B3, C3}, because they are the only empty cells in
row 3. A star at B4 would make row 3 unsolvable, so B4 must be a dot.
There must be a star in {A3, B3, C3}, because they are the only empty cells in
row 3. A star at B4 would make row 3 unsolvable, so B4 must be a dot.
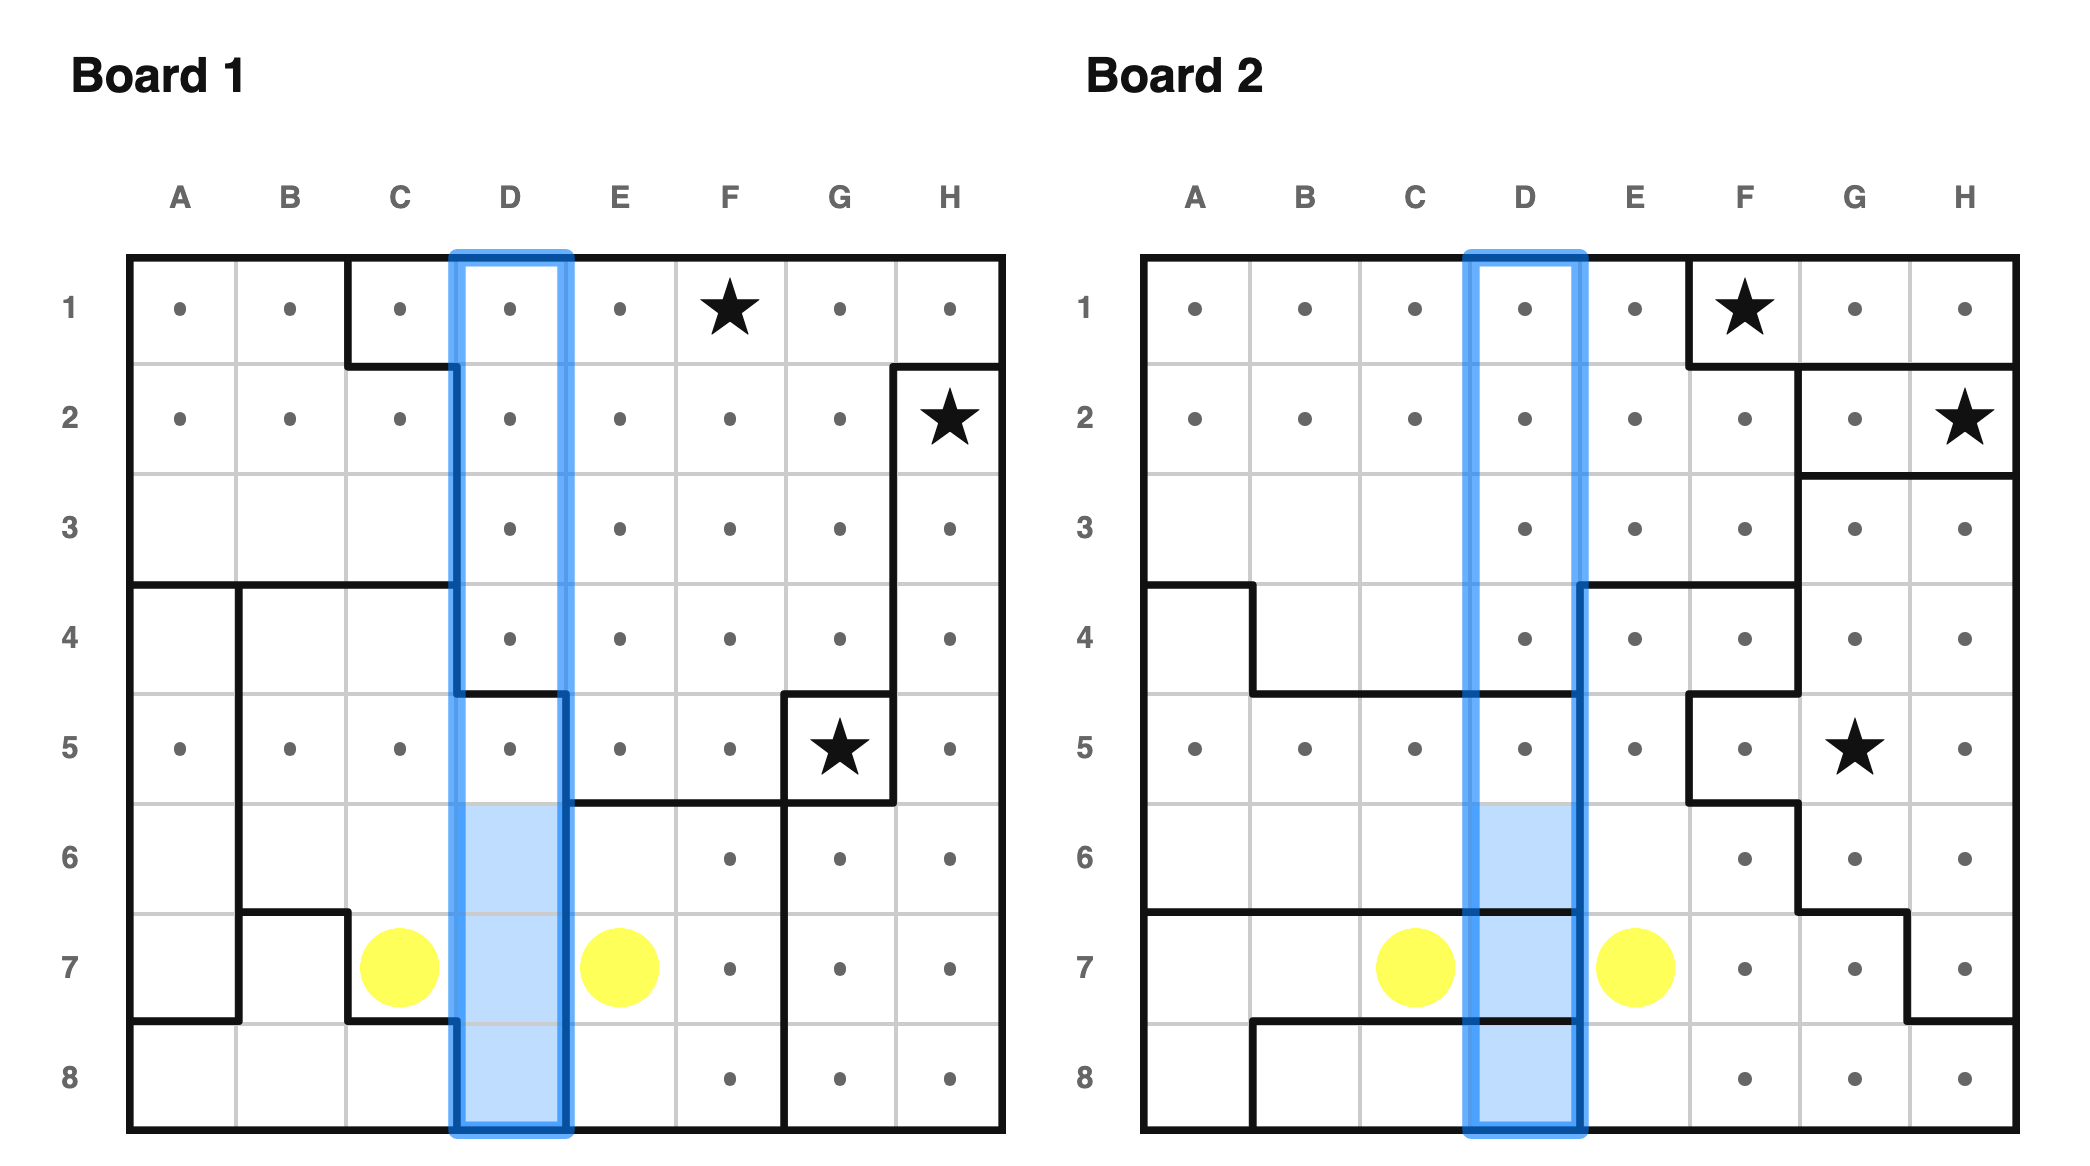 On the same puzzle, there must also be a star in {D6, D8}, since they are the
only empty cells left in column D. A star in C7 or E7 would make column D
impossible, so both C7 and E7 must be dots.
---
On the same puzzle, there must also be a star in {D6, D8}, since they are the
only empty cells left in column D. A star in C7 or E7 would make column D
impossible, so both C7 and E7 must be dots.
---
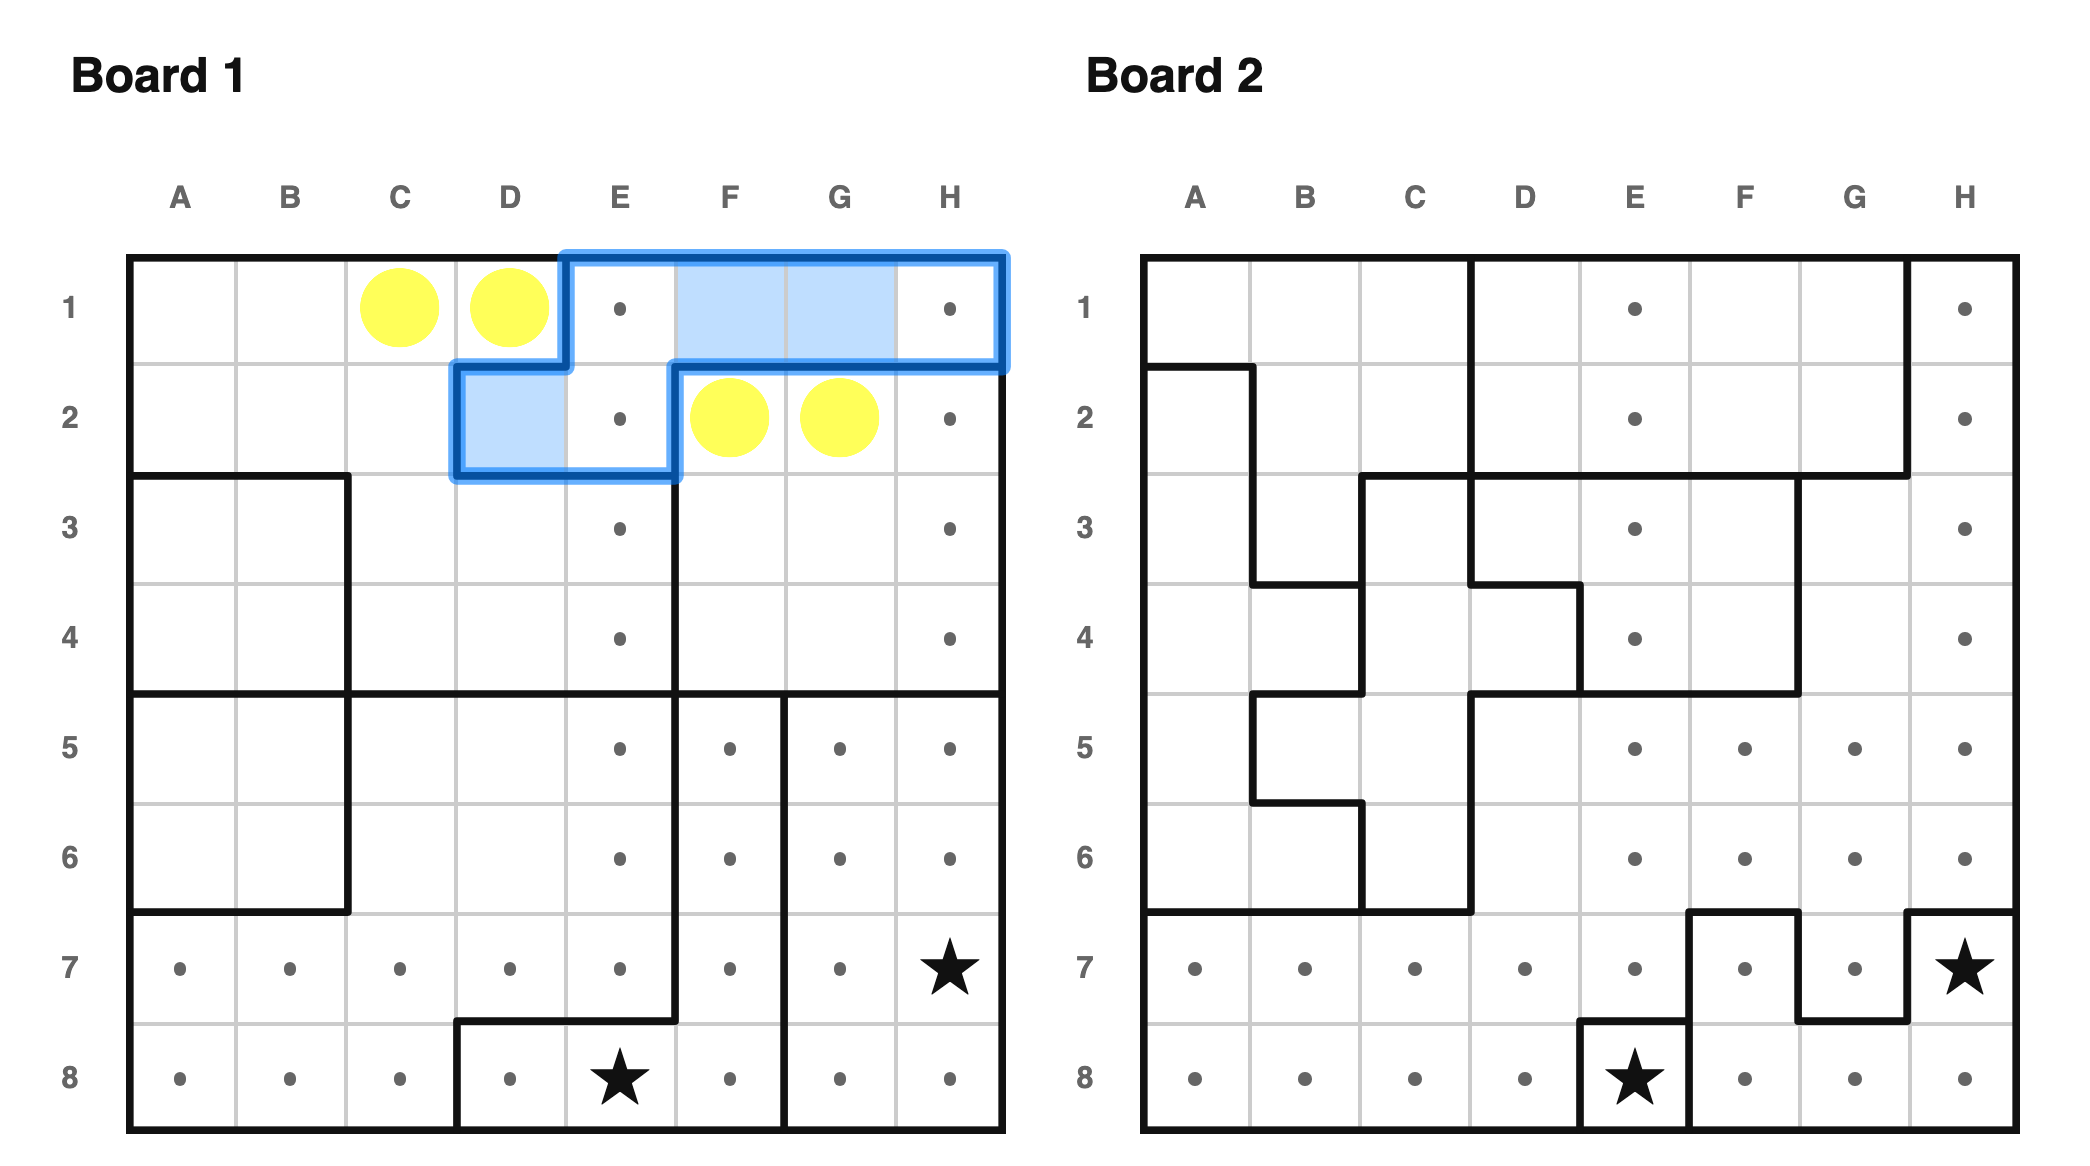 There must be a star in {D2, F1, G1}, since they form a region on board 1. Each
of these cells "sees" {C1, D1, F2, G2} by row, col, or adjacency. So a star in
any of these 4 cells would make that region of board 1 unsolvable. Thus, all
four must be dots.
---
More generally, if every empty cell of an unsolved row/col/region "sees" the
same set of cells outside of that row/col/region, then those cells cannot hold a
star. I call this category of inference "sees too much".
### Adjacent rows/cols
This technique comes in 2 flavors.
A. If a group of N regions covers all the empty cells in a group of N adjacent
rows/cols - the rest of those regions cannot possibly have a star. If it did,
there wouldn't be room to satisfy all the regions.
B. If the empty cells of a group of N regions are fully contained in N adjacent
rows/cols, then the remainder of those rows/cols cannot have a star. If it did,
those regions wouldn't all be solvable.
These descriptions are pretty abstract, so let's look at some concrete examples,
starting with N=1.
#### One row/col
There must be a star in {D2, F1, G1}, since they form a region on board 1. Each
of these cells "sees" {C1, D1, F2, G2} by row, col, or adjacency. So a star in
any of these 4 cells would make that region of board 1 unsolvable. Thus, all
four must be dots.
---
More generally, if every empty cell of an unsolved row/col/region "sees" the
same set of cells outside of that row/col/region, then those cells cannot hold a
star. I call this category of inference "sees too much".
### Adjacent rows/cols
This technique comes in 2 flavors.
A. If a group of N regions covers all the empty cells in a group of N adjacent
rows/cols - the rest of those regions cannot possibly have a star. If it did,
there wouldn't be room to satisfy all the regions.
B. If the empty cells of a group of N regions are fully contained in N adjacent
rows/cols, then the remainder of those rows/cols cannot have a star. If it did,
those regions wouldn't all be solvable.
These descriptions are pretty abstract, so let's look at some concrete examples,
starting with N=1.
#### One row/col
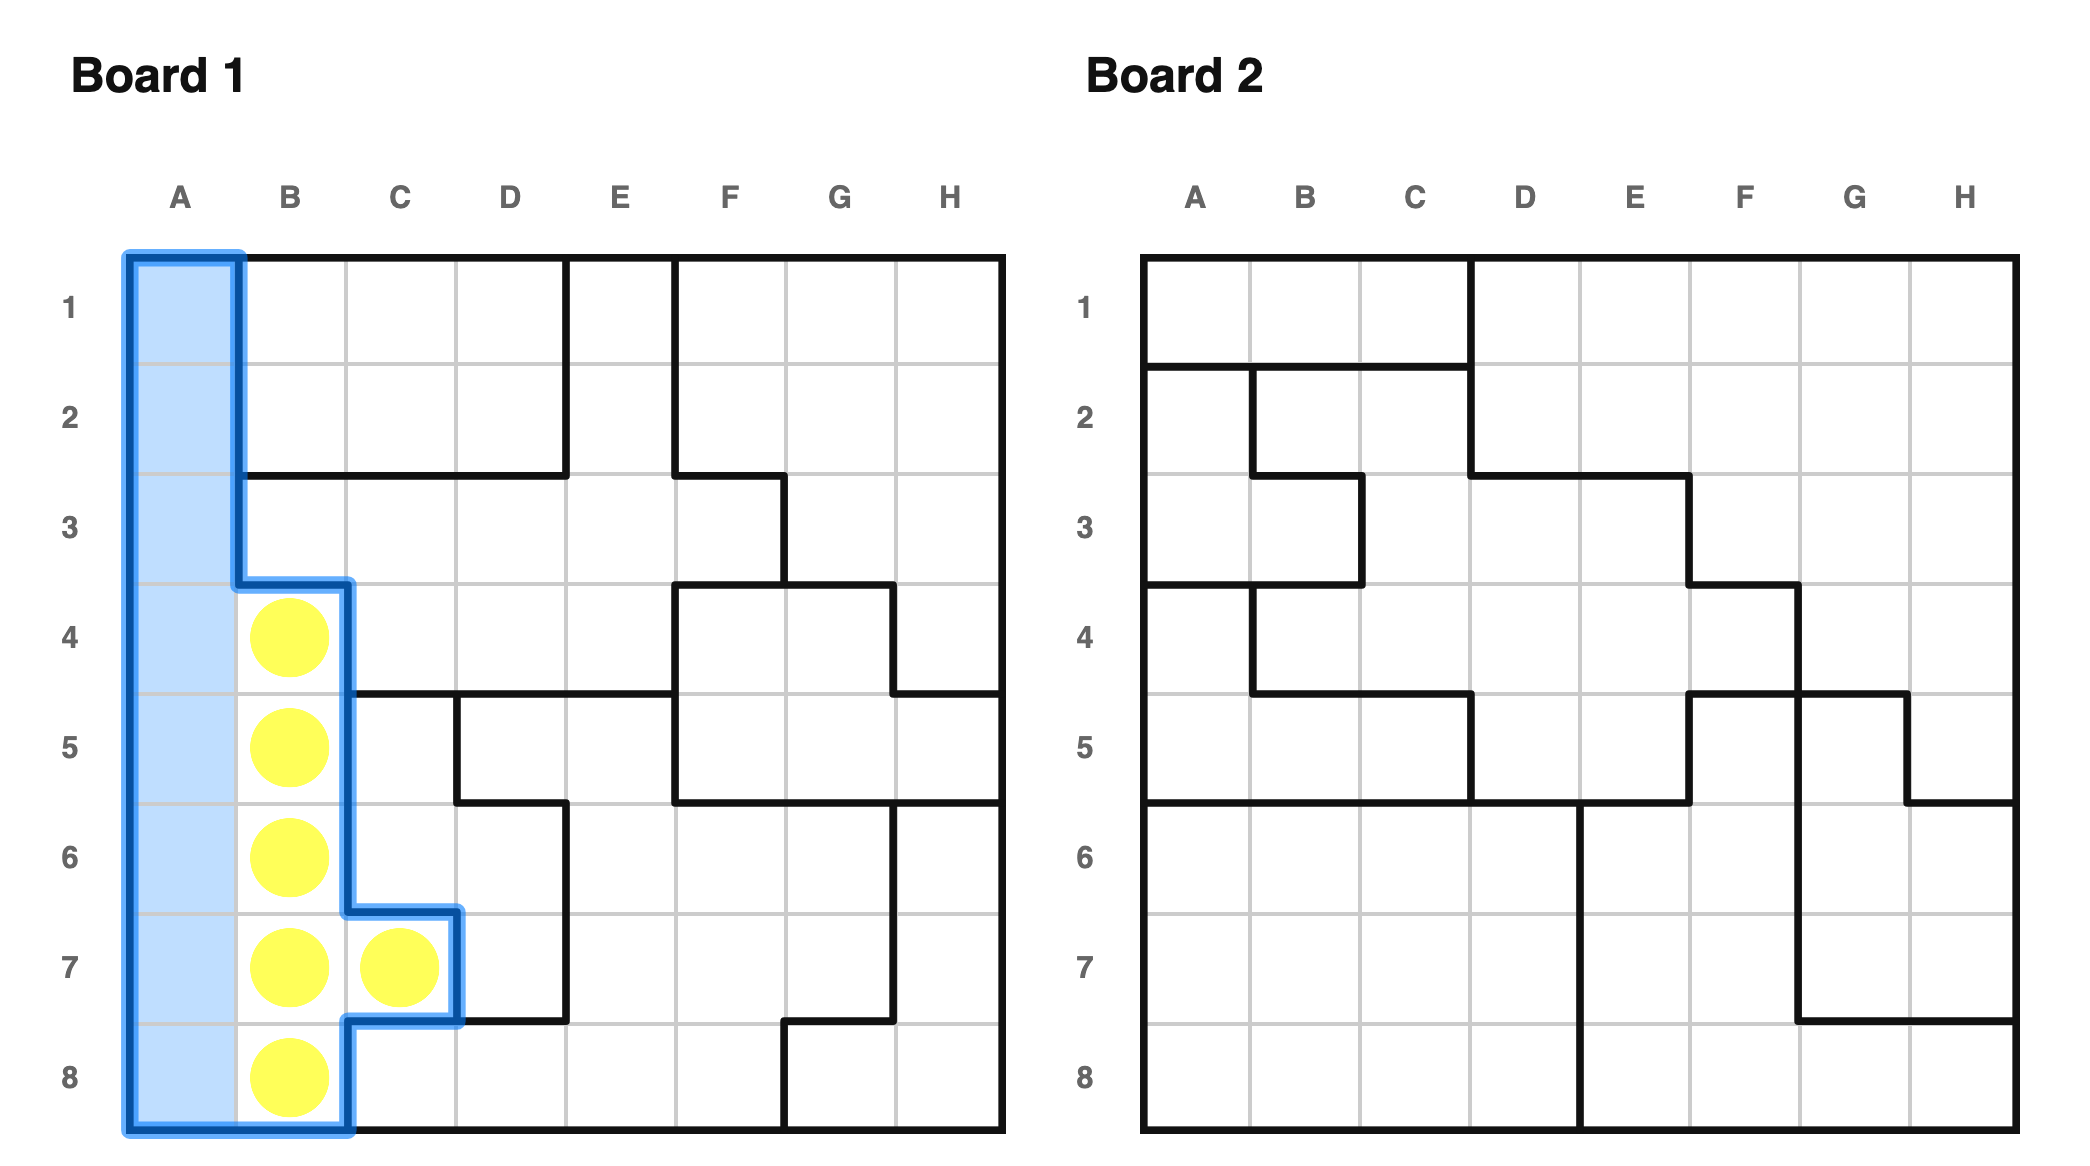 In this case, the leftmost region on board 1 is fully contained in column A.
Therefore, the rest of that region cannot hold a star, or column A would be
unsolvable.
---
In this case, the leftmost region on board 1 is fully contained in column A.
Therefore, the rest of that region cannot hold a star, or column A would be
unsolvable.
---
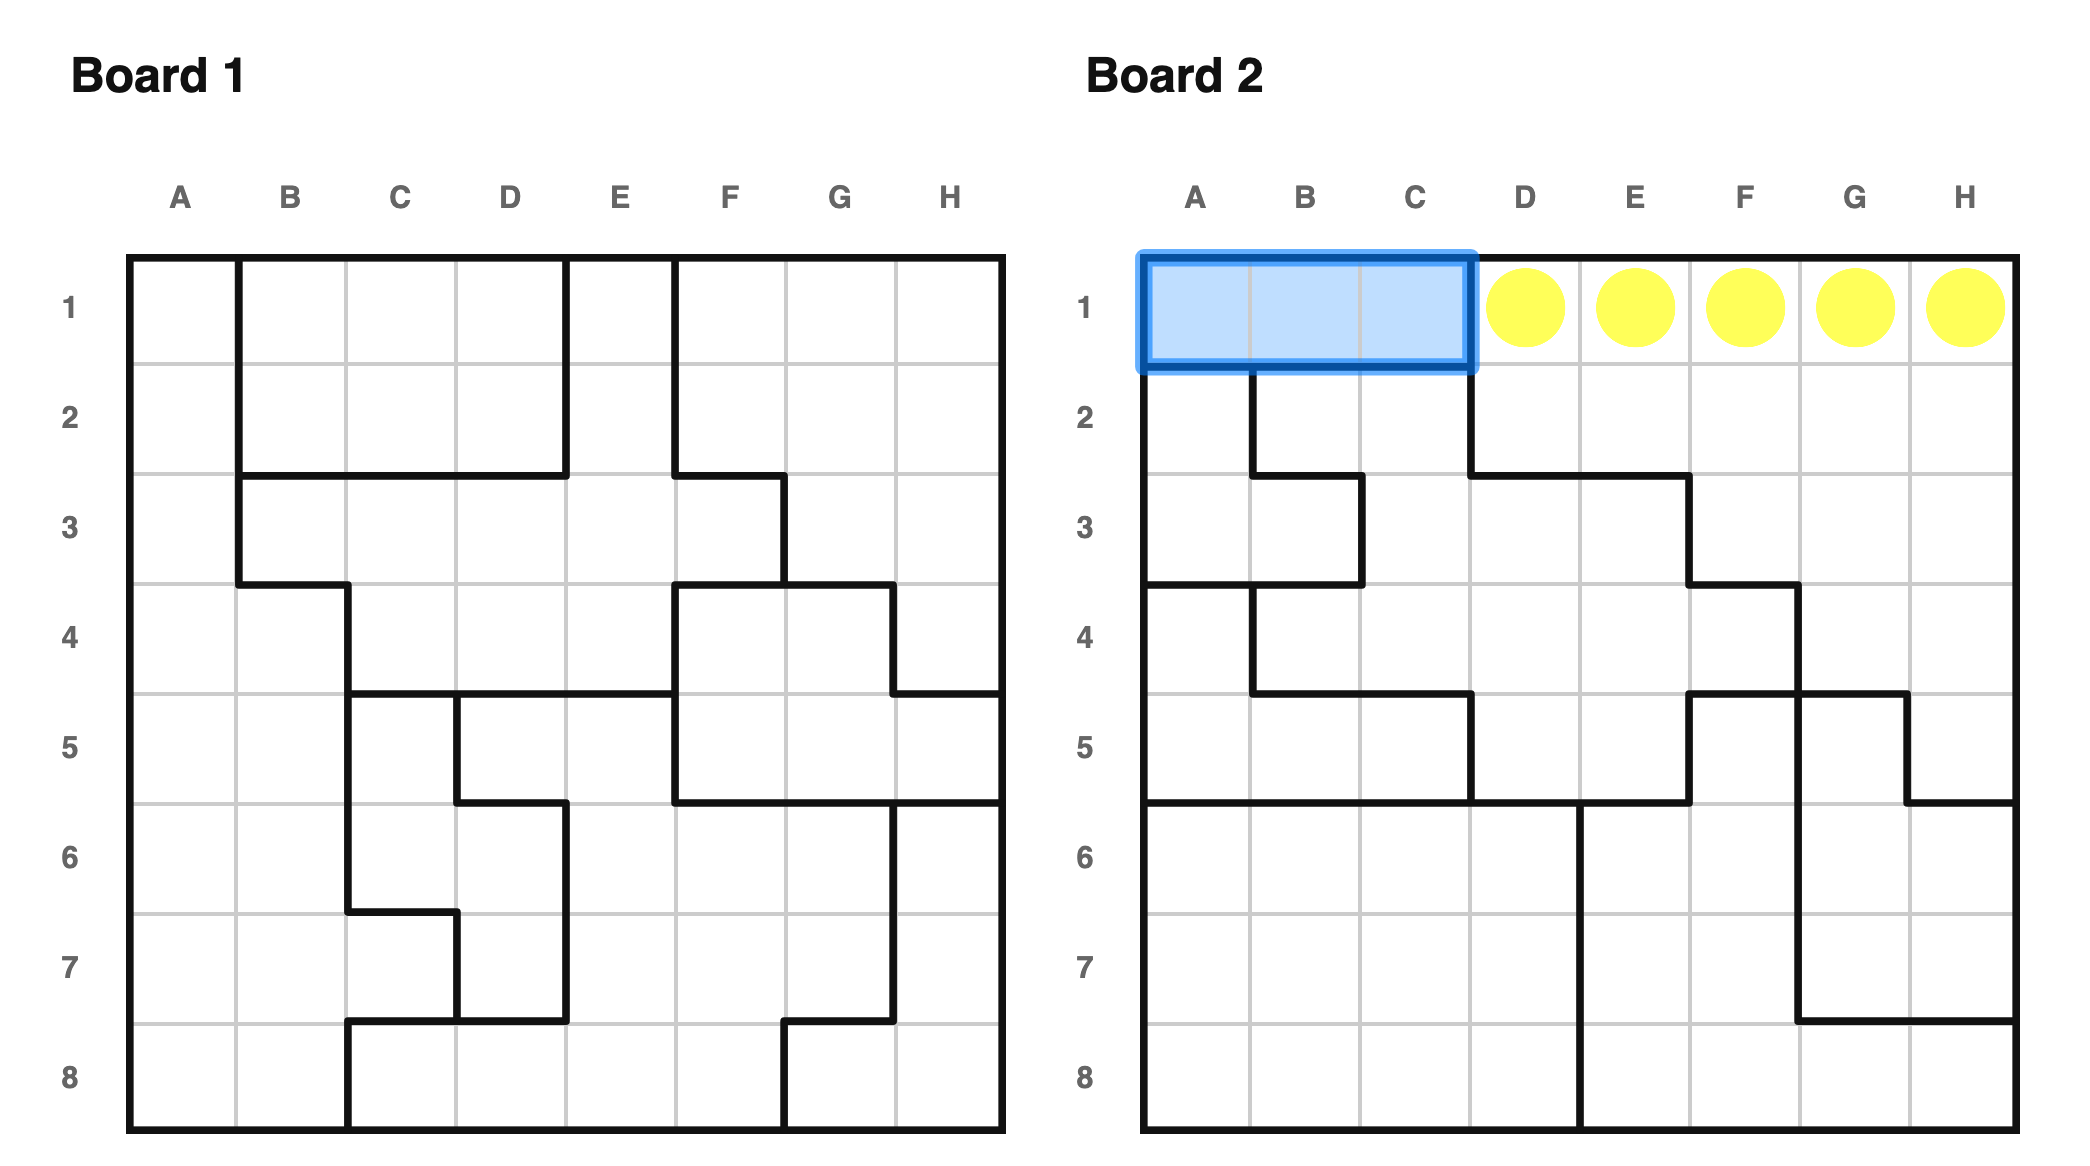 On the same puzzle, we can also look at the top-left region on board 2. This
region is fully contained in row 1, so the rest of row 1 cannot hold a star. If
it did, the top-left region would be unsolvable.
#### More than one row/col
On the same puzzle, we can also look at the top-left region on board 2. This
region is fully contained in row 1, so the rest of row 1 cannot hold a star. If
it did, the top-left region would be unsolvable.
#### More than one row/col
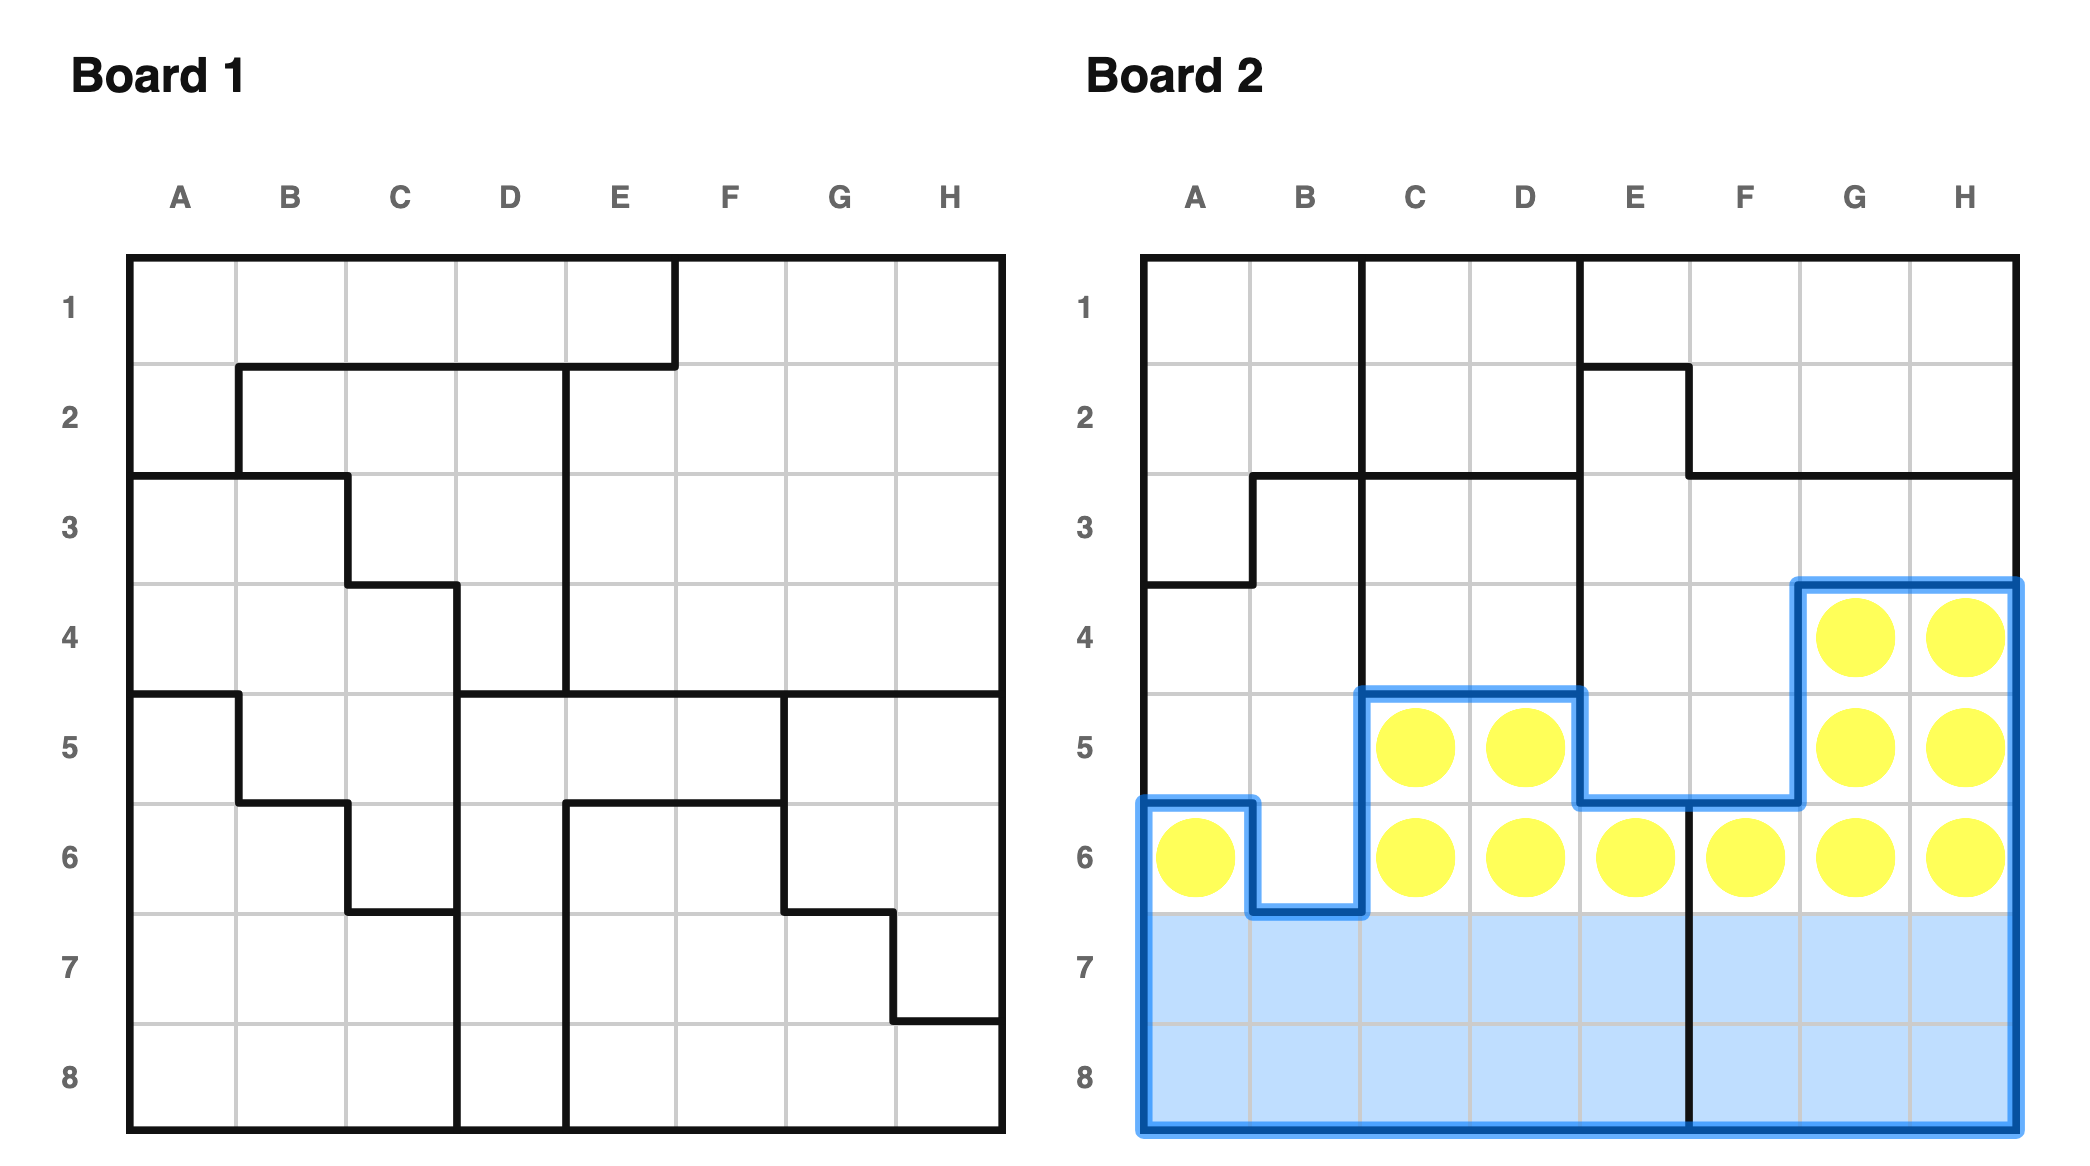 Now let's consider a case where N=2. In this case, the bottom-right and
bottom-left regions of board 2 combine to fill rows 7 and 8. We know that these
two rows contain two stars, so there's no room for stars in the rest of those
regions.
---
Now let's consider a case where N=2. In this case, the bottom-right and
bottom-left regions of board 2 combine to fill rows 7 and 8. We know that these
two rows contain two stars, so there's no room for stars in the rest of those
regions.
---
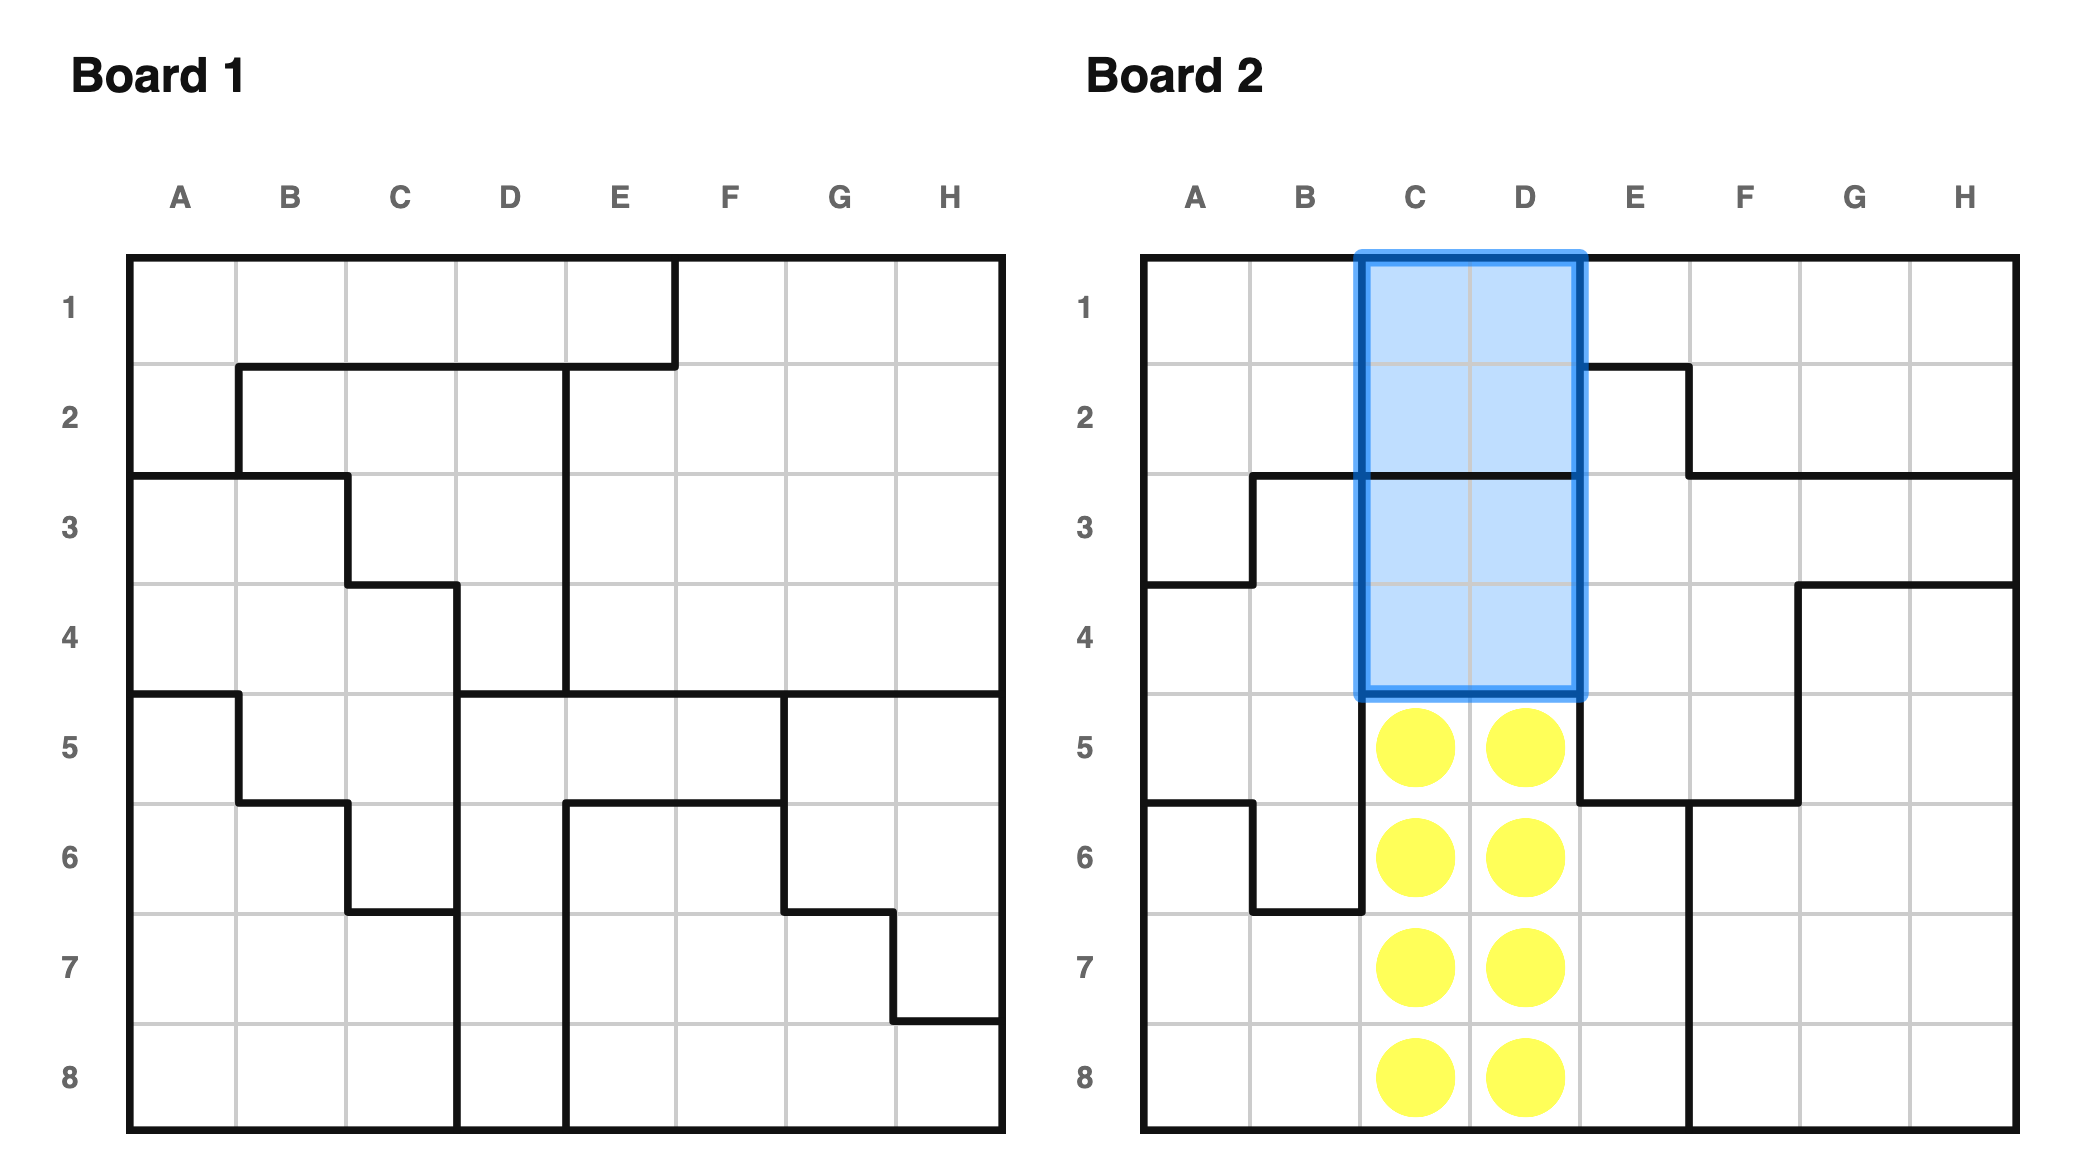 On the same puzzle, we can also focus on columns C and D of board 2. The two
square regions are both contained in those columns. Each region must contain a
star, so the rest of columns C and D must contain dots.
---
On the same puzzle, we can also focus on columns C and D of board 2. The two
square regions are both contained in those columns. Each region must contain a
star, so the rest of columns C and D must contain dots.
---
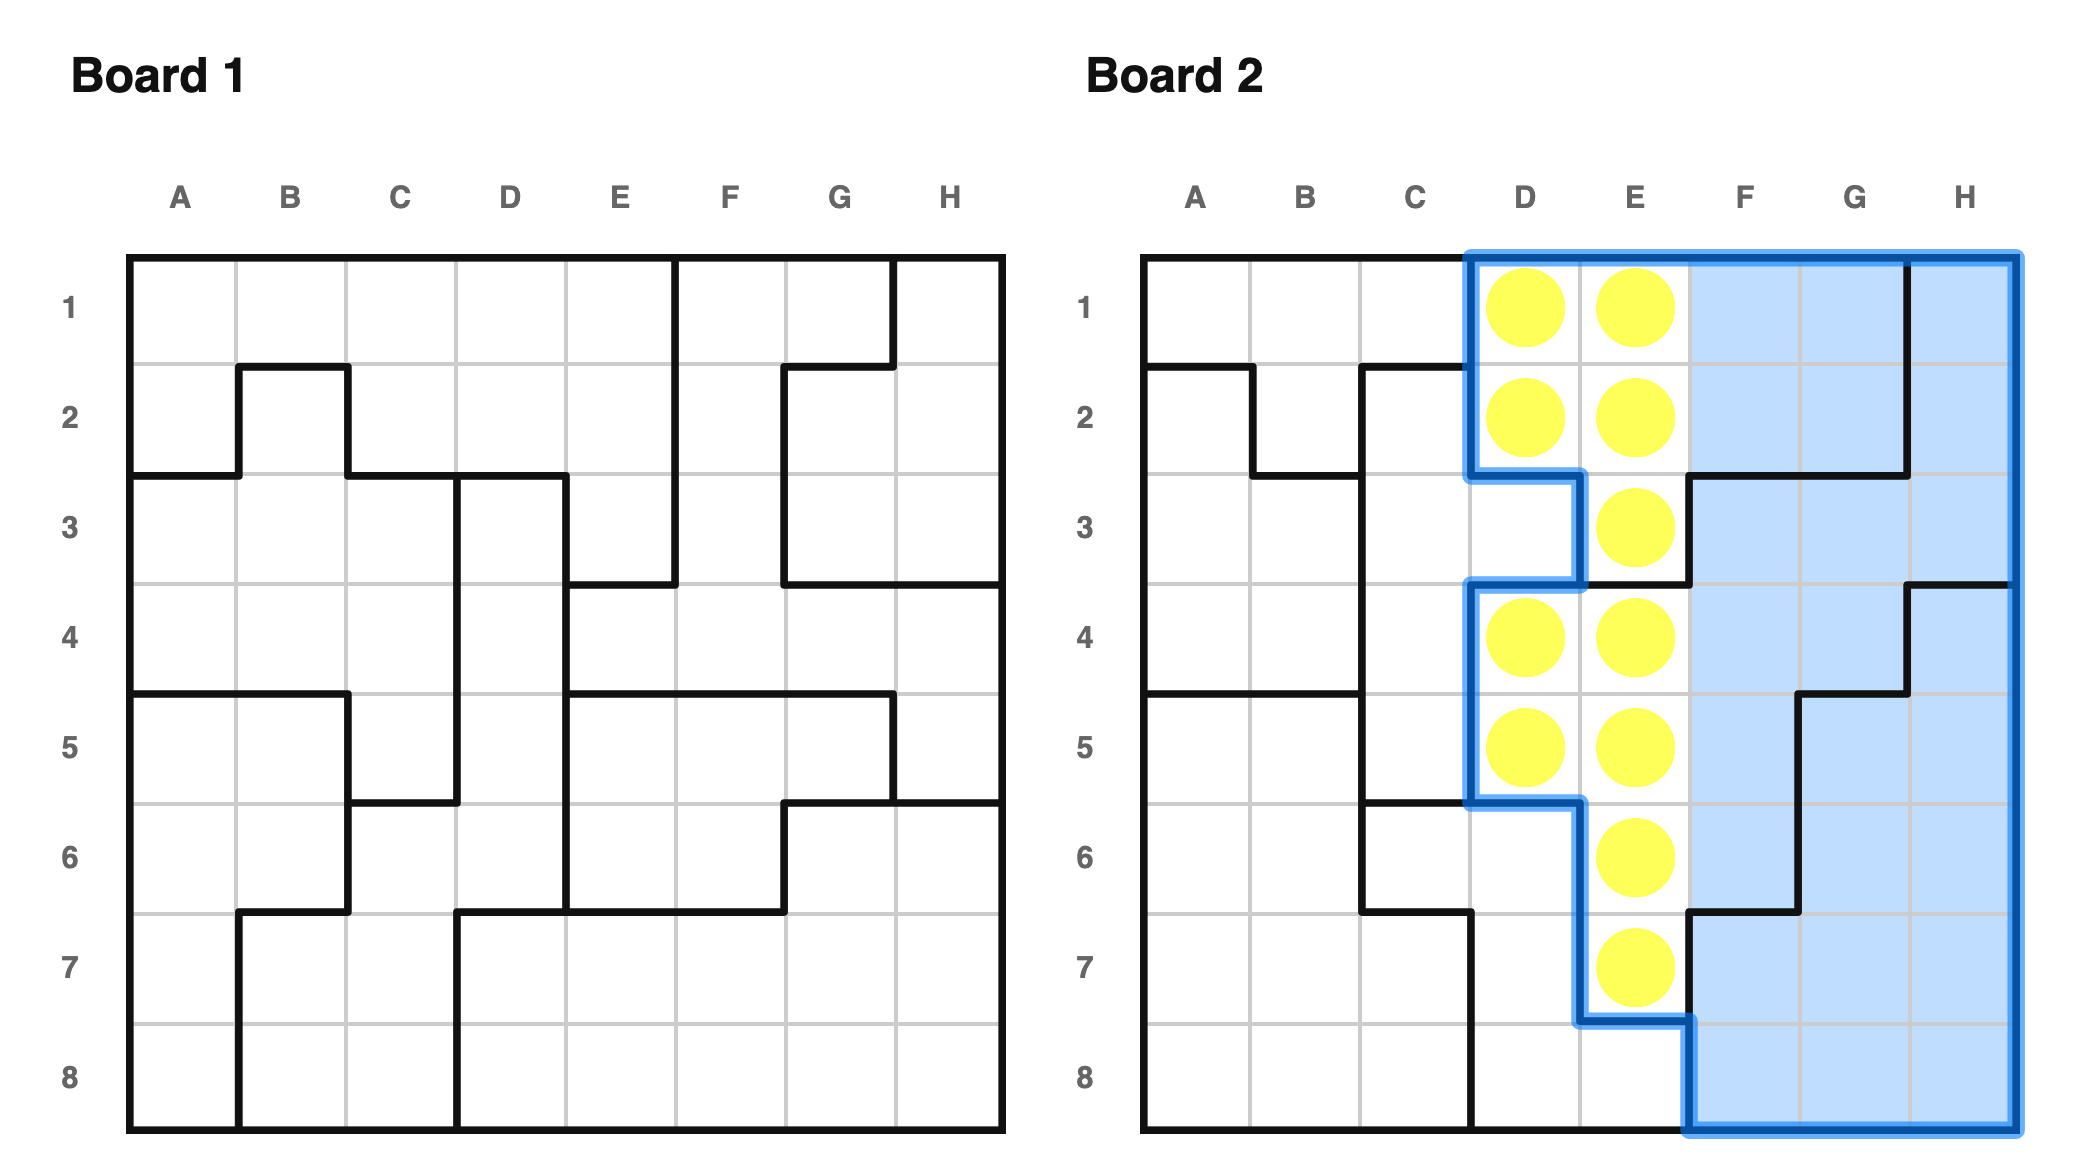 Moving on to N=3, the story is the same. Columns {F,G,H} on board 2 are filled
by 3 regions, so the remainder of those regions cannot have stars.
---
Moving on to N=3, the story is the same. Columns {F,G,H} on board 2 are filled
by 3 regions, so the remainder of those regions cannot have stars.
---
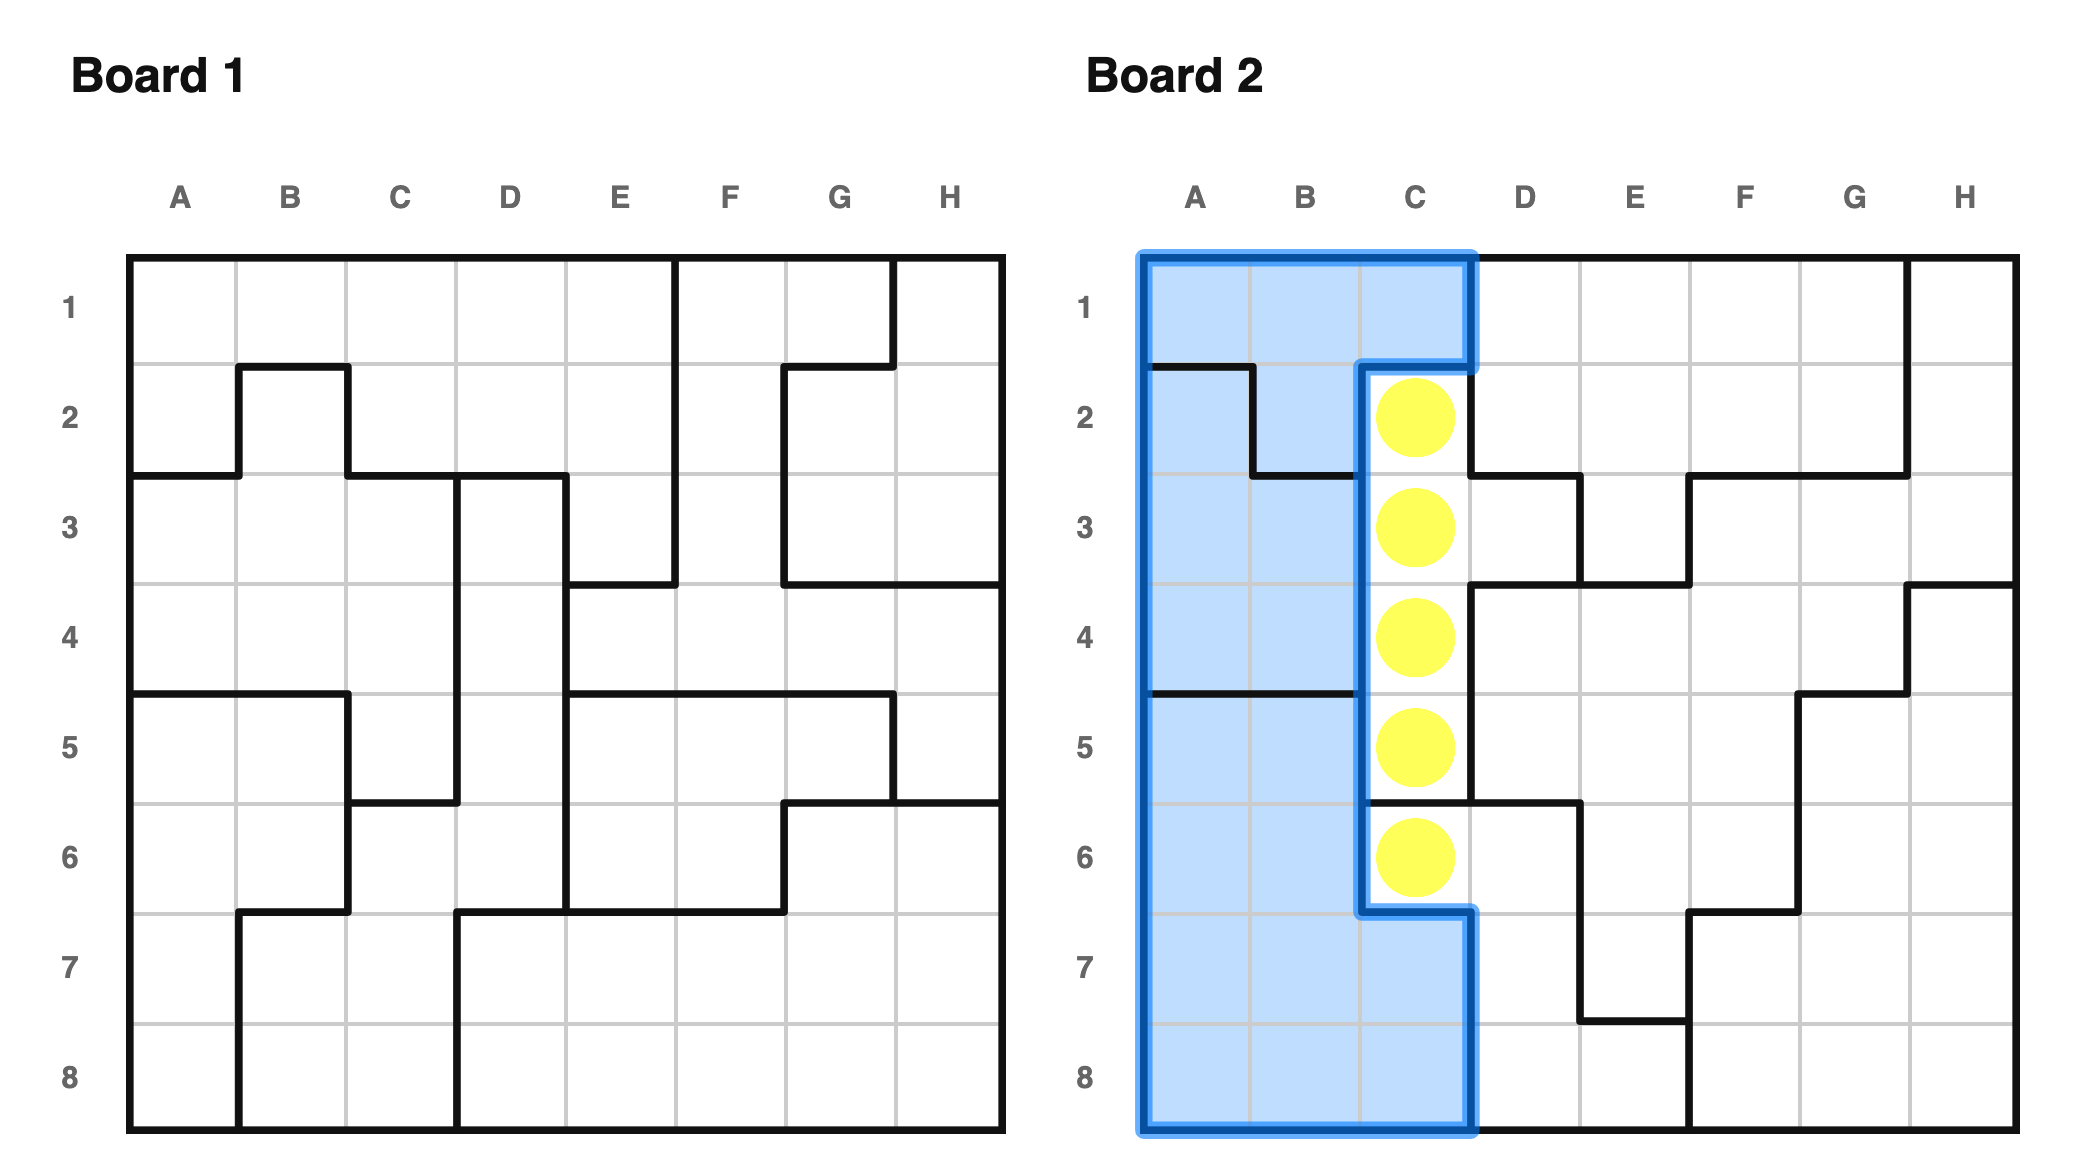 The same board contains an example of case B for N=3. The leftmost 3 regions on
board 2 are fully contained in columns {A,B,C}. Each region must contain a star,
so they must collectively put three stars in those three columns. Therefore the
rest of those columns must have dots.
---
The same board contains an example of case B for N=3. The leftmost 3 regions on
board 2 are fully contained in columns {A,B,C}. Each region must contain a star,
so they must collectively put three stars in those three columns. Therefore the
rest of those columns must have dots.
---
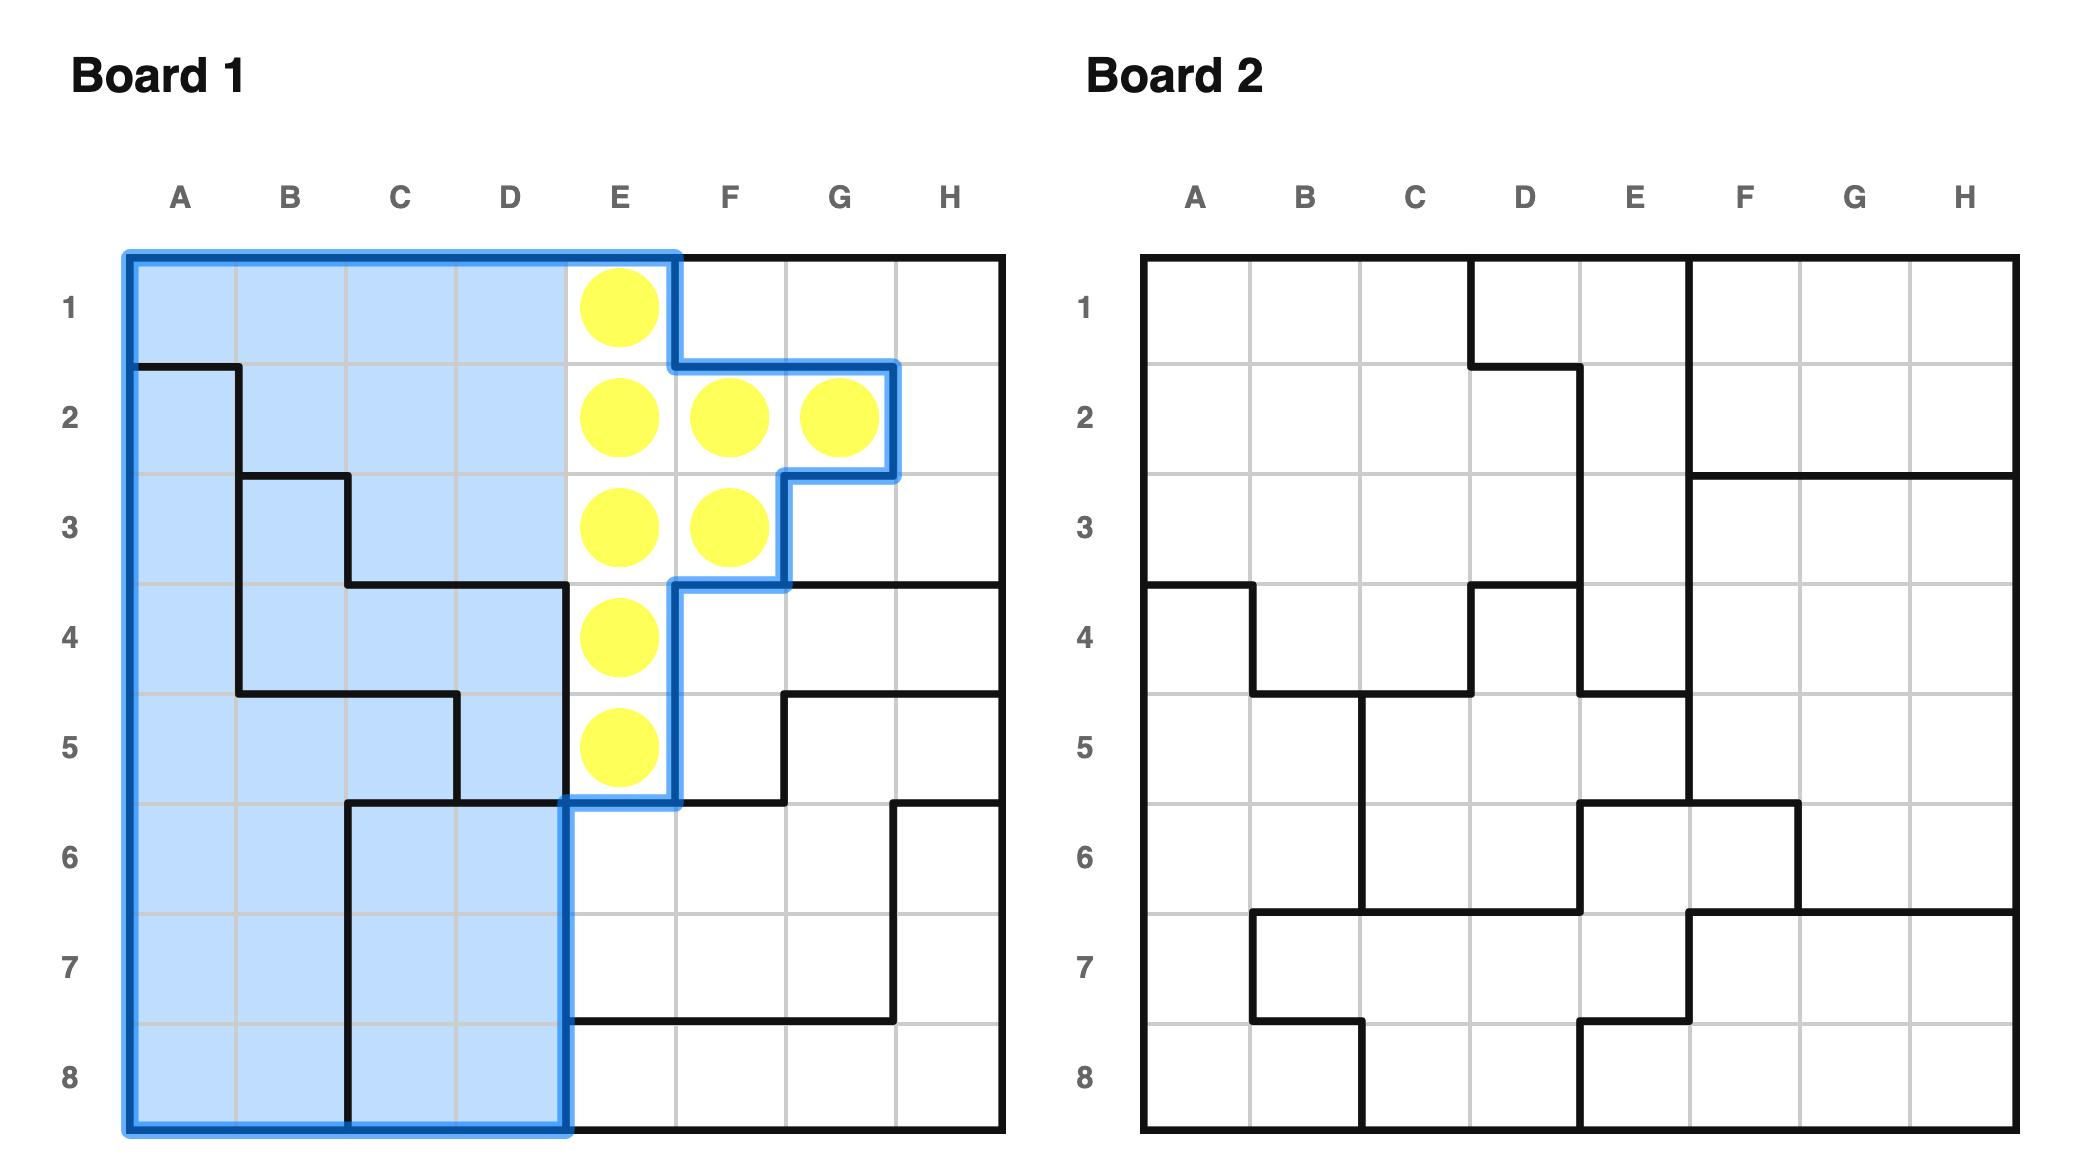
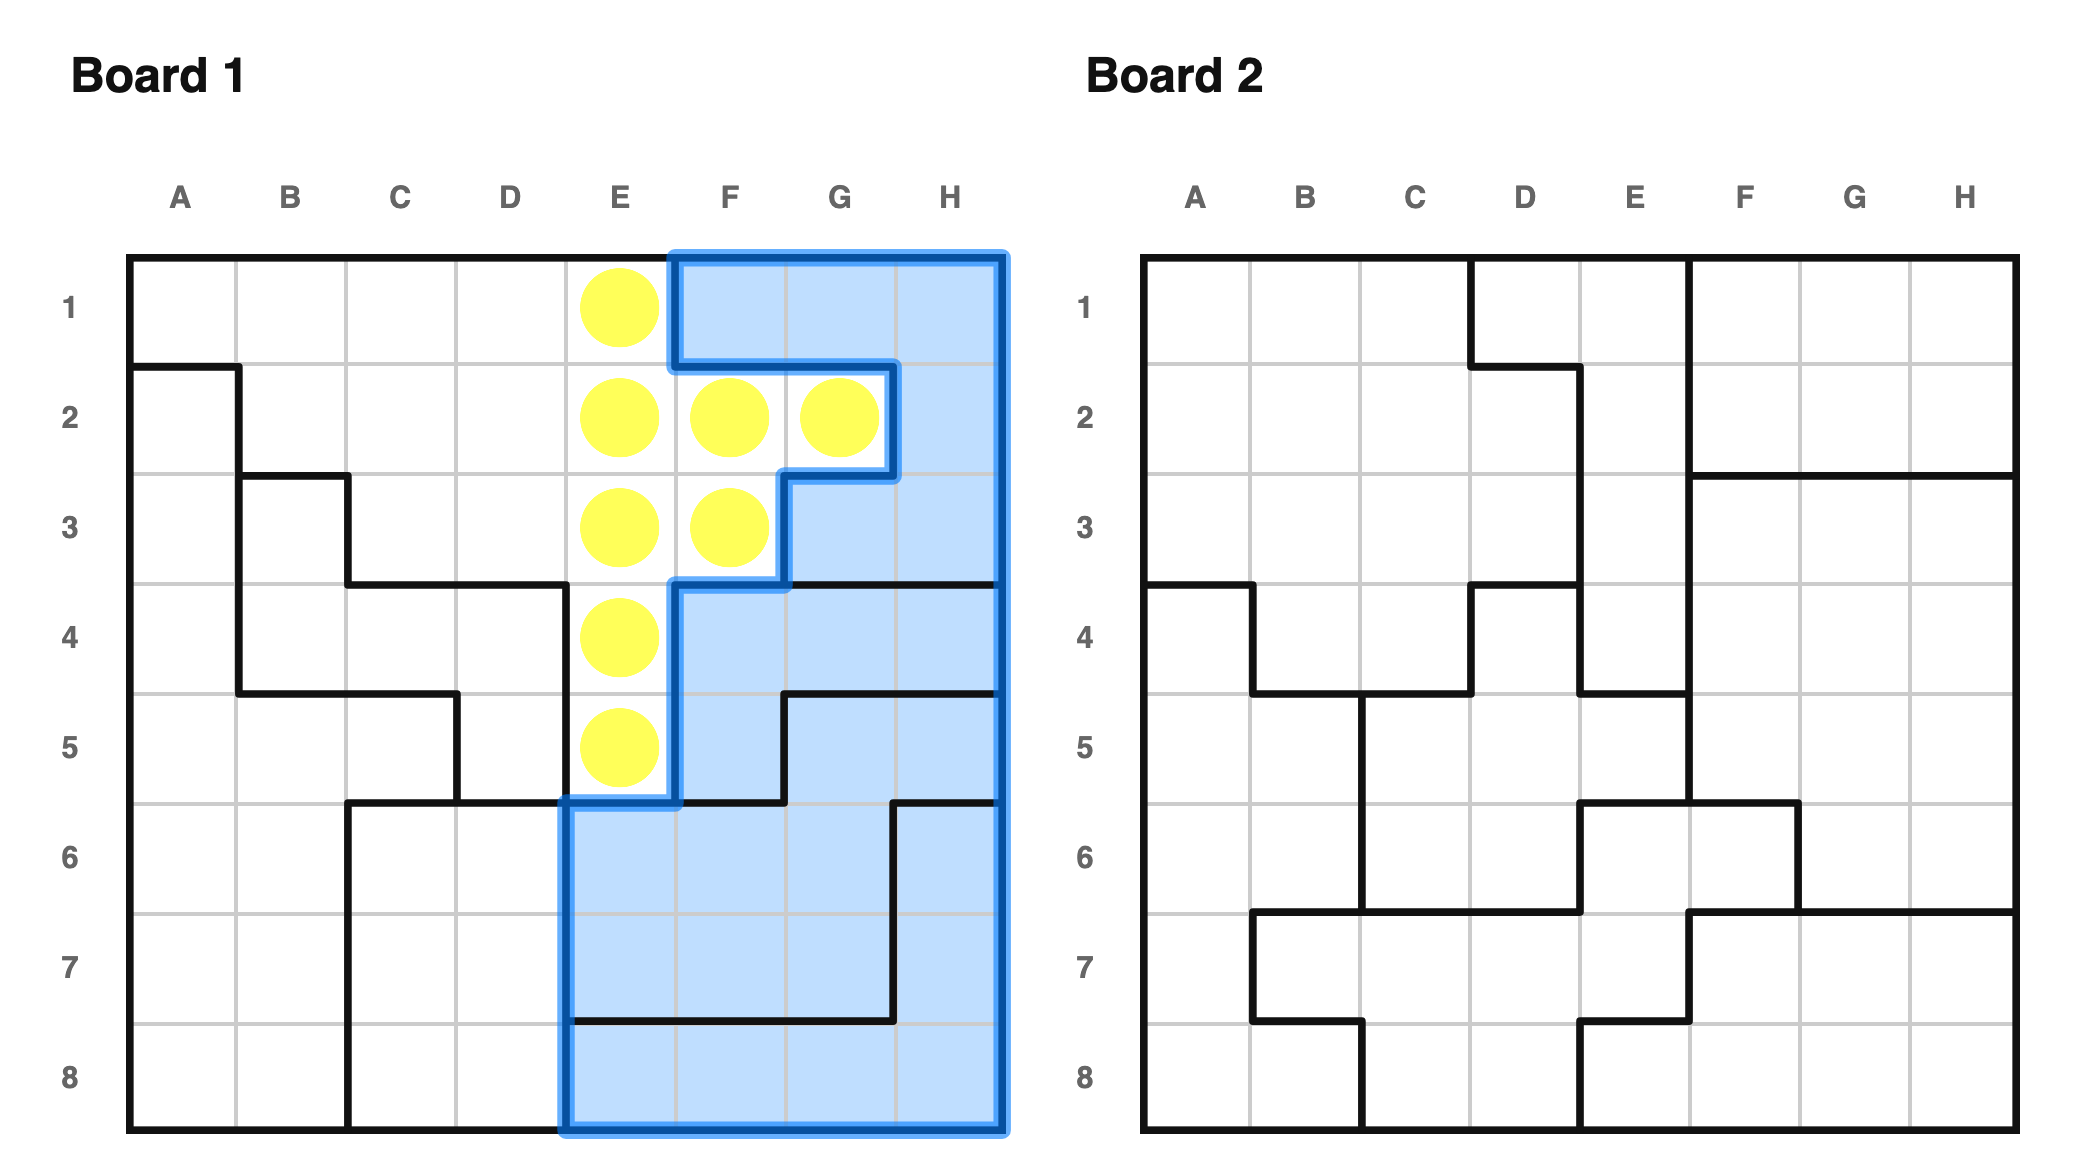 One last example for N=4. In this case, we can make the same observation using a
type-A inference, or a type-B inference.
### Disjoint rows/cols
I find it easier to spot row/col based inferences when the rows/cols are
contiguous, but the logic works exactly the same even if they are not. Here are
some examples:
---
One last example for N=4. In this case, we can make the same observation using a
type-A inference, or a type-B inference.
### Disjoint rows/cols
I find it easier to spot row/col based inferences when the rows/cols are
contiguous, but the logic works exactly the same even if they are not. Here are
some examples:
---
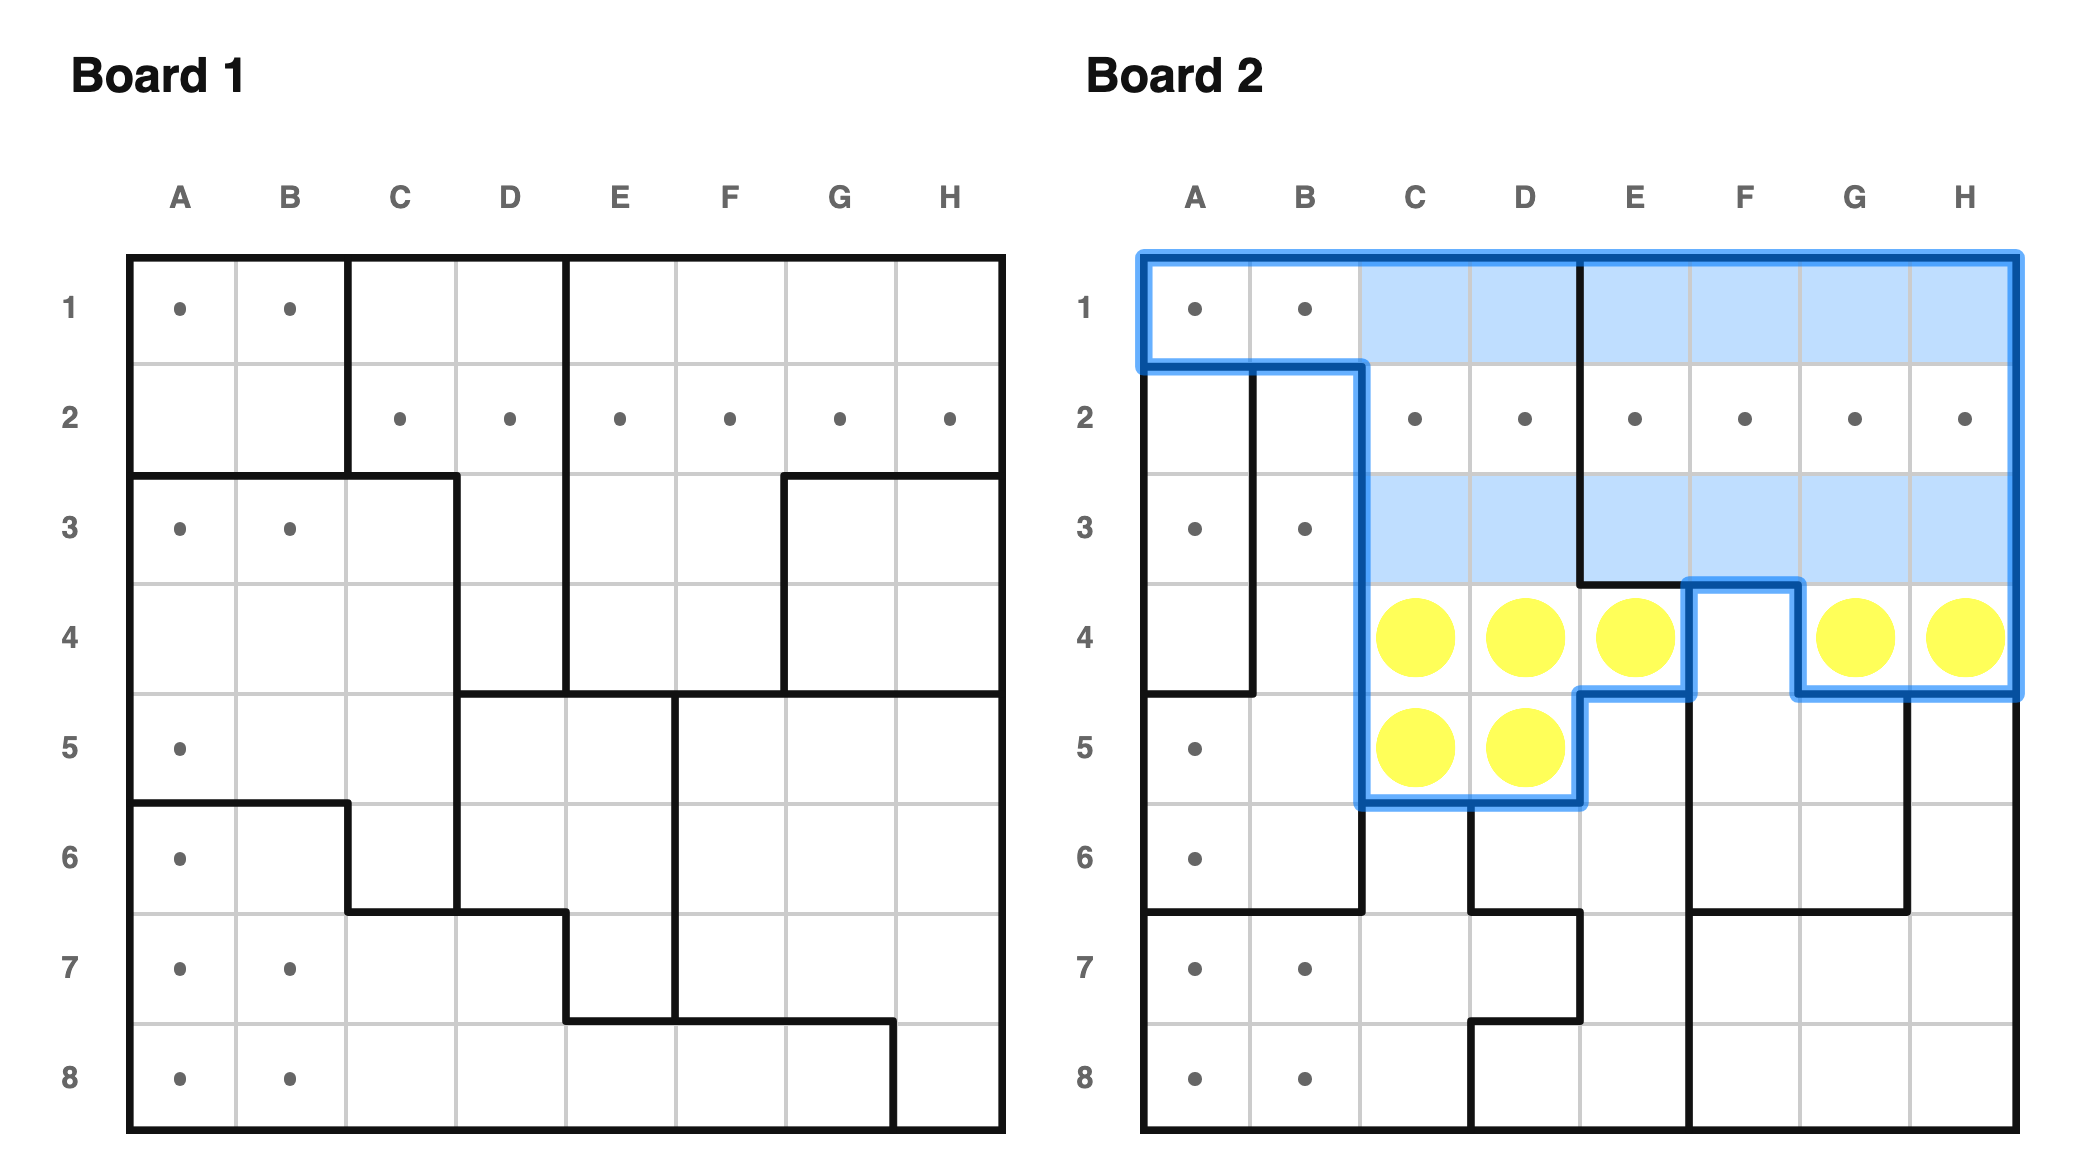 Look at rows 1 and 3. Together, they must contain two stars. No matter how we
place them, we'll satisfy the top two regions of board 2, so the remainder of
those regions must be dots.
---
Look at rows 1 and 3. Together, they must contain two stars. No matter how we
place them, we'll satisfy the top two regions of board 2, so the remainder of
those regions must be dots.
---
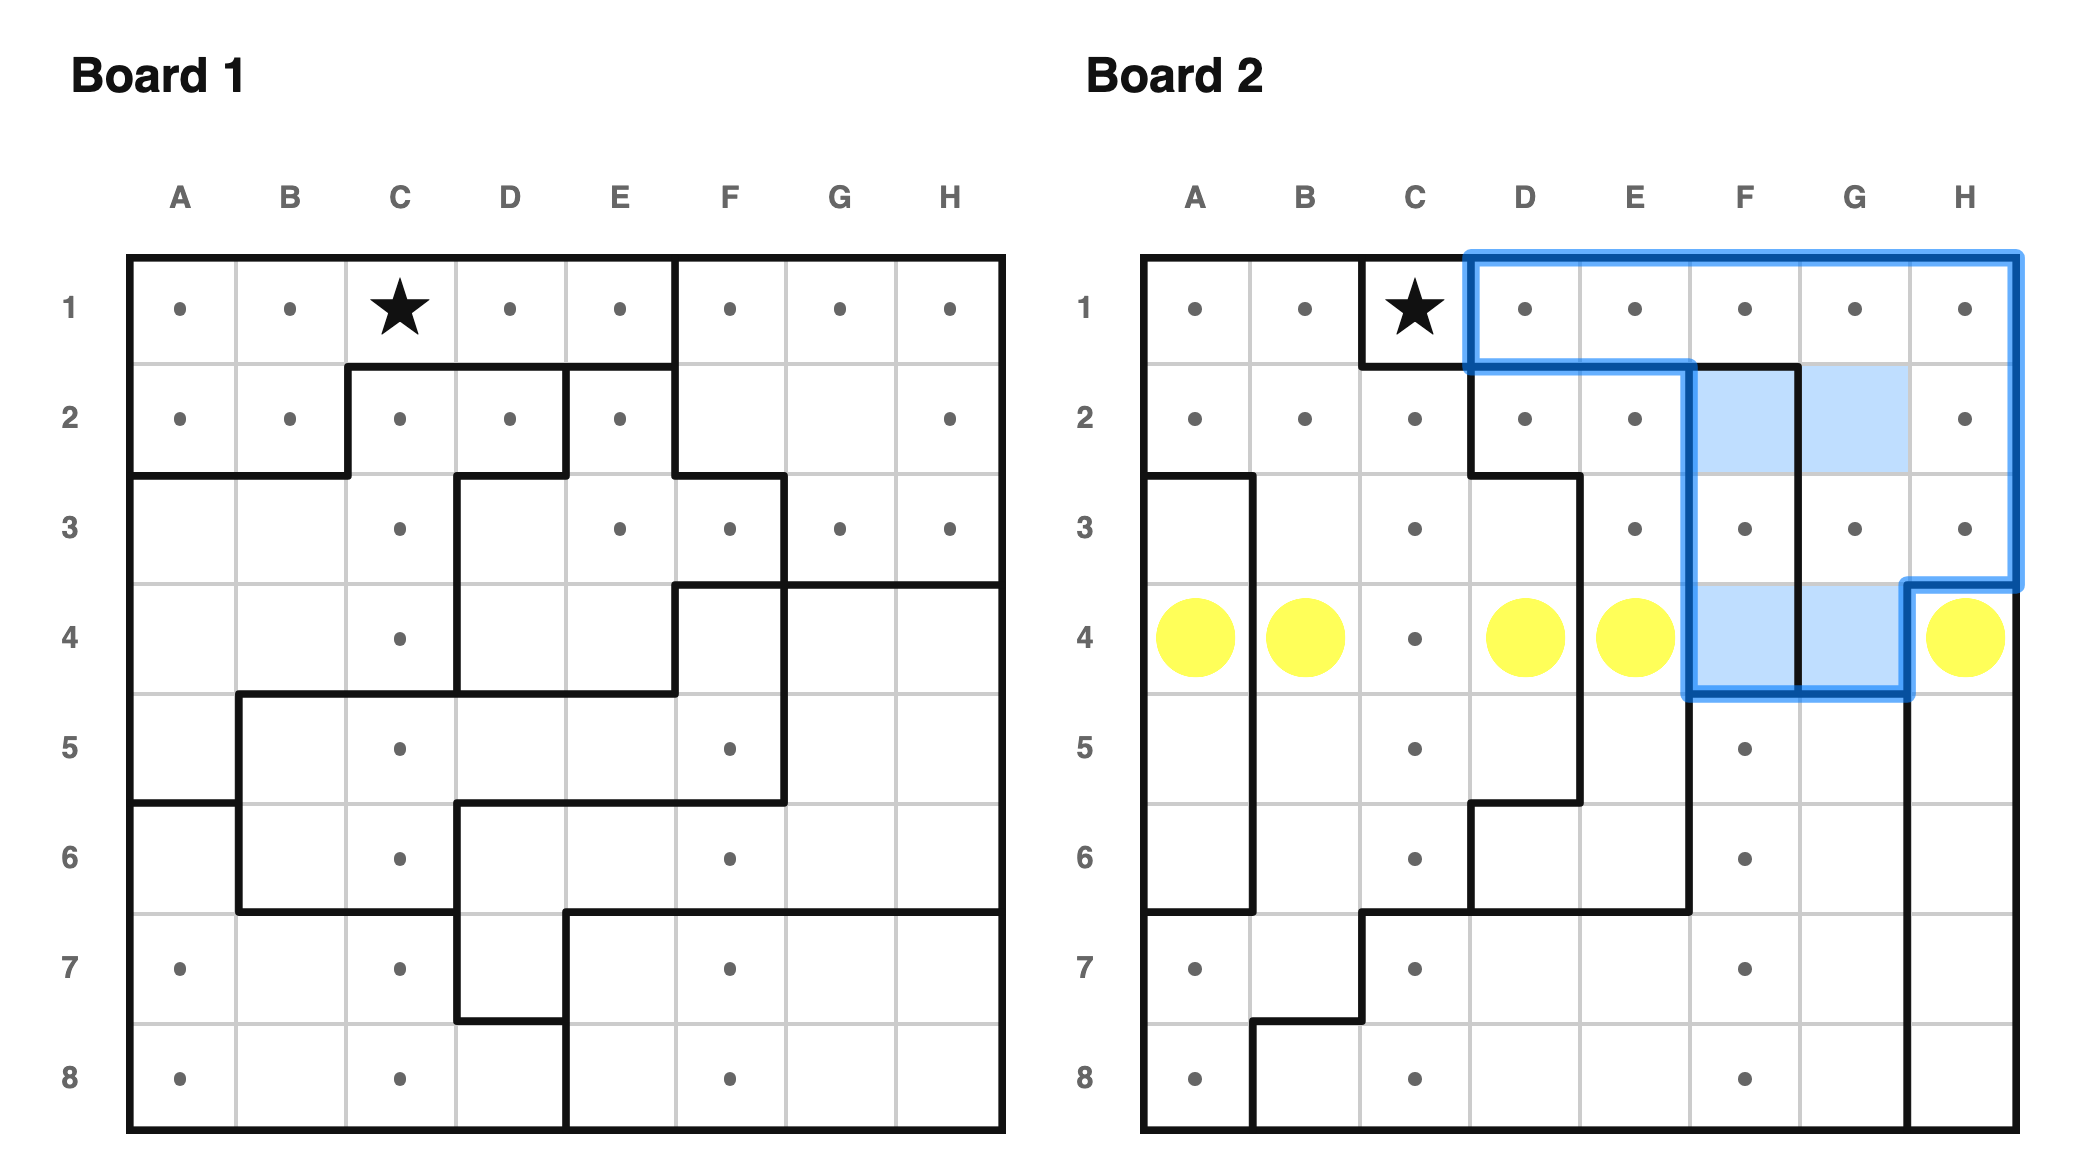 Look at the regions containing blue squares. Together, they must place stars in
rows 2 and 4. Therefore the rest of those rows must contain dots.
---
Look at the regions containing blue squares. Together, they must place stars in
rows 2 and 4. Therefore the rest of those rows must contain dots.
---
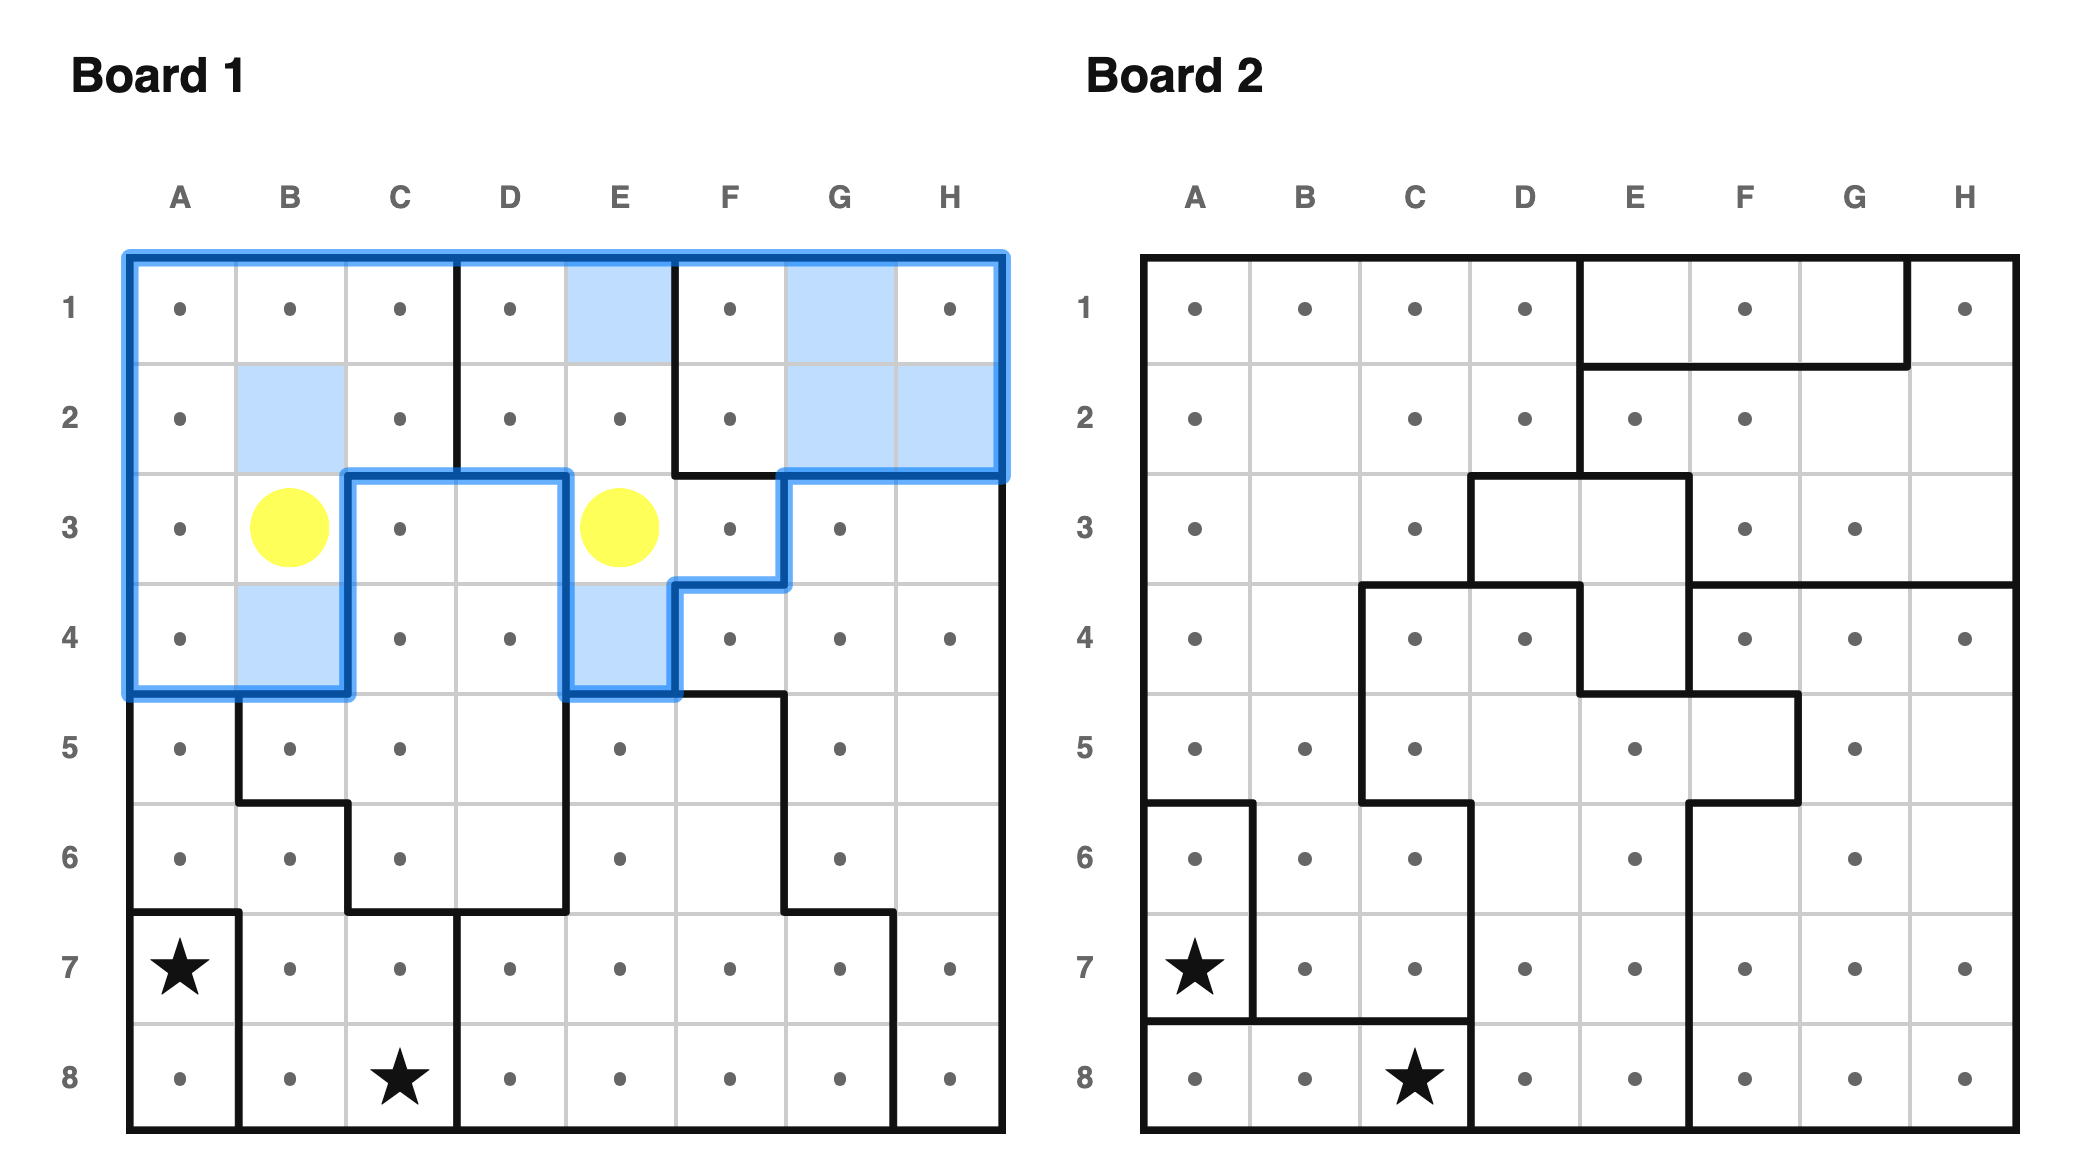 We can also make this type of observation with N=3 disjoint rows/cols. Rows
{1,2,4} only see three regions, so the rest of those regions must contain dots.
---
We can also make this type of observation with N=3 disjoint rows/cols. Rows
{1,2,4} only see three regions, so the rest of those regions must contain dots.
---
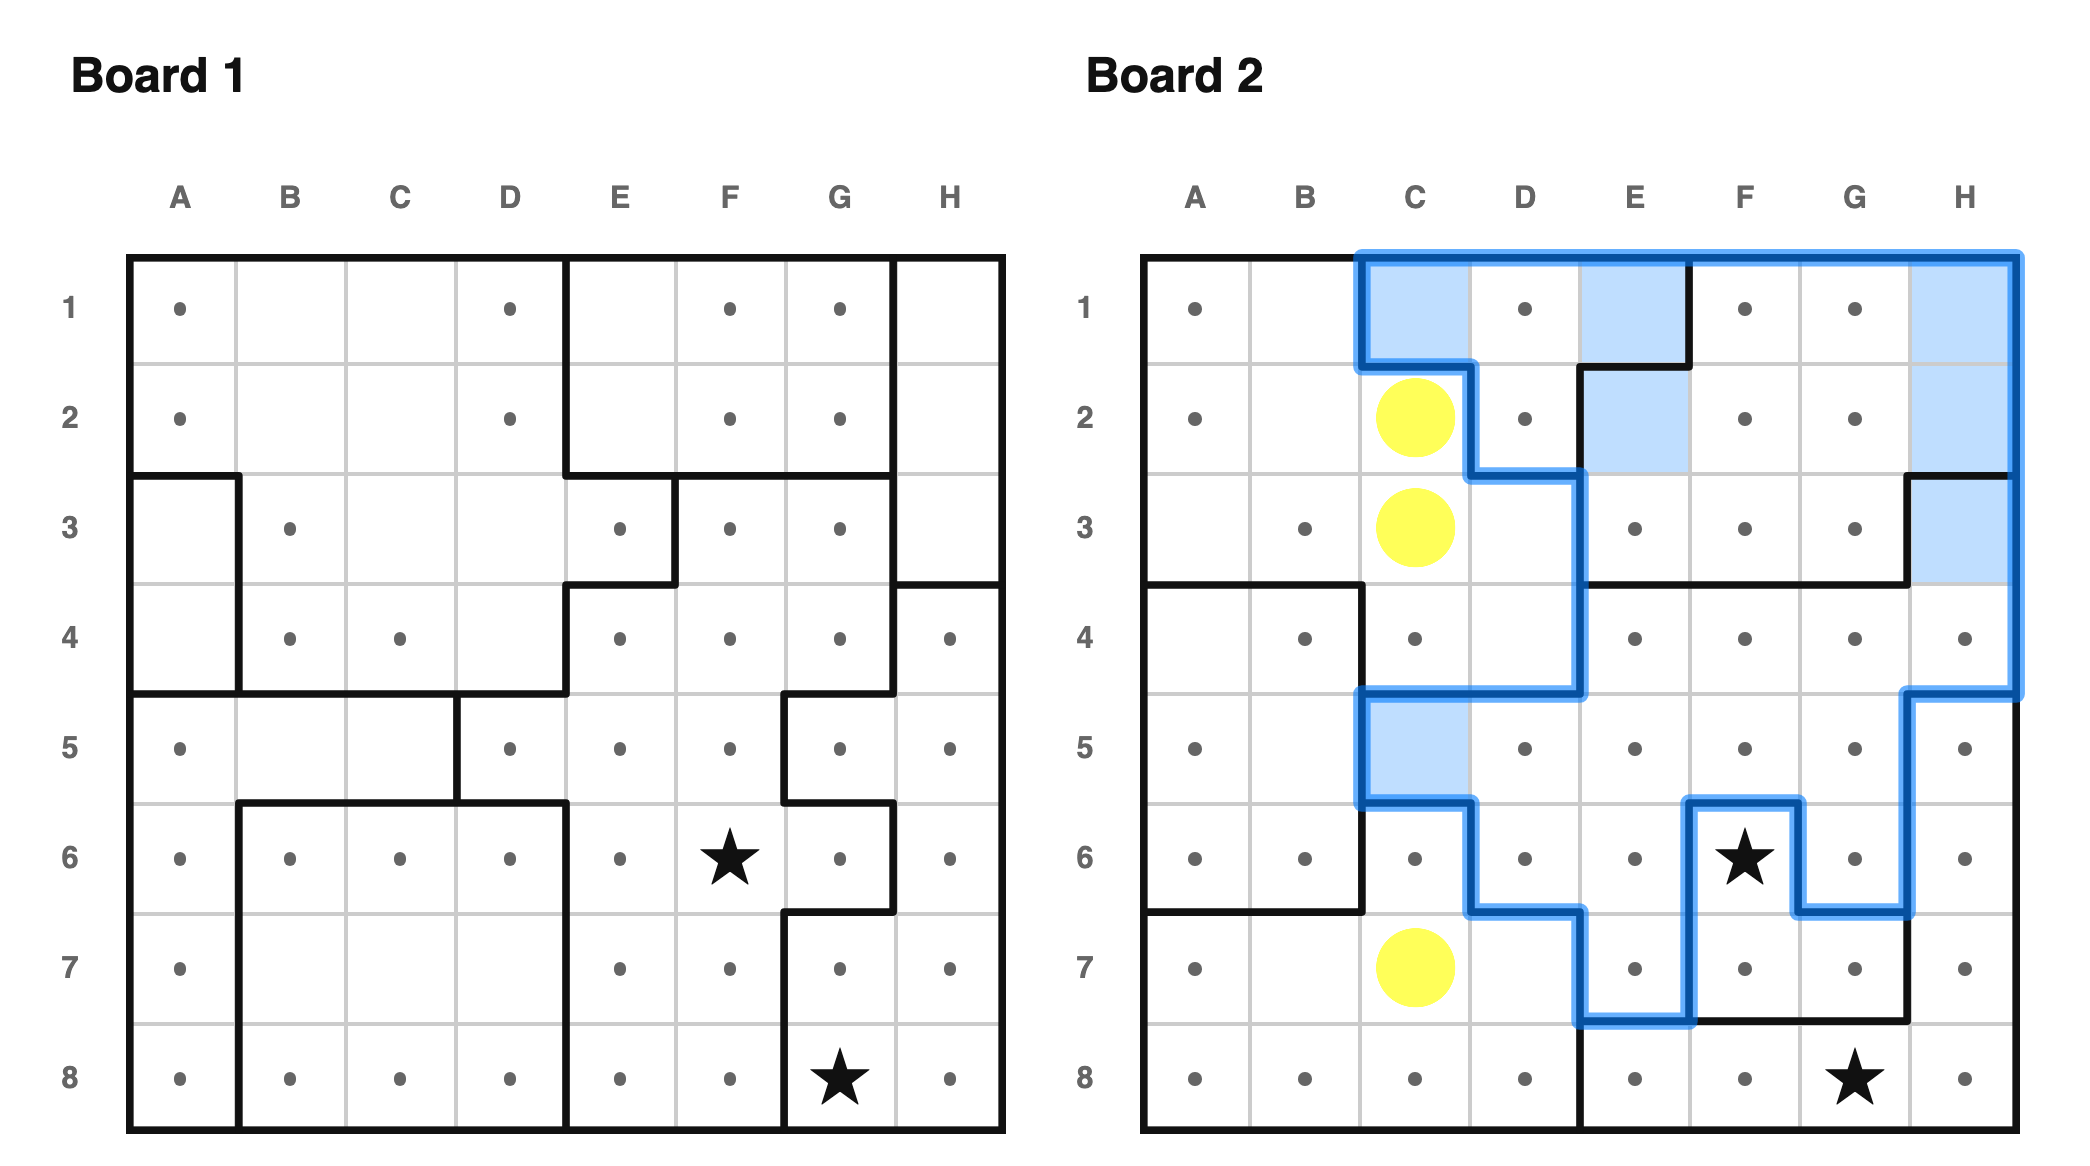 Three regions are fully contained in columns {C, E, H}, so the rest of those
columns must contain dots.
### Row/col line sync
Here's a variant that doesn't use regions at all — just rows against columns.
Three regions are fully contained in columns {C, E, H}, so the rest of those
columns must contain dots.
### Row/col line sync
Here's a variant that doesn't use regions at all — just rows against columns.
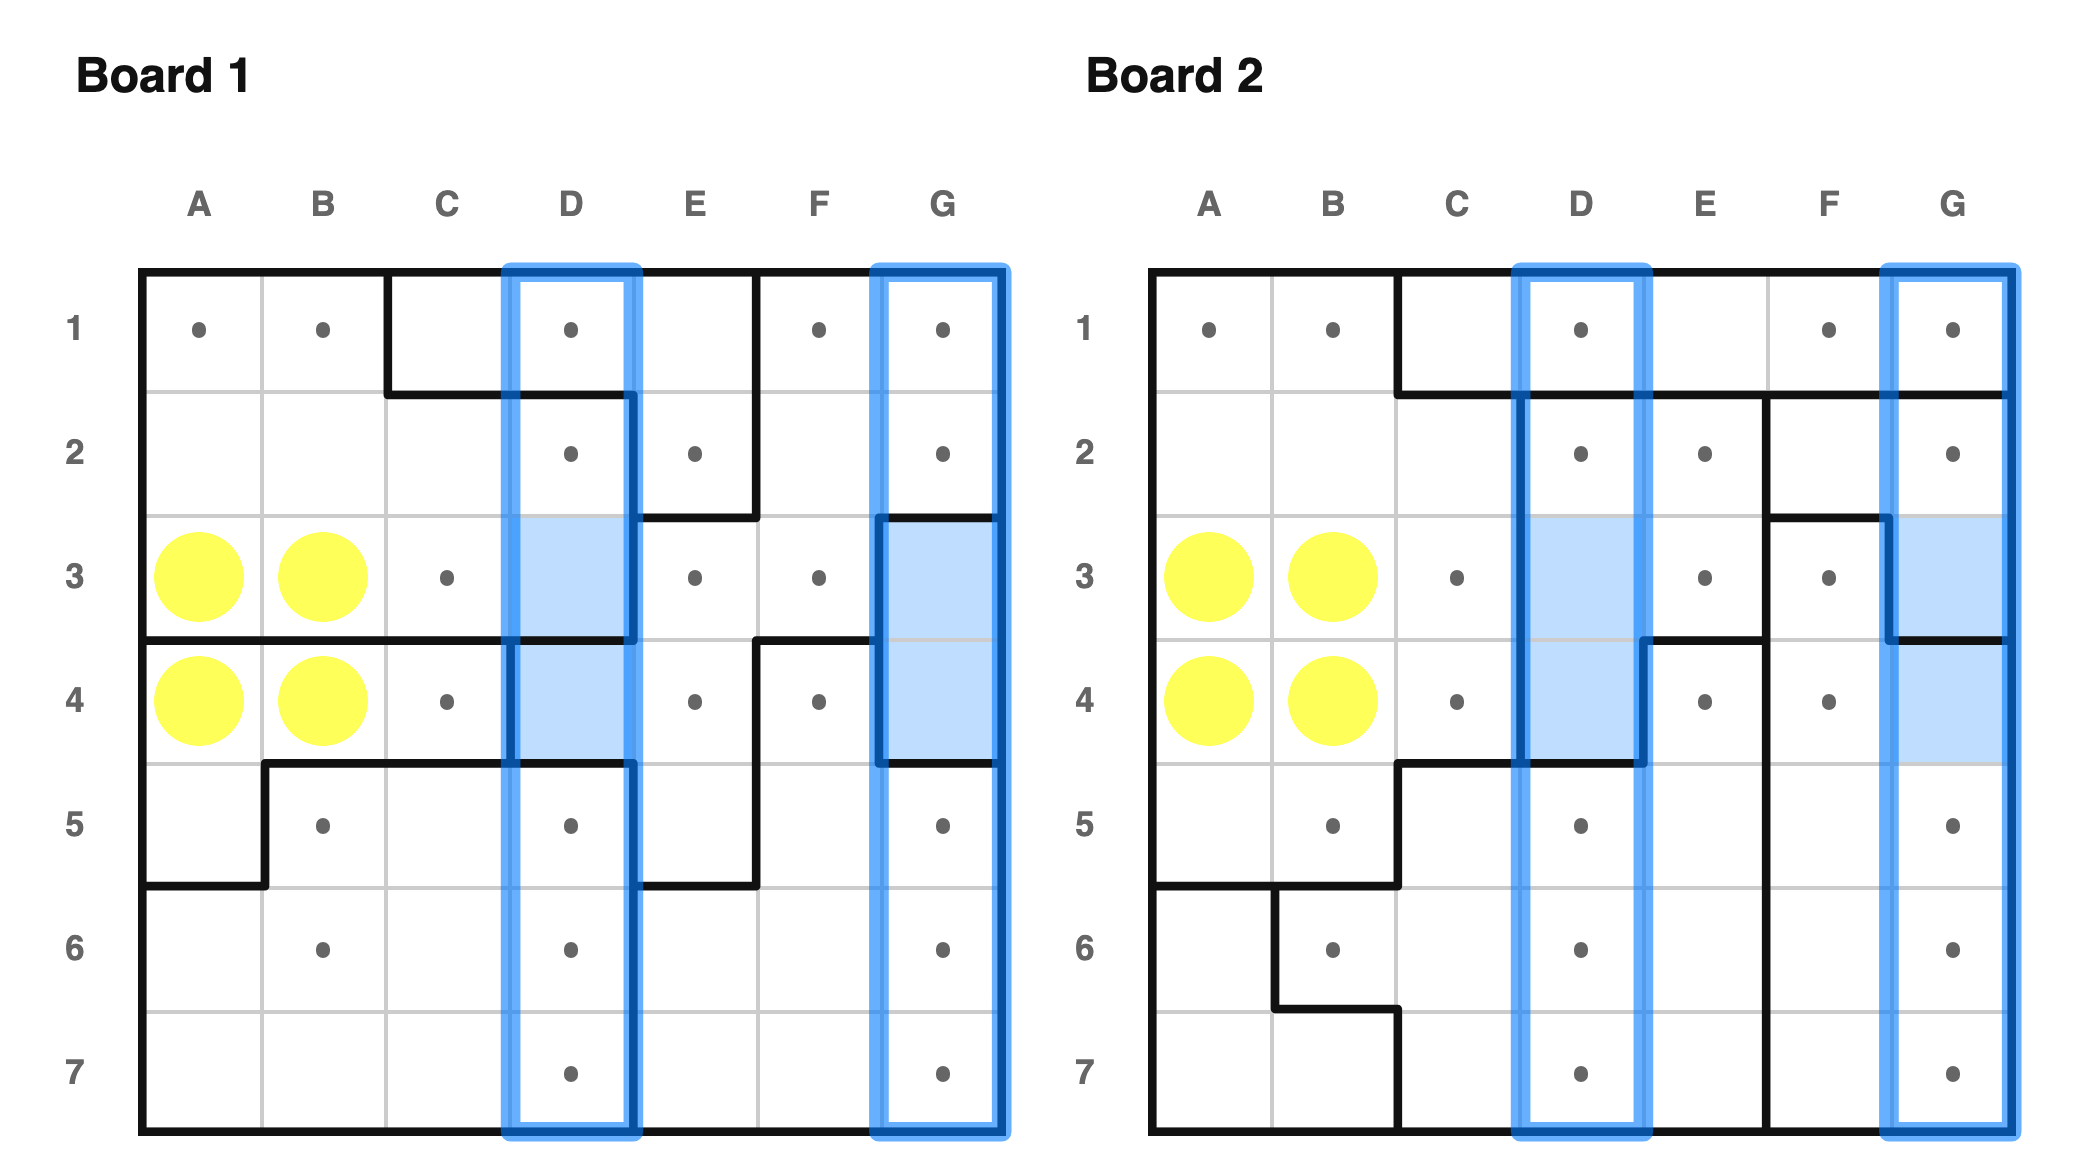 Look at columns D and G. They aren't adjacent, and I'm not using any region
information here. Their only empty cells are D3, D4, G3, and G4 — all four fall
inside just two rows, 3 and 4. Columns D and G need two stars between them, and
rows 3 and 4 also need exactly two stars between them. Since columns D and G's
stars have nowhere else to go but rows 3 and 4, those two columns must be
supplying rows 3 and 4's entire quota. So every other empty cell in rows 3 and 4
— here, that's A3, B3, A4, and B4 — must be dots.
More generally: if N rows' empty cells all fall within some set of columns, and
those columns' combined remaining room exactly matches what the N rows still
need, the rest of those columns must be dots (and the same argument works with
rows and columns swapped). Unlike "adjacent rows/cols," the N rows don't need to
be next to each other, and unlike "disjoint rows/cols," no region has to be doing
the pinning — just the columns themselves.
### Tiles
This is my formalization of an idea I used to call "implied region": sometimes a
group of cells behaves exactly like a region, holding exactly one star, even
though it isn't drawn as one — and once you notice that, you can reuse every
region trick (domino, sees-too-much, subsets) against it.
Specifically: take any pair of adjacent rows or columns. Every cell in that pair
touches every other cell in the *same 2x2 block* of the pair, even diagonally —
so a 2x2 block can never hold more than one star. If the pair's empty cells
happen to split cleanly into some number of non-overlapping 2x2 blocks, and that
number matches exactly how many stars the pair still needs, then — since no
block can hold more than one star, and there are exactly enough blocks for the
stars needed — every single block is guaranteed exactly one star. I call a block
like this a "confirmed tile."
Look at columns D and G. They aren't adjacent, and I'm not using any region
information here. Their only empty cells are D3, D4, G3, and G4 — all four fall
inside just two rows, 3 and 4. Columns D and G need two stars between them, and
rows 3 and 4 also need exactly two stars between them. Since columns D and G's
stars have nowhere else to go but rows 3 and 4, those two columns must be
supplying rows 3 and 4's entire quota. So every other empty cell in rows 3 and 4
— here, that's A3, B3, A4, and B4 — must be dots.
More generally: if N rows' empty cells all fall within some set of columns, and
those columns' combined remaining room exactly matches what the N rows still
need, the rest of those columns must be dots (and the same argument works with
rows and columns swapped). Unlike "adjacent rows/cols," the N rows don't need to
be next to each other, and unlike "disjoint rows/cols," no region has to be doing
the pinning — just the columns themselves.
### Tiles
This is my formalization of an idea I used to call "implied region": sometimes a
group of cells behaves exactly like a region, holding exactly one star, even
though it isn't drawn as one — and once you notice that, you can reuse every
region trick (domino, sees-too-much, subsets) against it.
Specifically: take any pair of adjacent rows or columns. Every cell in that pair
touches every other cell in the *same 2x2 block* of the pair, even diagonally —
so a 2x2 block can never hold more than one star. If the pair's empty cells
happen to split cleanly into some number of non-overlapping 2x2 blocks, and that
number matches exactly how many stars the pair still needs, then — since no
block can hold more than one star, and there are exactly enough blocks for the
stars needed — every single block is guaranteed exactly one star. I call a block
like this a "confirmed tile."
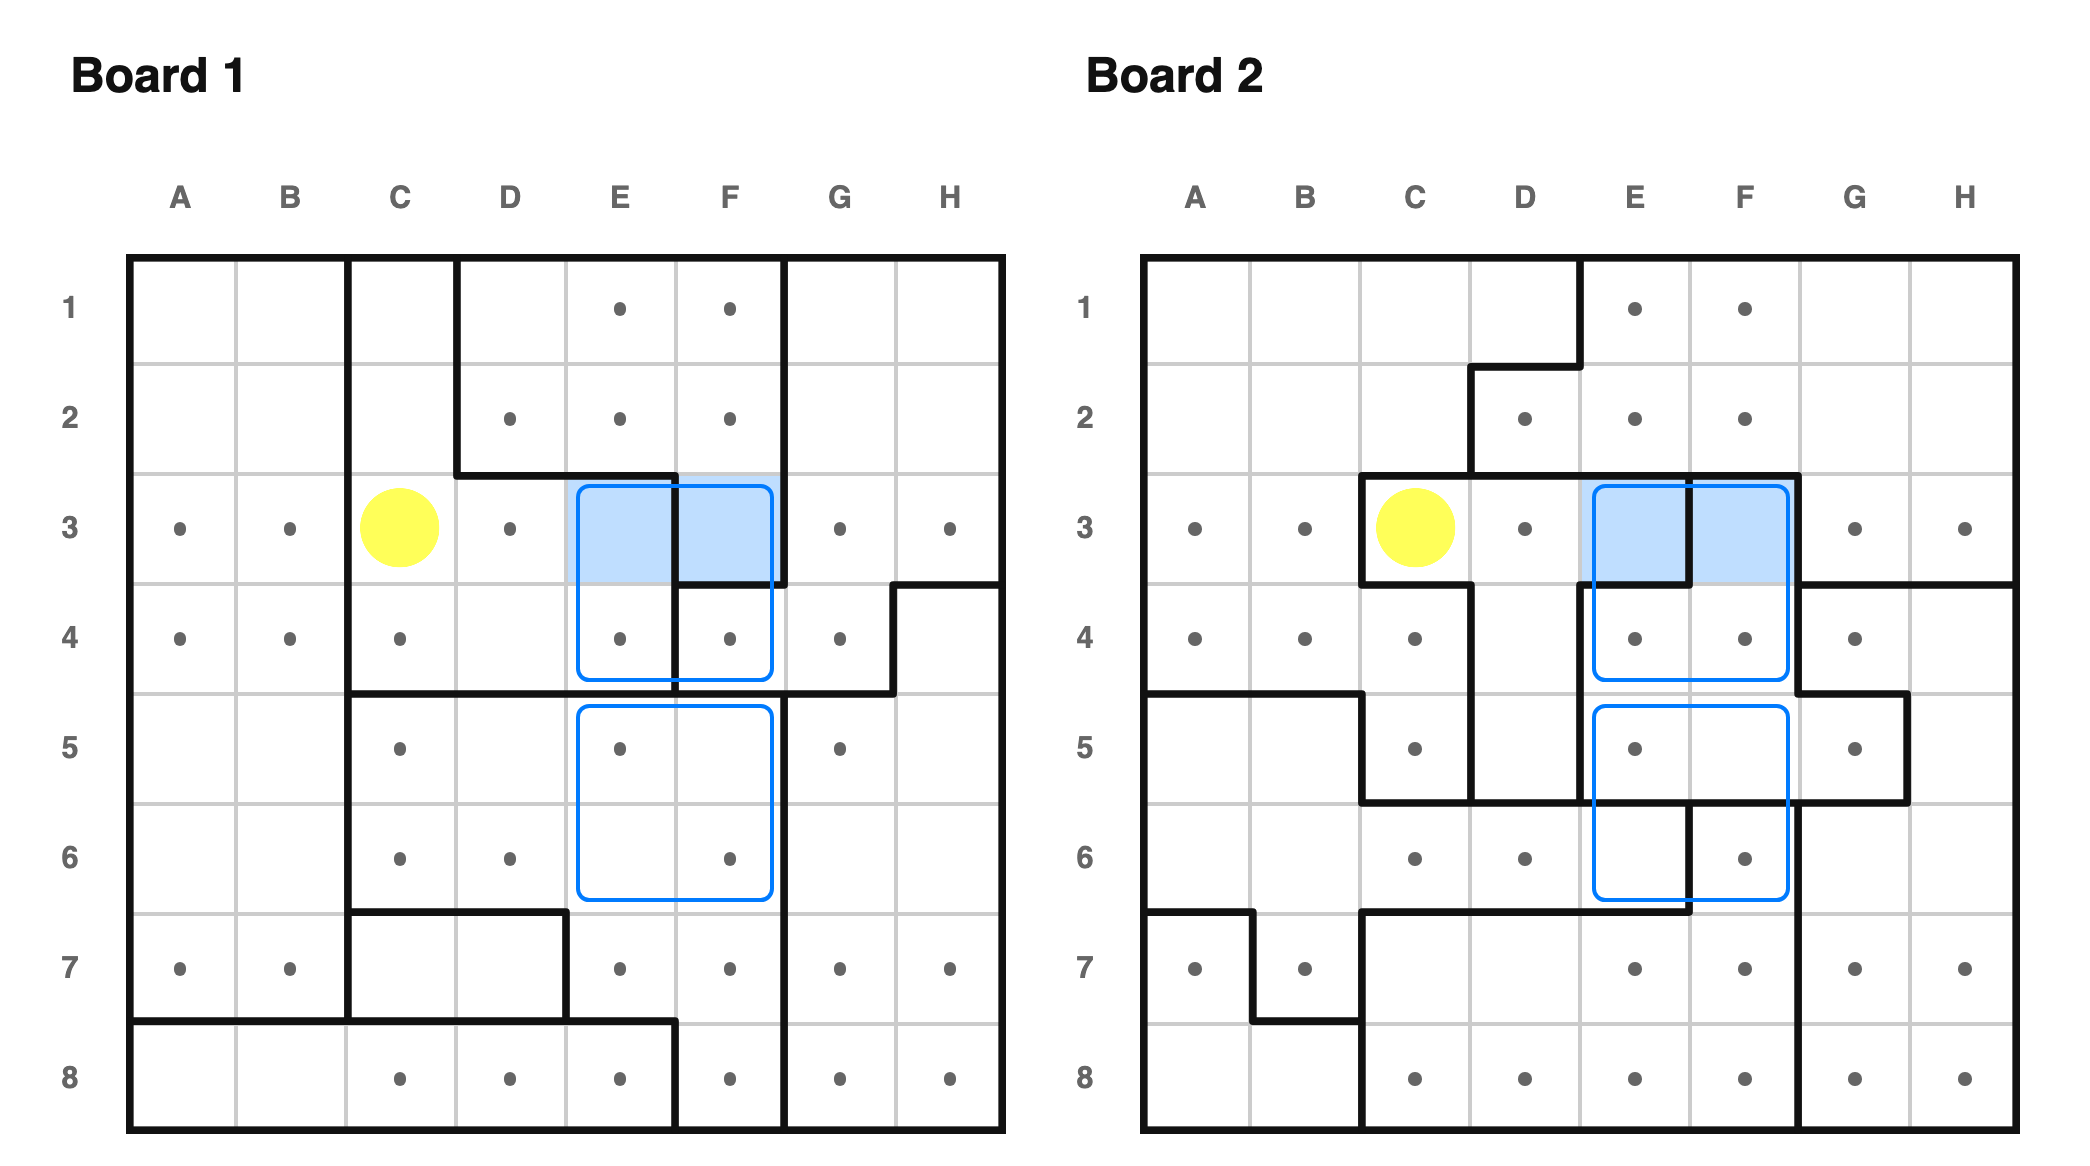 Here, E3 and F3 form a confirmed tile (their row-pair has no other empty cells
left to tile, and one star is still needed). A confirmed tile with exactly two
empty cells in the same row or column is a domino, just like the "Notable
shapes" section — so it eliminates the rest of that row exactly the way an
ordinary domino would. C3 is in the same row, so it becomes a dot.
---
Here, E3 and F3 form a confirmed tile (their row-pair has no other empty cells
left to tile, and one star is still needed). A confirmed tile with exactly two
empty cells in the same row or column is a domino, just like the "Notable
shapes" section — so it eliminates the rest of that row exactly the way an
ordinary domino would. C3 is in the same row, so it becomes a dot.
---
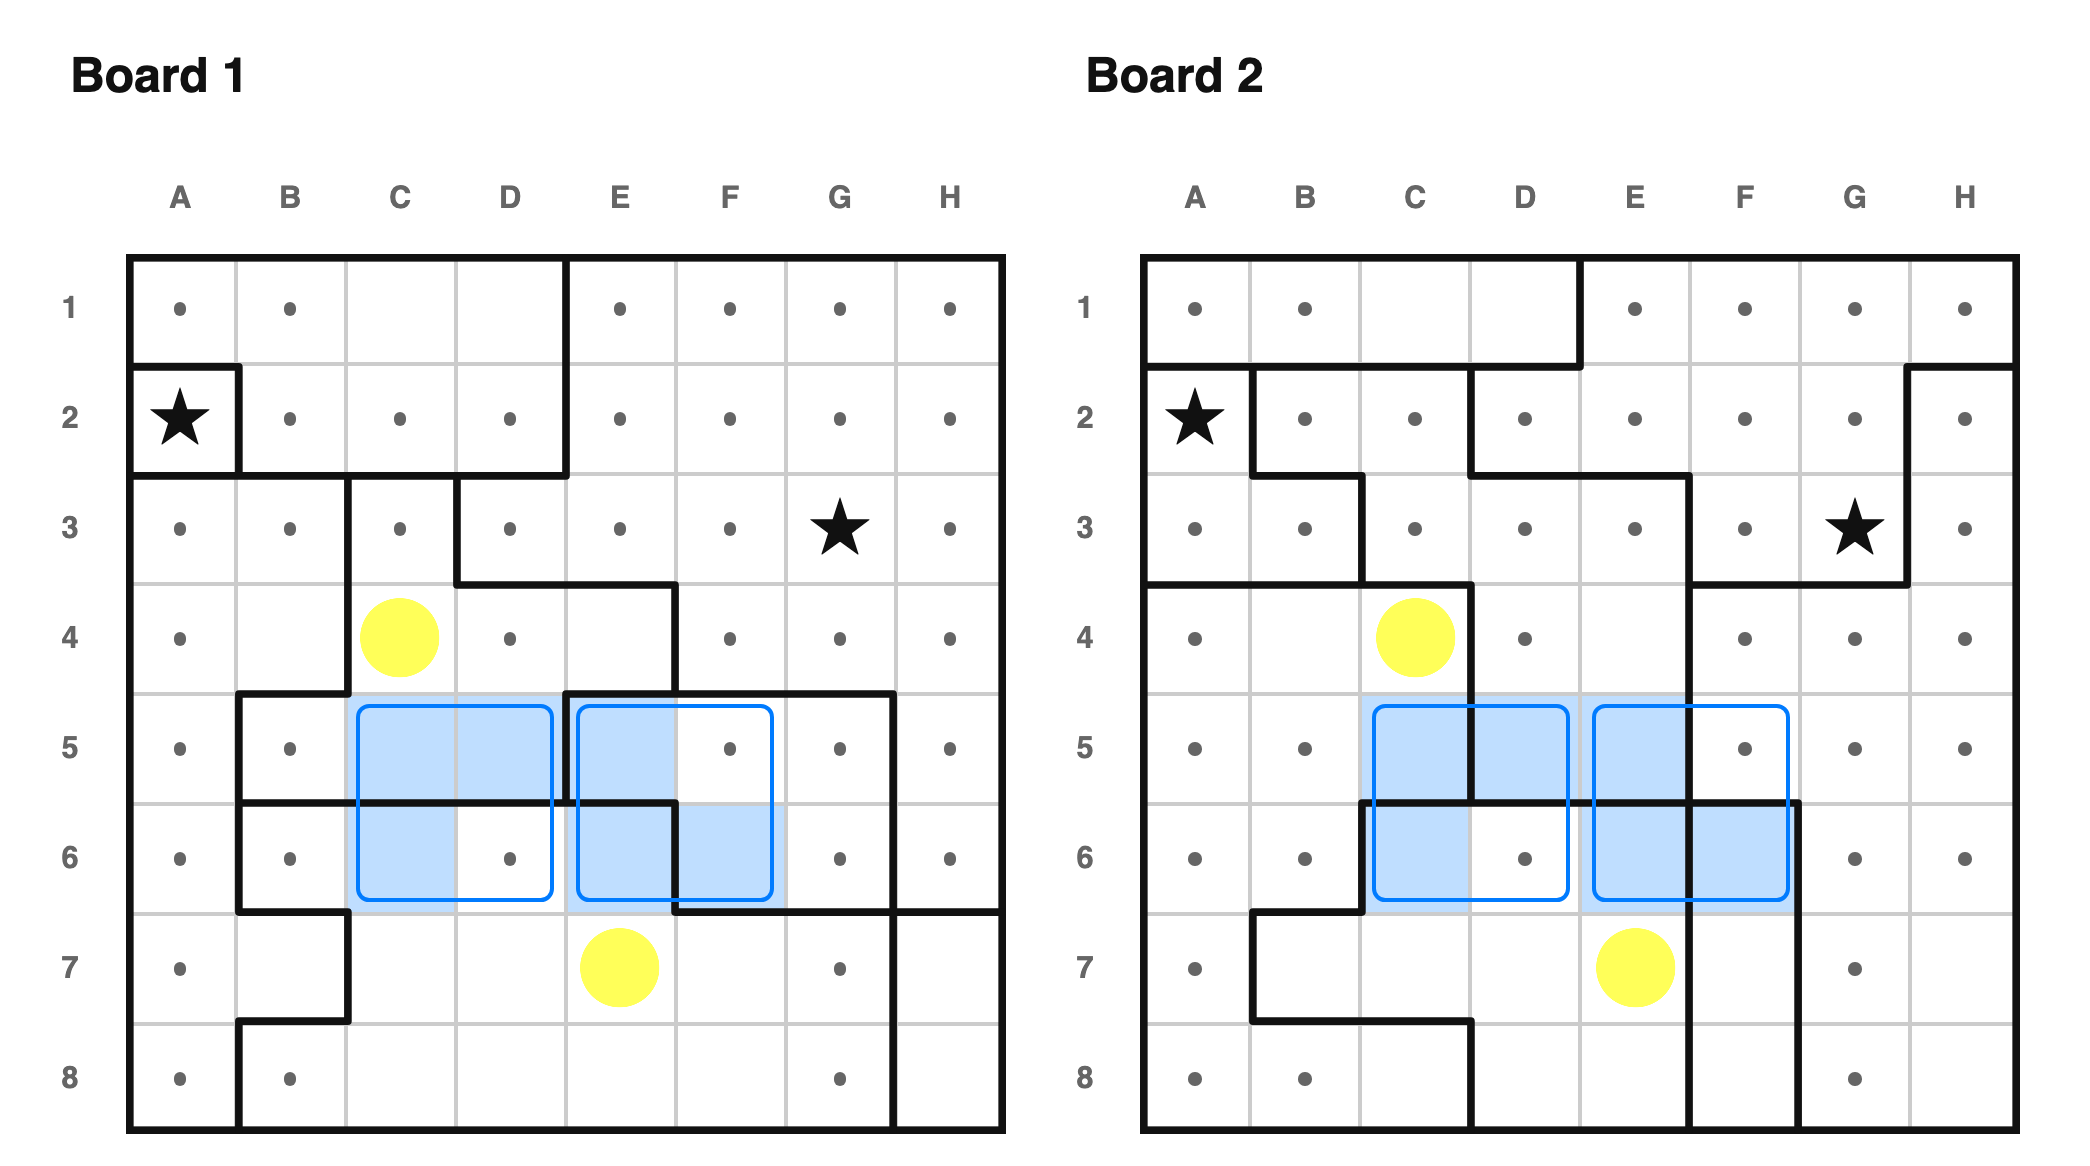 A confirmed tile can have more than two empty cells, too. Here the tile
{C5, C6, D5} is guaranteed exactly one star, and C4 "sees" all three of them —
by column for C5 and C6, by adjacency for D5. So no matter which of the three
ends up with the tile's star, C4 can't be it: C4 must be a dot. Same "sees too
much" logic as before, just applied to a tile instead of a drawn region.
---
A confirmed tile can have more than two empty cells, too. Here the tile
{C5, C6, D5} is guaranteed exactly one star, and C4 "sees" all three of them —
by column for C5 and C6, by adjacency for D5. So no matter which of the three
ends up with the tile's star, C4 can't be it: C4 must be a dot. Same "sees too
much" logic as before, just applied to a tile instead of a drawn region.
---
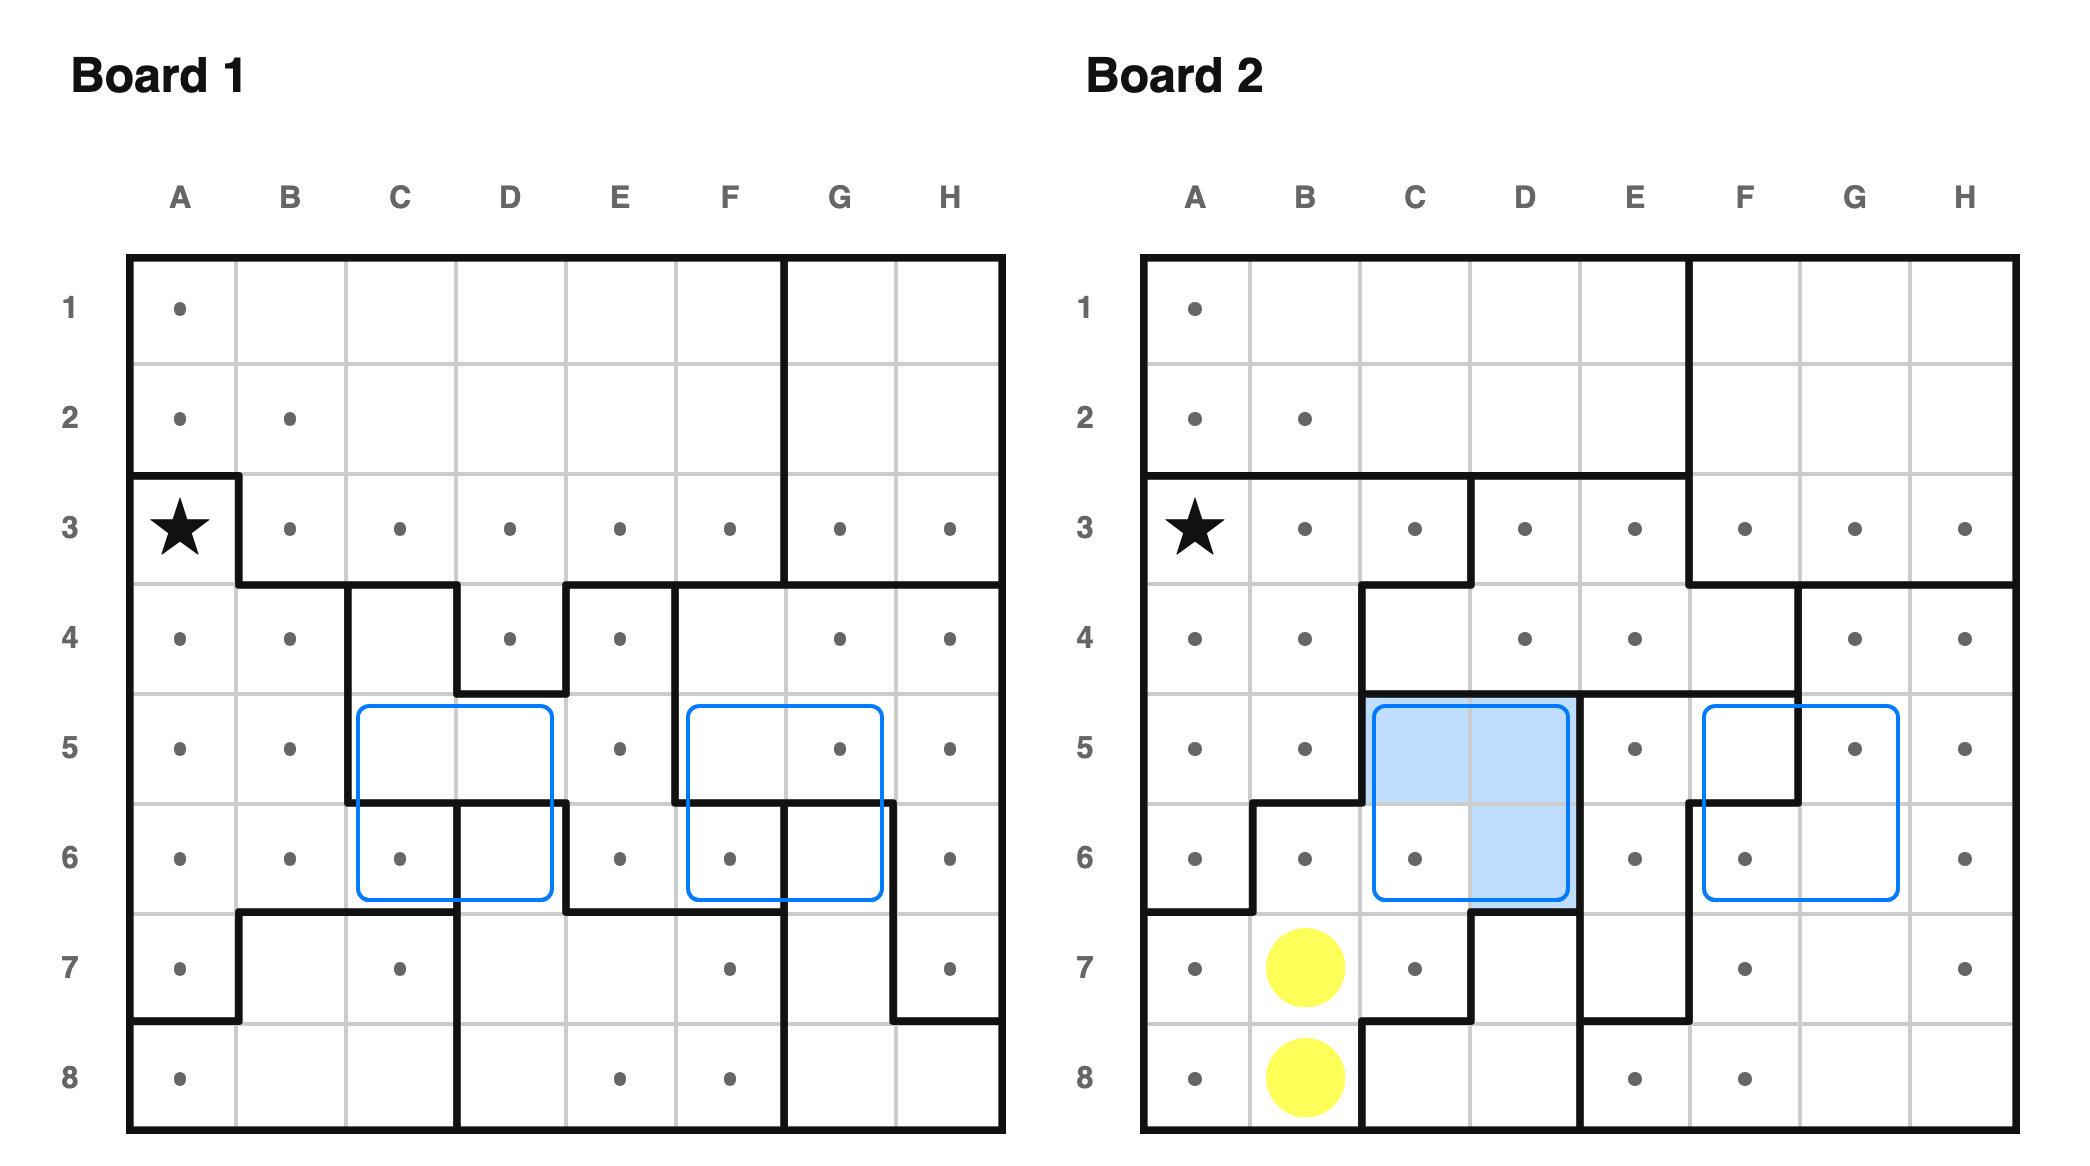 A confirmed tile can also fall entirely inside a real, drawn region. Here the
tile {C5, D5, D6} sits completely inside one region on board 2. The tile's
guaranteed star already satisfies that region's whole quota, so the rest of the
region — B7 and B8 — must be dots. This is exactly "region contains region," just
with a tile standing in for one of the regions.
---
A confirmed tile can also fall entirely inside a real, drawn region. Here the
tile {C5, D5, D6} sits completely inside one region on board 2. The tile's
guaranteed star already satisfies that region's whole quota, so the rest of the
region — B7 and B8 — must be dots. This is exactly "region contains region," just
with a tile standing in for one of the regions.
---
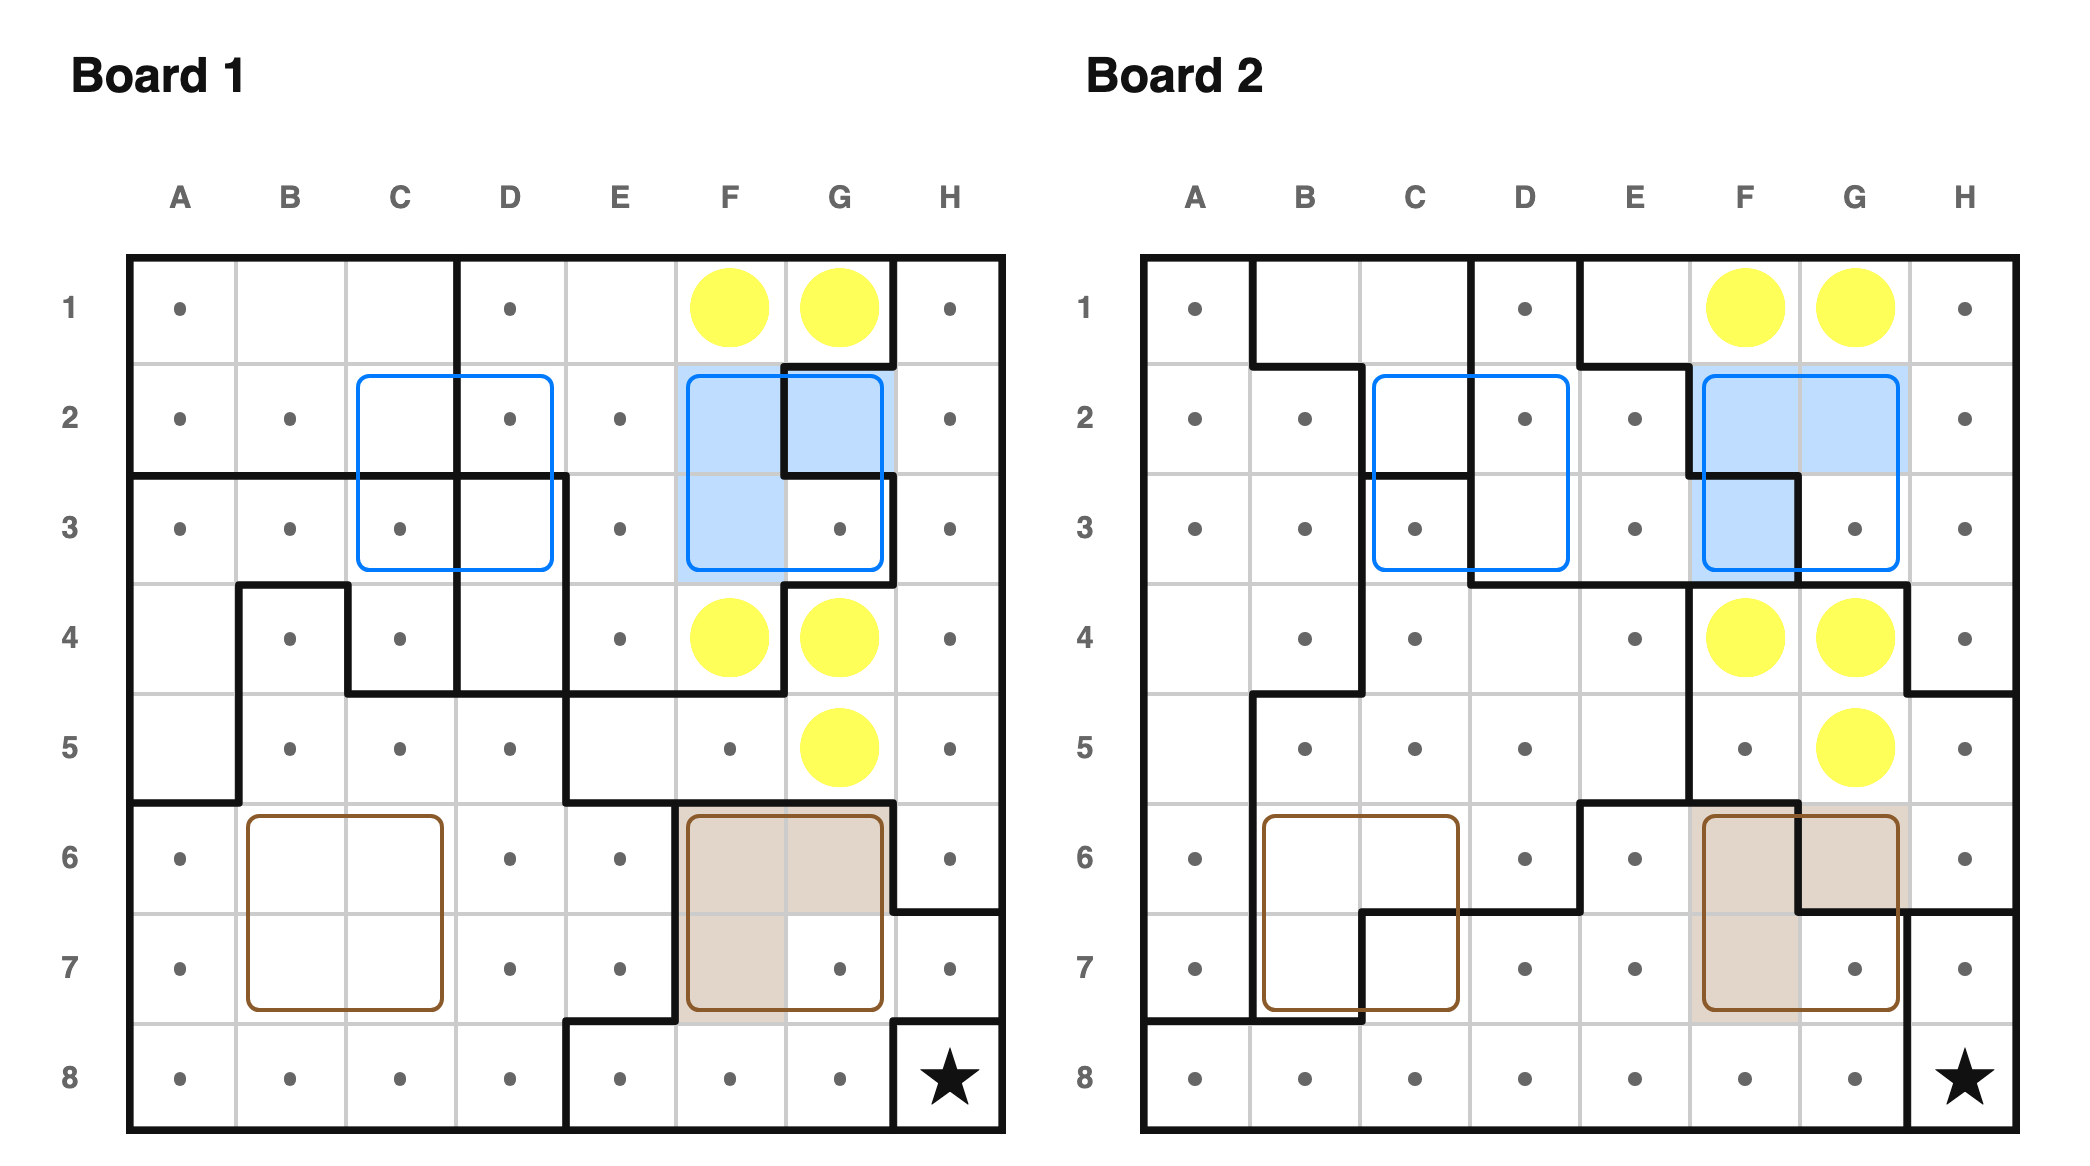 Confirmed tiles from *different, unrelated* row-pairs can still add up. Here, a
tile from rows 2-3 and another tile from rows 6-7 both happen to land in the
same two columns, F and G. Independently, each is guaranteed one star — and
together, that's exactly as many stars as columns F and G still need. So every
other empty cell in those two columns must be a dot.
I haven't figured out how to write the solver logic for spotting a confirmed
tile from a *partial*, not-quite-complete tiling (where most of a row-pair
tiles cleanly but one leftover strip doesn't) — I suspect there's a sound
argument there too, but I haven't chased it down for 1★ boards.
### Symmetry
Sometimes we can tell, just from the structure of the boards, that the solution
has some symmetry. We can use this to to our advantage.
#### Diagonal
Confirmed tiles from *different, unrelated* row-pairs can still add up. Here, a
tile from rows 2-3 and another tile from rows 6-7 both happen to land in the
same two columns, F and G. Independently, each is guaranteed one star — and
together, that's exactly as many stars as columns F and G still need. So every
other empty cell in those two columns must be a dot.
I haven't figured out how to write the solver logic for spotting a confirmed
tile from a *partial*, not-quite-complete tiling (where most of a row-pair
tiles cleanly but one leftover strip doesn't) — I suspect there's a sound
argument there too, but I haven't chased it down for 1★ boards.
### Symmetry
Sometimes we can tell, just from the structure of the boards, that the solution
has some symmetry. We can use this to to our advantage.
#### Diagonal
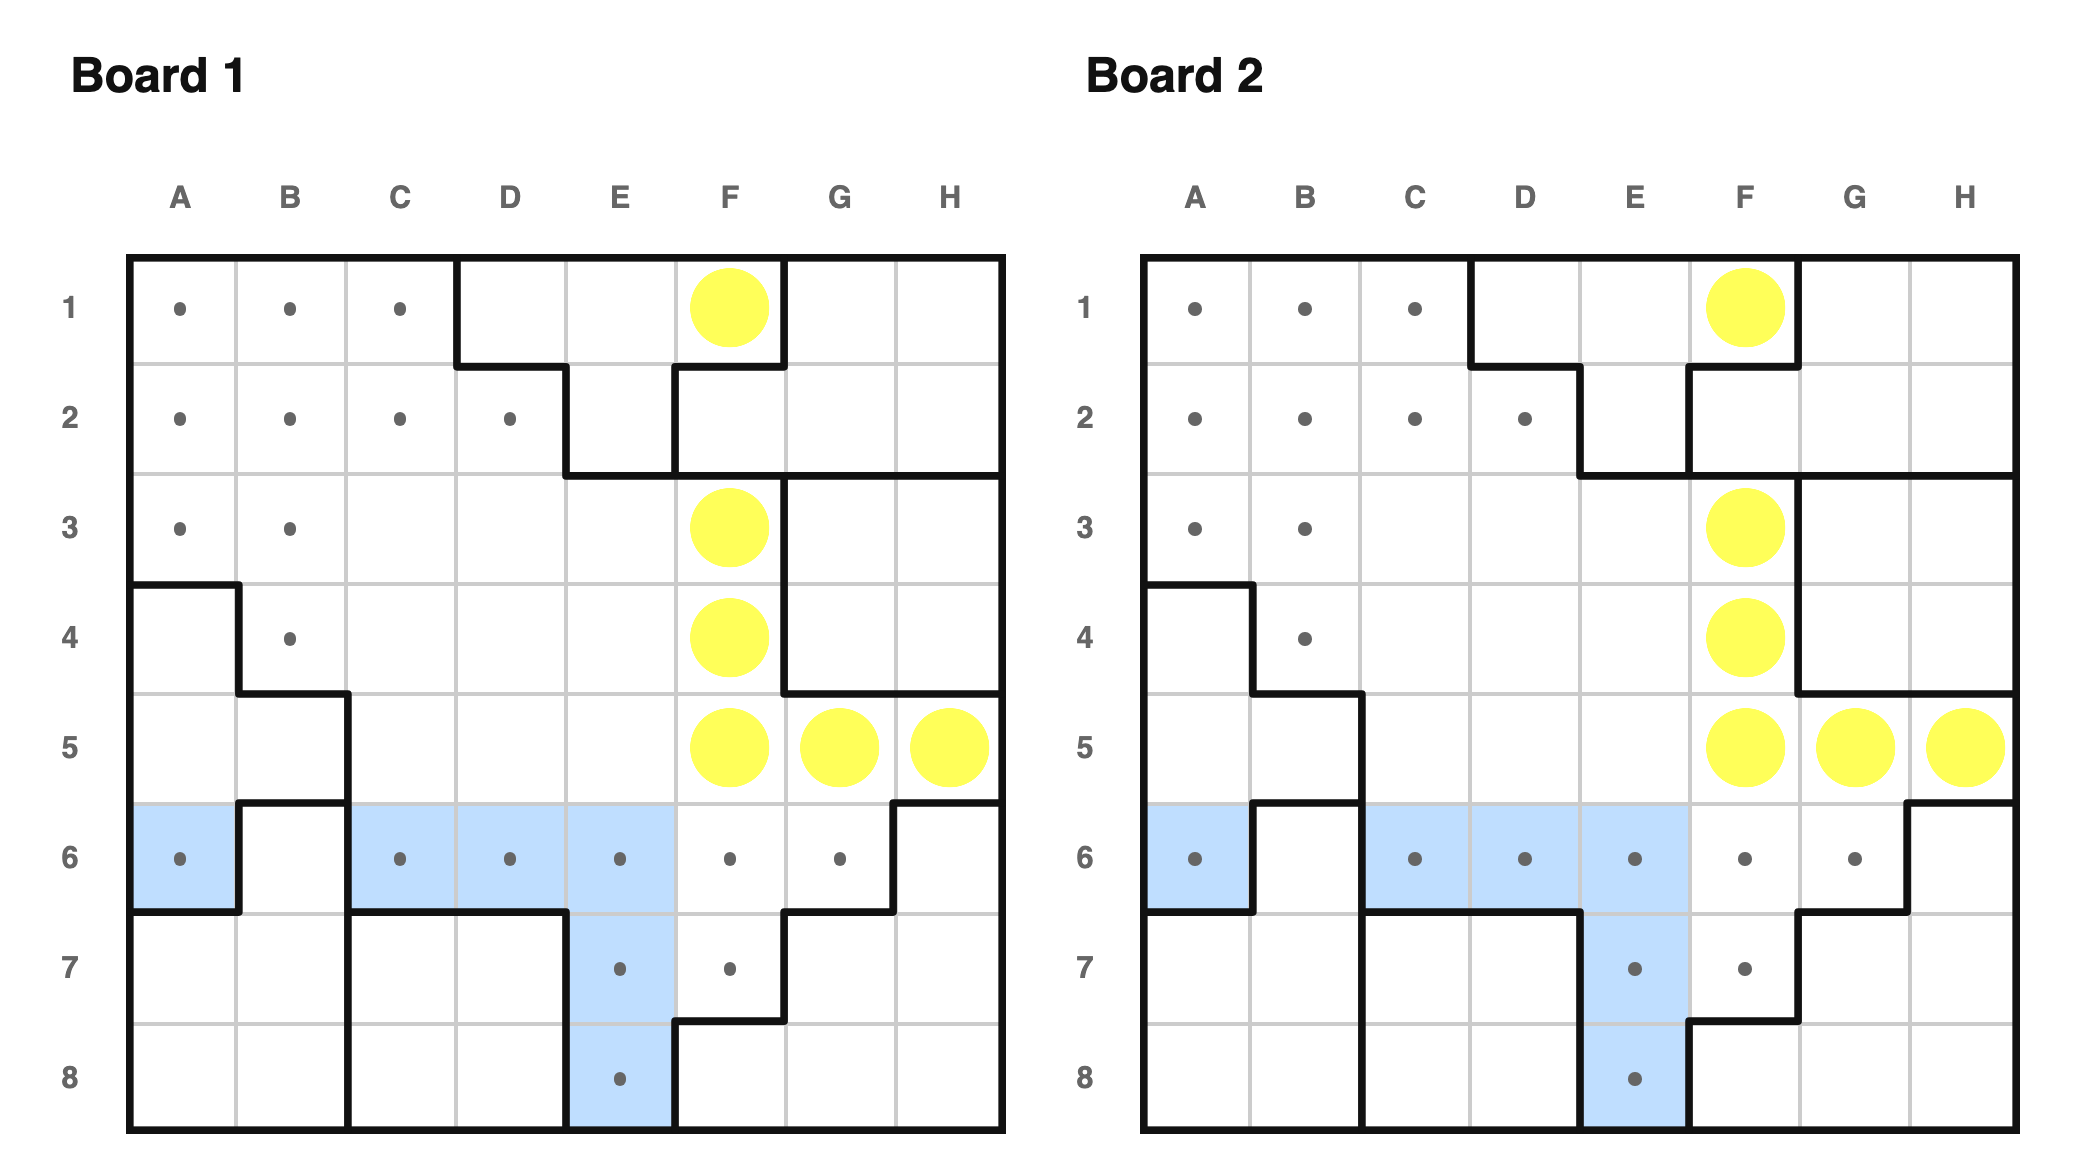 This board is symmetric across its main diagonal (↘), so the solution has to be
too — otherwise reflecting it would give a second valid solution. That means the
simplest possible move is available: whenever a cell's reflection is already
decided, copy it over. Here several cells were already dots (worked out from
ordinary rules elsewhere on the board), so their reflections — F1, F3, F4, F5,
G5, and H5 — all become dots too, all at once.
---
This board is symmetric across its main diagonal (↘), so the solution has to be
too — otherwise reflecting it would give a second valid solution. That means the
simplest possible move is available: whenever a cell's reflection is already
decided, copy it over. Here several cells were already dots (worked out from
ordinary rules elsewhere on the board), so their reflections — F1, F3, F4, F5,
G5, and H5 — all become dots too, all at once.
---
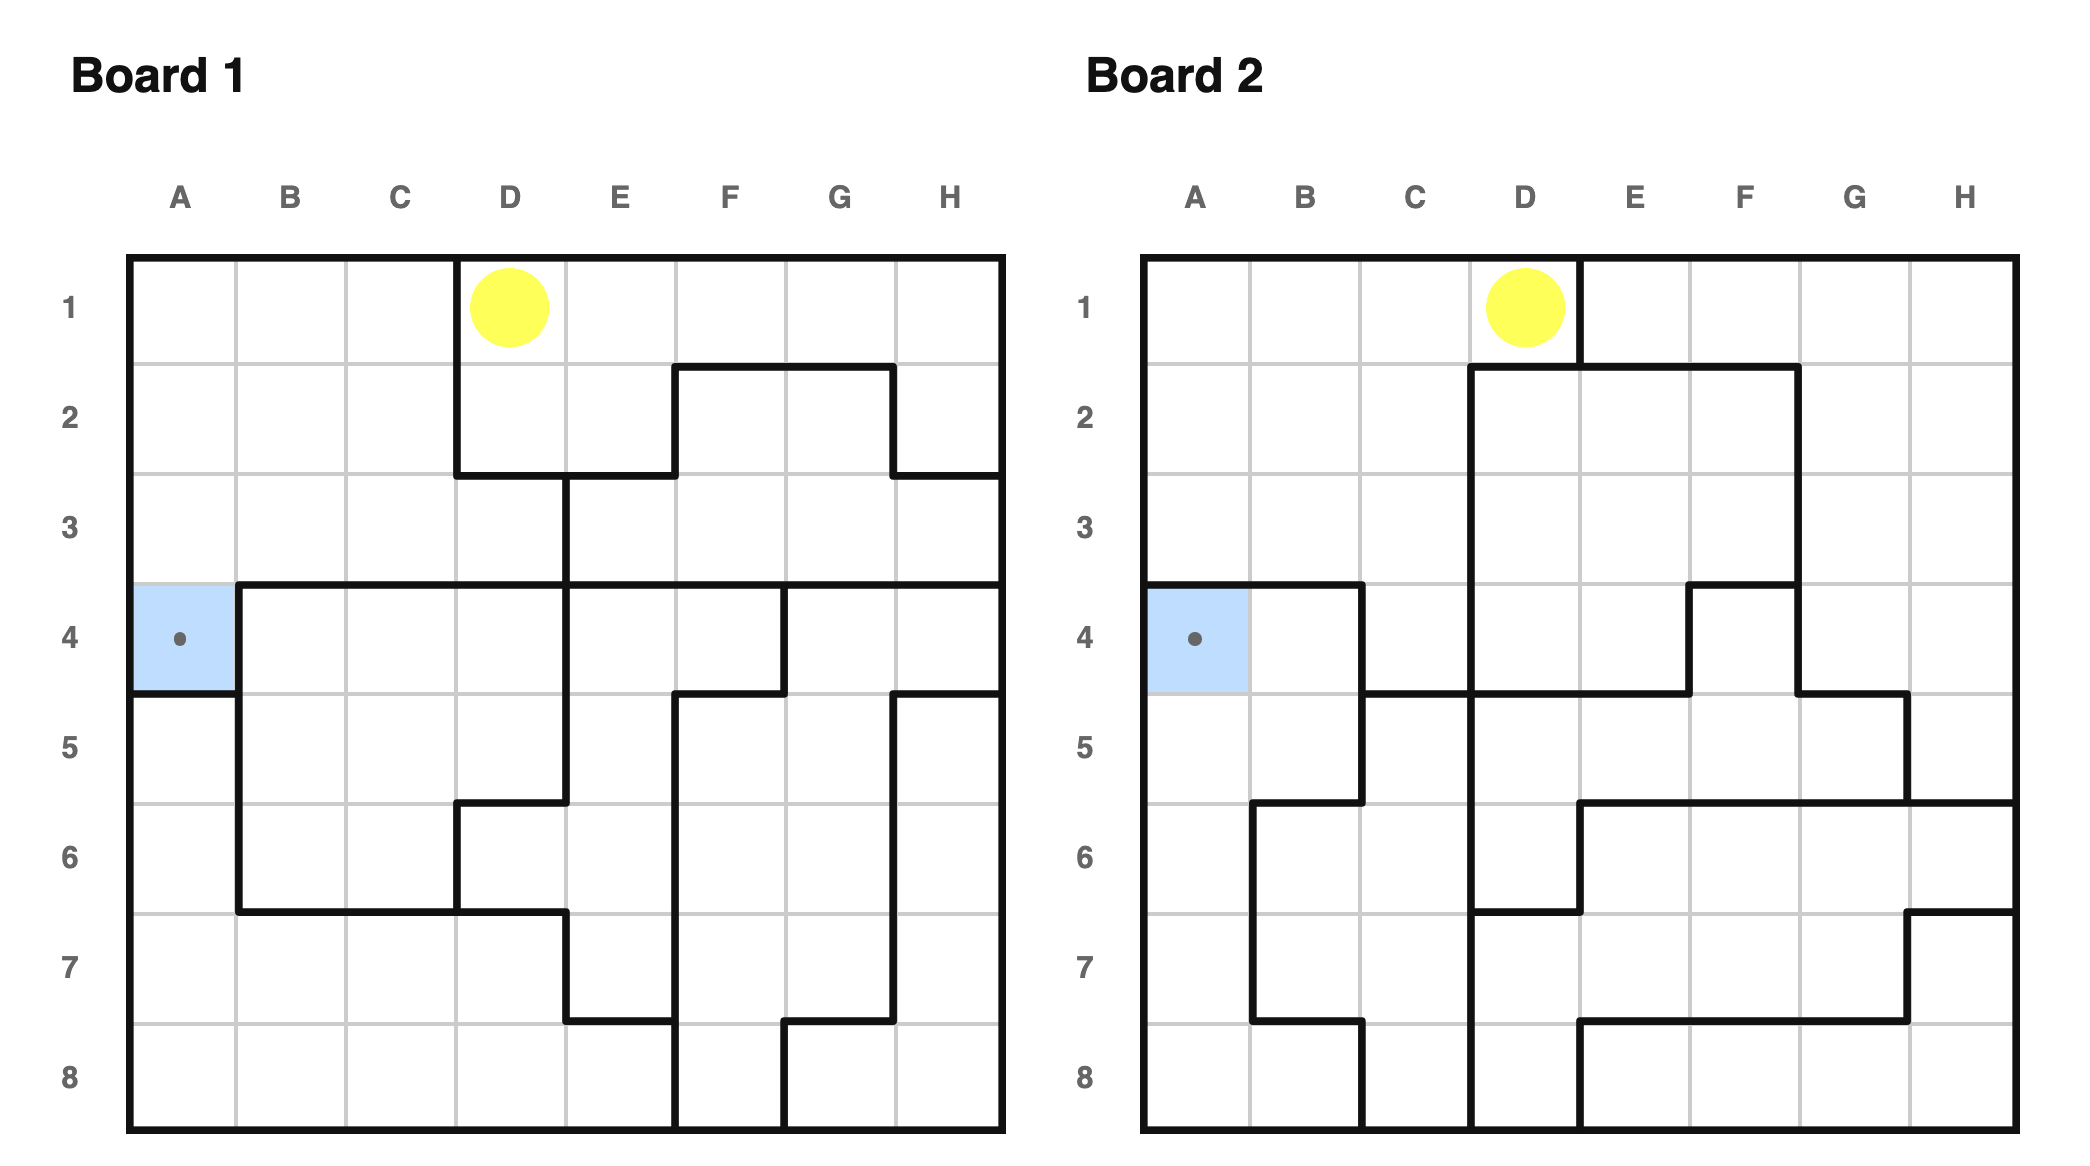 In this case, the two boards are diagonal reflections of one another. If the
solution wasn't symmetric along that reflection, then we could reflect it, and
have a second valid solution. But since we know the solution is unique, we can
infer that the reflection of every dot must be a dot, and the reflection of
every star must be a star. In this case, we've placed a dot at A4, and that
tells us that there must also be a dot at D1.
---
In this case, the two boards are diagonal reflections of one another. If the
solution wasn't symmetric along that reflection, then we could reflect it, and
have a second valid solution. But since we know the solution is unique, we can
infer that the reflection of every dot must be a dot, and the reflection of
every star must be a star. In this case, we've placed a dot at A4, and that
tells us that there must also be a dot at D1.
---
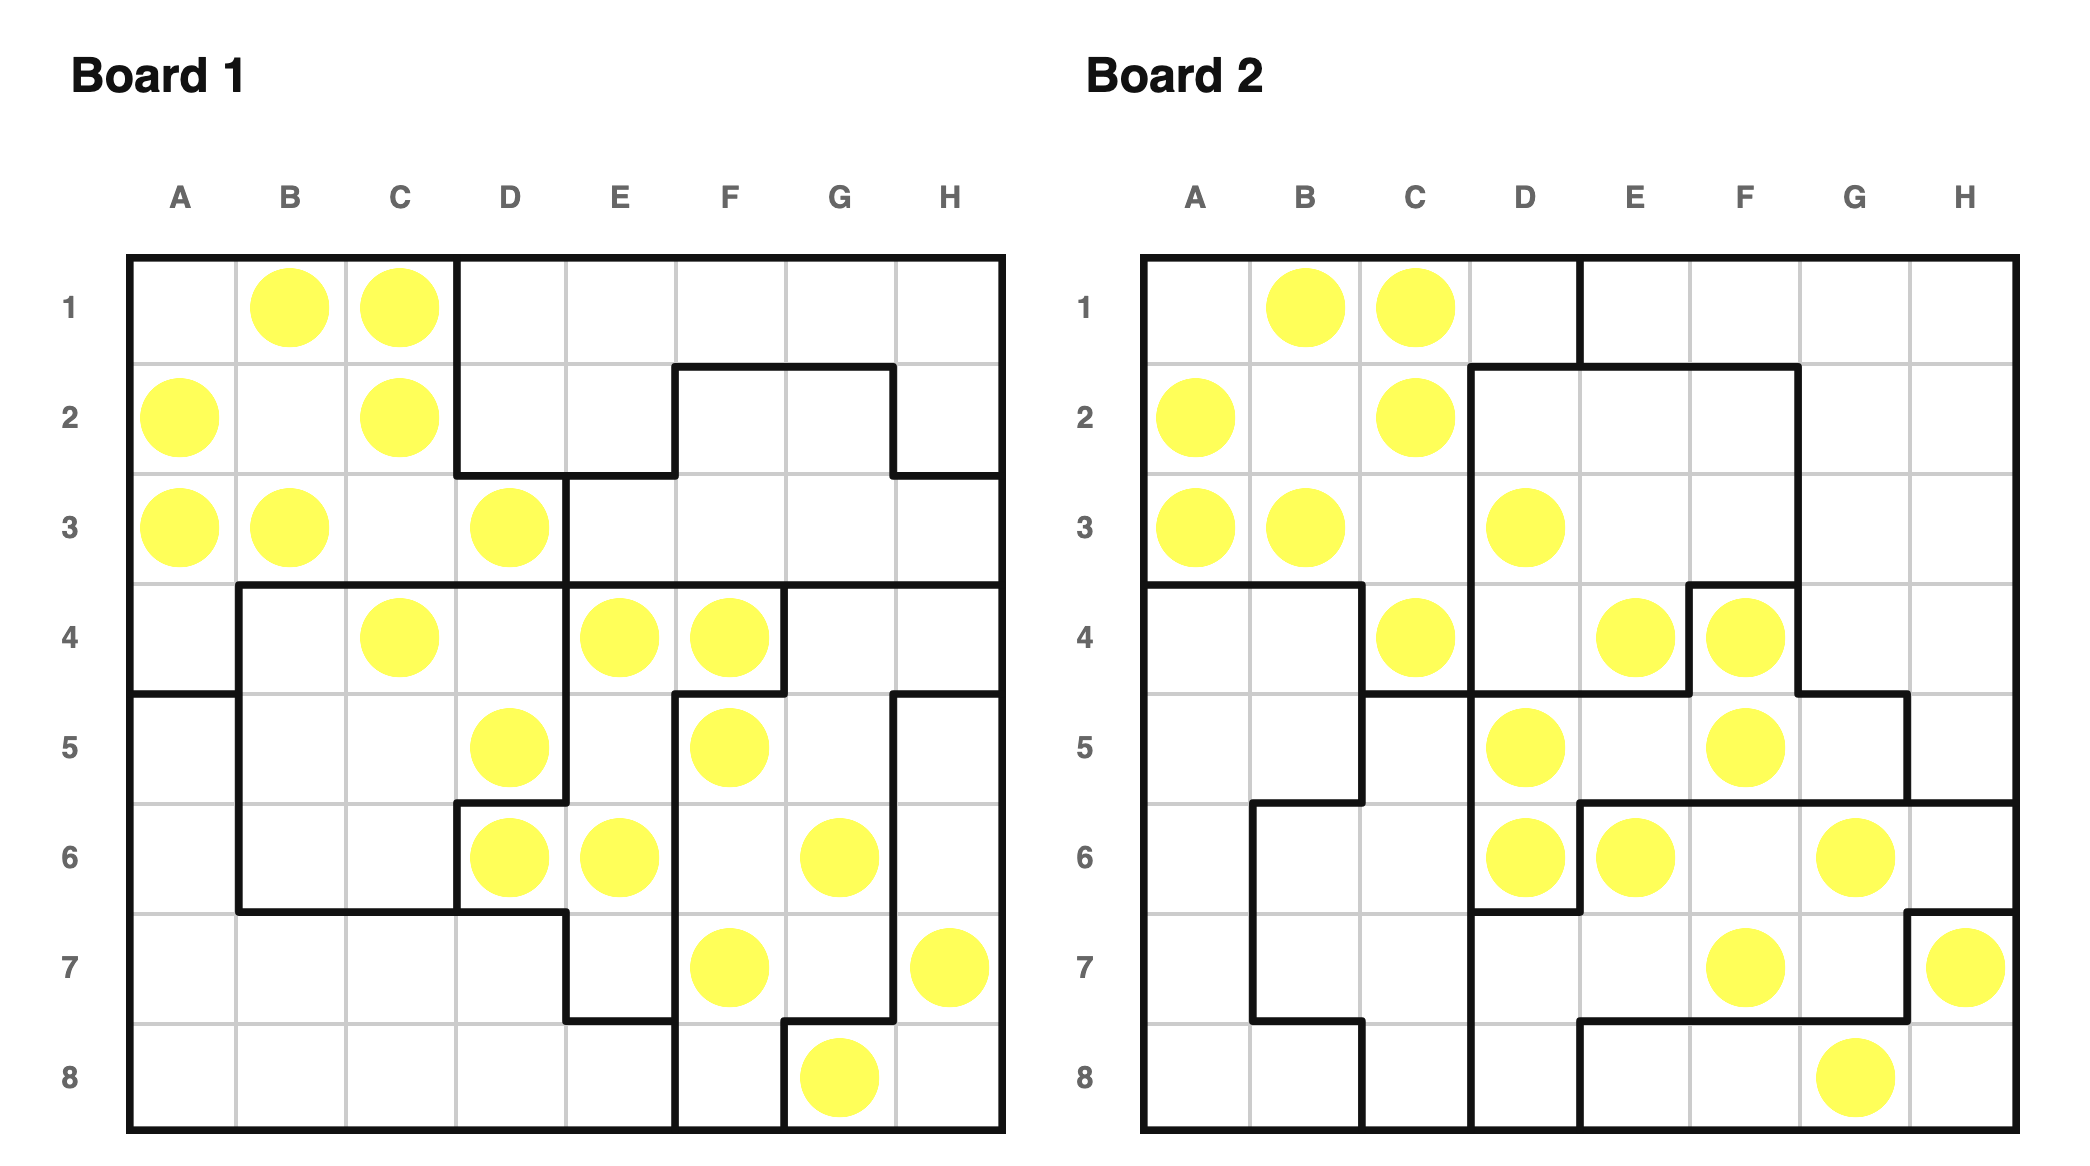 Let's keep looking at this puzzle, and take this line of thinking one step
further. Since the solution is symmetric, any cell which "sees" its own
reflection (by row/col/adjacency/region) cannot have a star.
For example, A3 and C1 are reflections of one another, so either both are dots
or both are stars. Those two cells are in the same region (on both boards), so
they cannot be stars, and must be dots.
---
Let's keep looking at this puzzle, and take this line of thinking one step
further. Since the solution is symmetric, any cell which "sees" its own
reflection (by row/col/adjacency/region) cannot have a star.
For example, A3 and C1 are reflections of one another, so either both are dots
or both are stars. Those two cells are in the same region (on both boards), so
they cannot be stars, and must be dots.
---
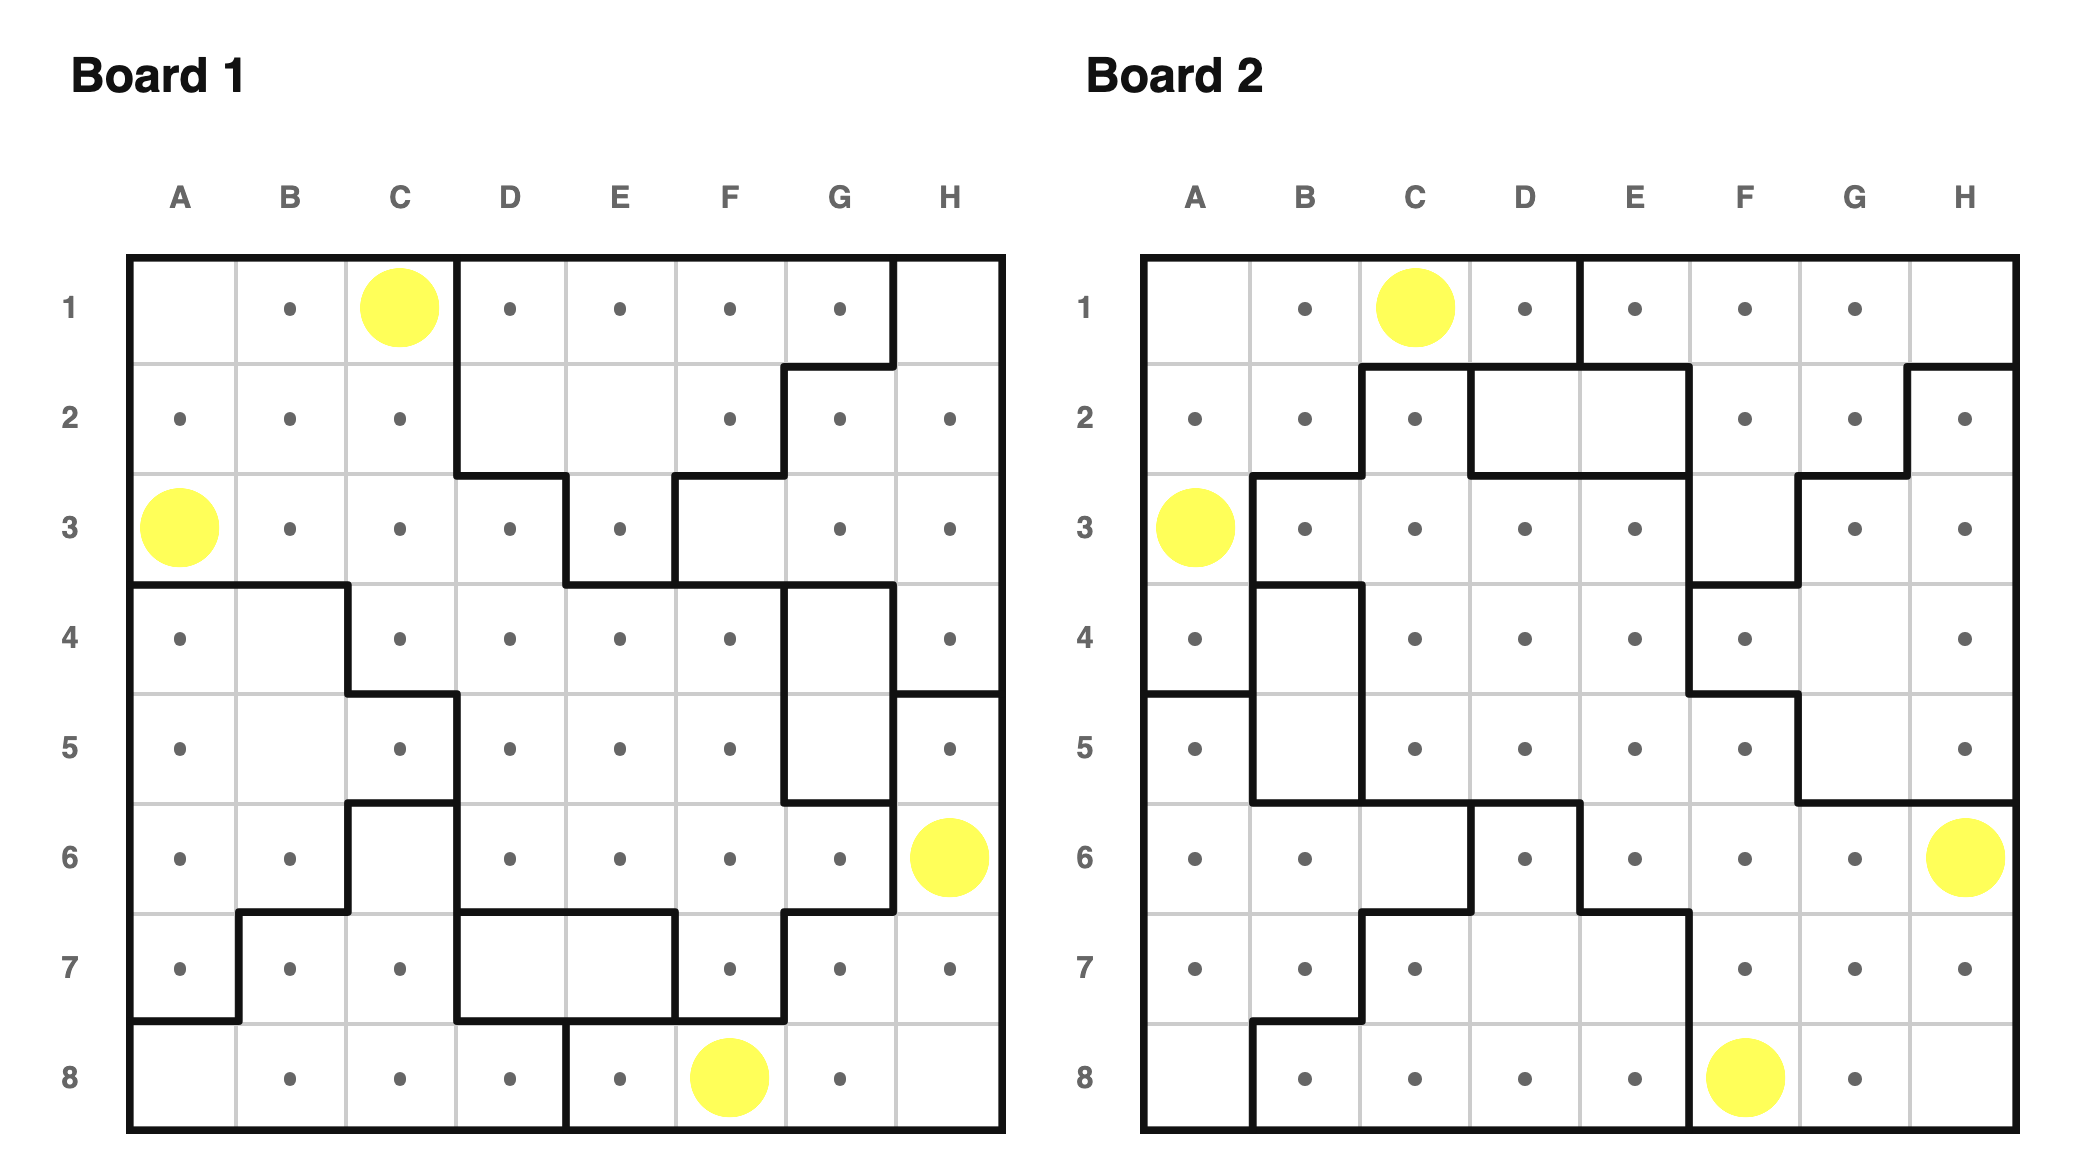 Here, both boards have diagonal self-symmetry. By the same logic above, this
means the solution must also have diagonal self-symmetry. This means we can
apply our diagonal-symmery rules here as well. The reflection of a dot is a dot,
the reflection of a star is a star, and any cell which "sees" itself under
diagonal reflection must be a dot.
I find this technique frustratingly powerful. It's easy to spot, and trivializes
many puzzles that would otherwise be very difficult.
#### Diagonal parity
Symmetry gives us one more trick, specific to the diagonal a board is symmetric
across. Since the reflection of a star is always a star, the diagonal's own
cells pair up with each other (any cell off the diagonal shares the diagonal
with its own reflection), except for however many cells sit exactly *on* the
diagonal. That means the number of stars on the diagonal has to share the same
parity (even/odd) as the board size — if it didn't, the rest of the board
couldn't make up the difference.
Here, both boards have diagonal self-symmetry. By the same logic above, this
means the solution must also have diagonal self-symmetry. This means we can
apply our diagonal-symmery rules here as well. The reflection of a dot is a dot,
the reflection of a star is a star, and any cell which "sees" itself under
diagonal reflection must be a dot.
I find this technique frustratingly powerful. It's easy to spot, and trivializes
many puzzles that would otherwise be very difficult.
#### Diagonal parity
Symmetry gives us one more trick, specific to the diagonal a board is symmetric
across. Since the reflection of a star is always a star, the diagonal's own
cells pair up with each other (any cell off the diagonal shares the diagonal
with its own reflection), except for however many cells sit exactly *on* the
diagonal. That means the number of stars on the diagonal has to share the same
parity (even/odd) as the board size — if it didn't, the rest of the board
couldn't make up the difference.
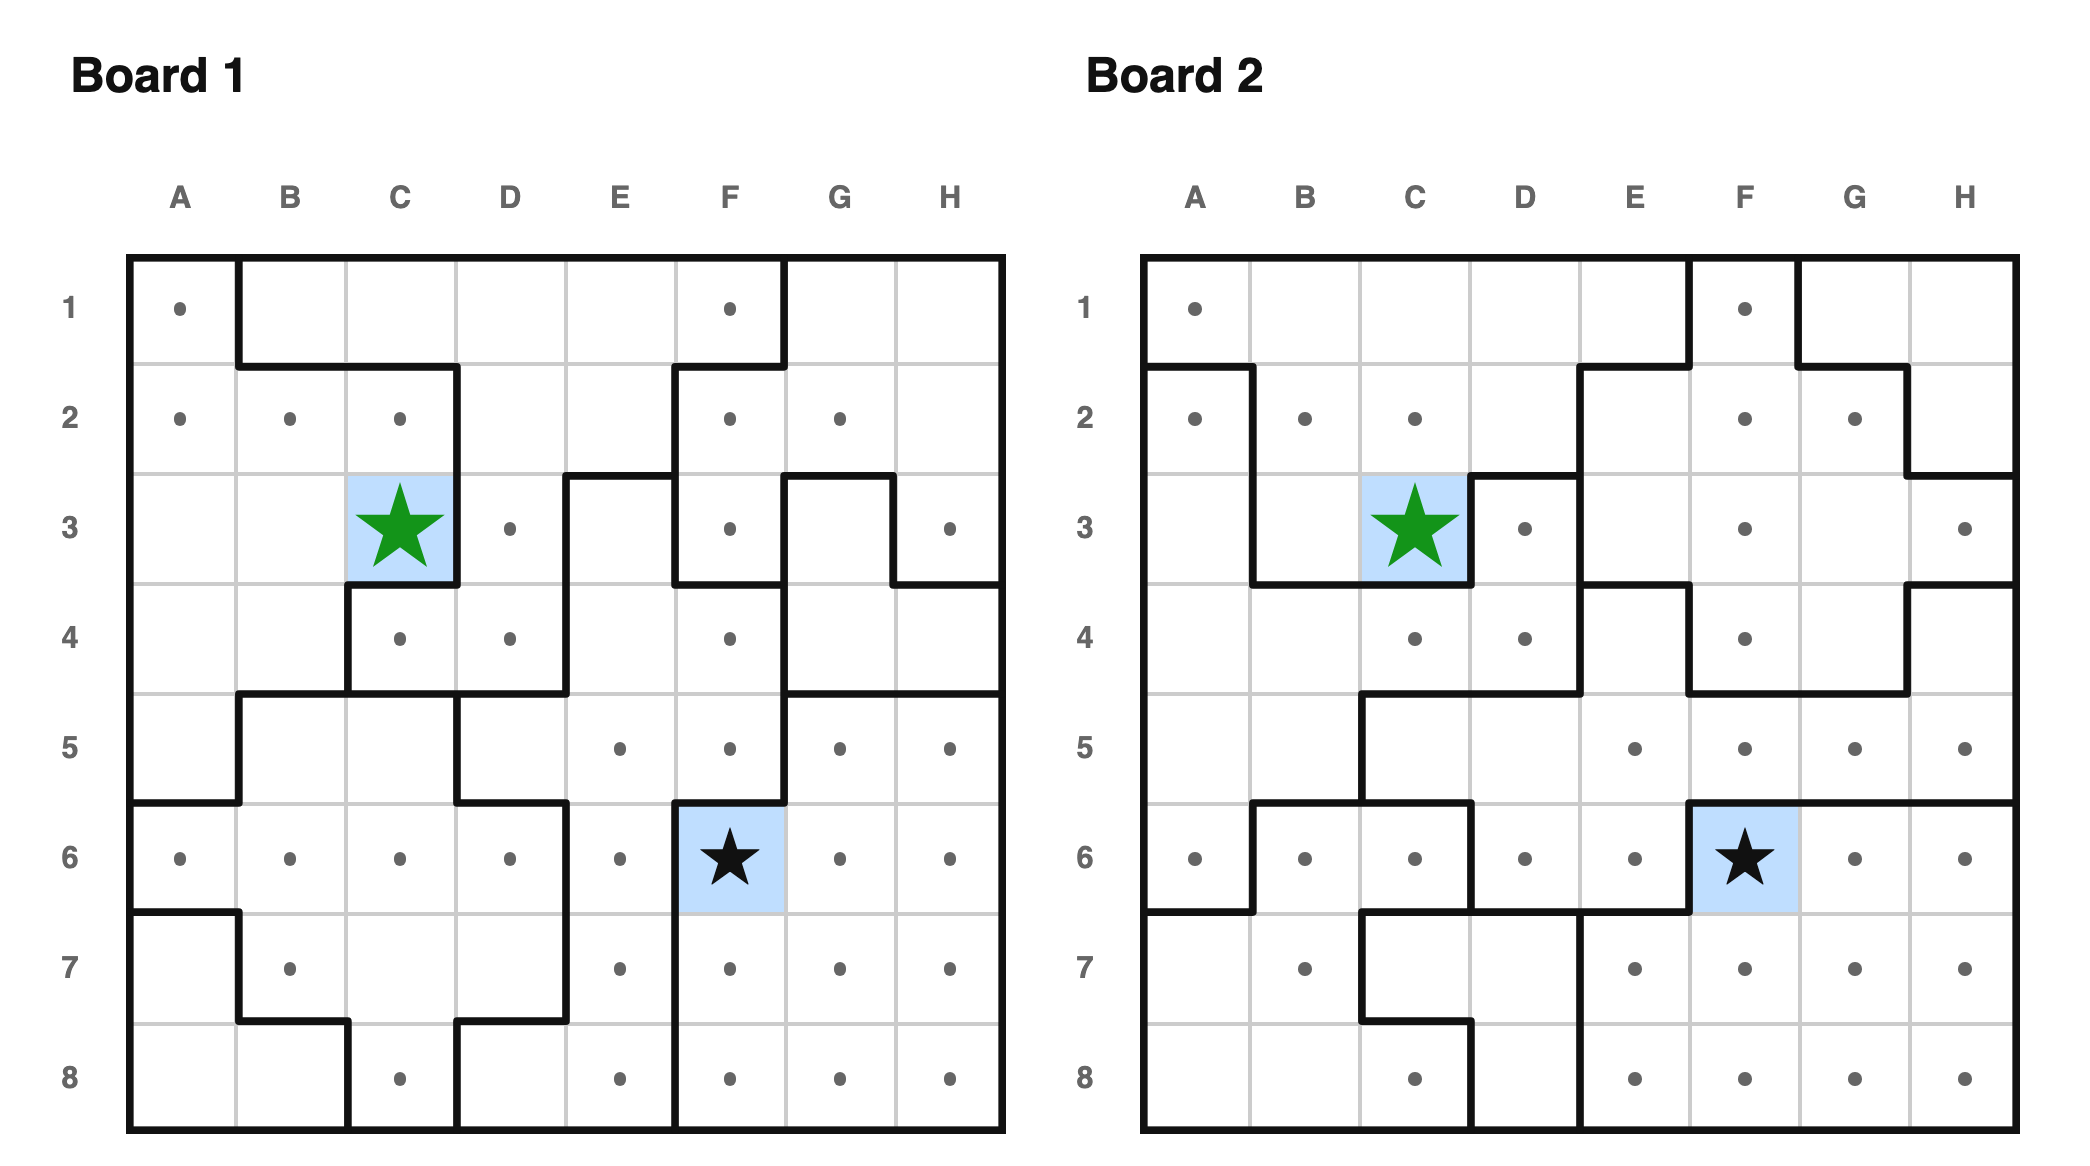 This board is 8x8 and symmetric across its main diagonal (↘). The diagonal
already has one star, and every other diagonal cell is decided except C3. Since
8 is even, the diagonal needs an even number of stars overall — so with one star
already placed, C3 must be a star too, bringing the diagonal's total to two.
---
This board is 8x8 and symmetric across its main diagonal (↘). The diagonal
already has one star, and every other diagonal cell is decided except C3. Since
8 is even, the diagonal needs an even number of stars overall — so with one star
already placed, C3 must be a star too, bringing the diagonal's total to two.
---
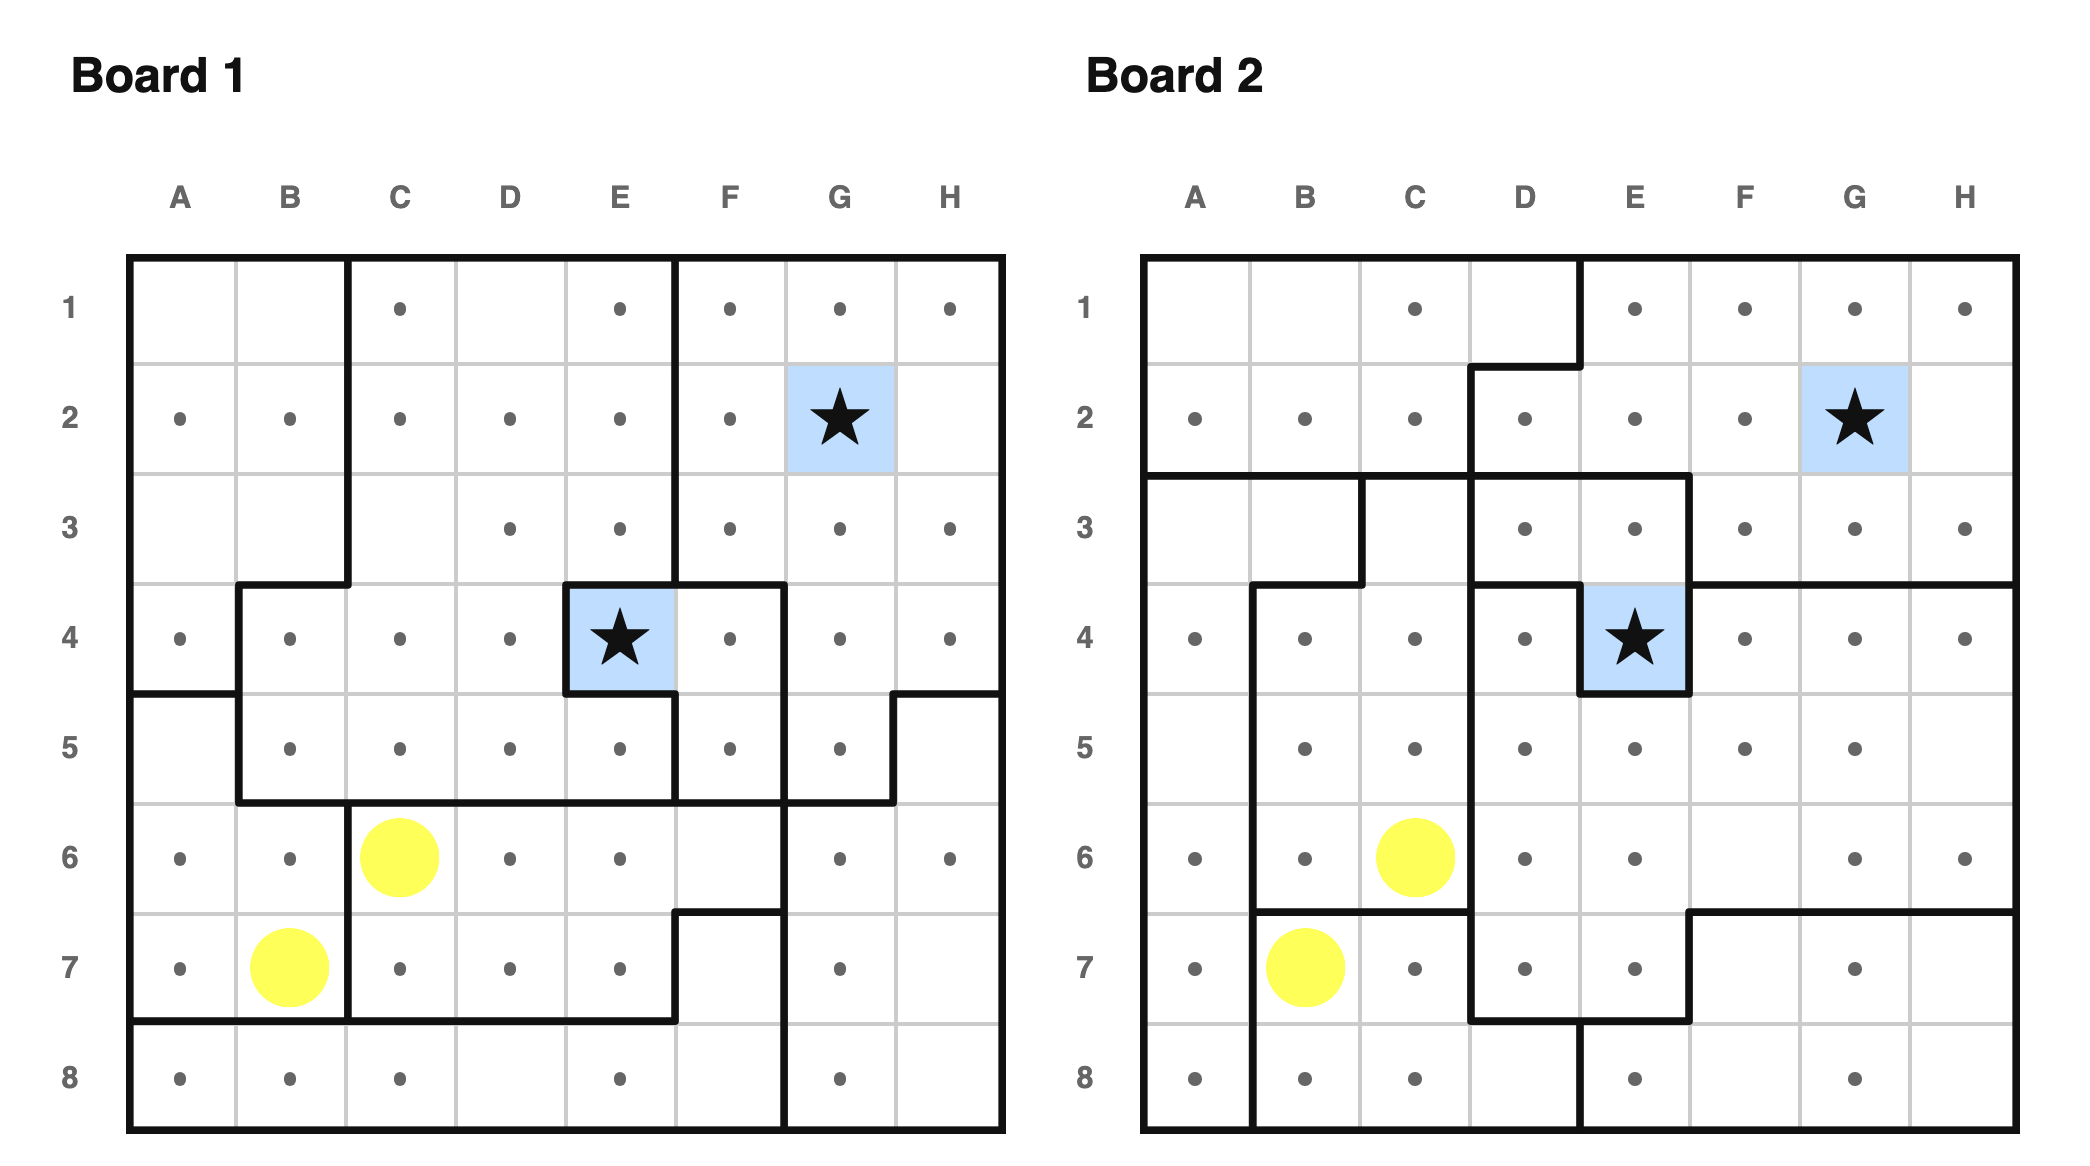 This one is symmetric across the *anti*-diagonal (↙) instead, and already has
two stars on it — already an even number, satisfying parity. Two cells remain
empty on the diagonal, C6 and B7, and they happen to touch each other
diagonally. If parity is already satisfied, at most one more diagonal star is
allowed without breaking it — but C6 and B7 can't both be dots and one be a star,
because touching means at most one of them could ever hold a star in the first
place, and adding exactly one star would break parity. So neither can be a star:
both must be dots.
I found this a lot harder to spot than plain symmetry copying — you have to
notice the diagonal's own parity, not just mirror moves across it. It used to
take a full lookahead search to crack puzzles like these; now it only takes this
one observation.
#### Rot180
This one is symmetric across the *anti*-diagonal (↙) instead, and already has
two stars on it — already an even number, satisfying parity. Two cells remain
empty on the diagonal, C6 and B7, and they happen to touch each other
diagonally. If parity is already satisfied, at most one more diagonal star is
allowed without breaking it — but C6 and B7 can't both be dots and one be a star,
because touching means at most one of them could ever hold a star in the first
place, and adding exactly one star would break parity. So neither can be a star:
both must be dots.
I found this a lot harder to spot than plain symmetry copying — you have to
notice the diagonal's own parity, not just mirror moves across it. It used to
take a full lookahead search to crack puzzles like these; now it only takes this
one observation.
#### Rot180
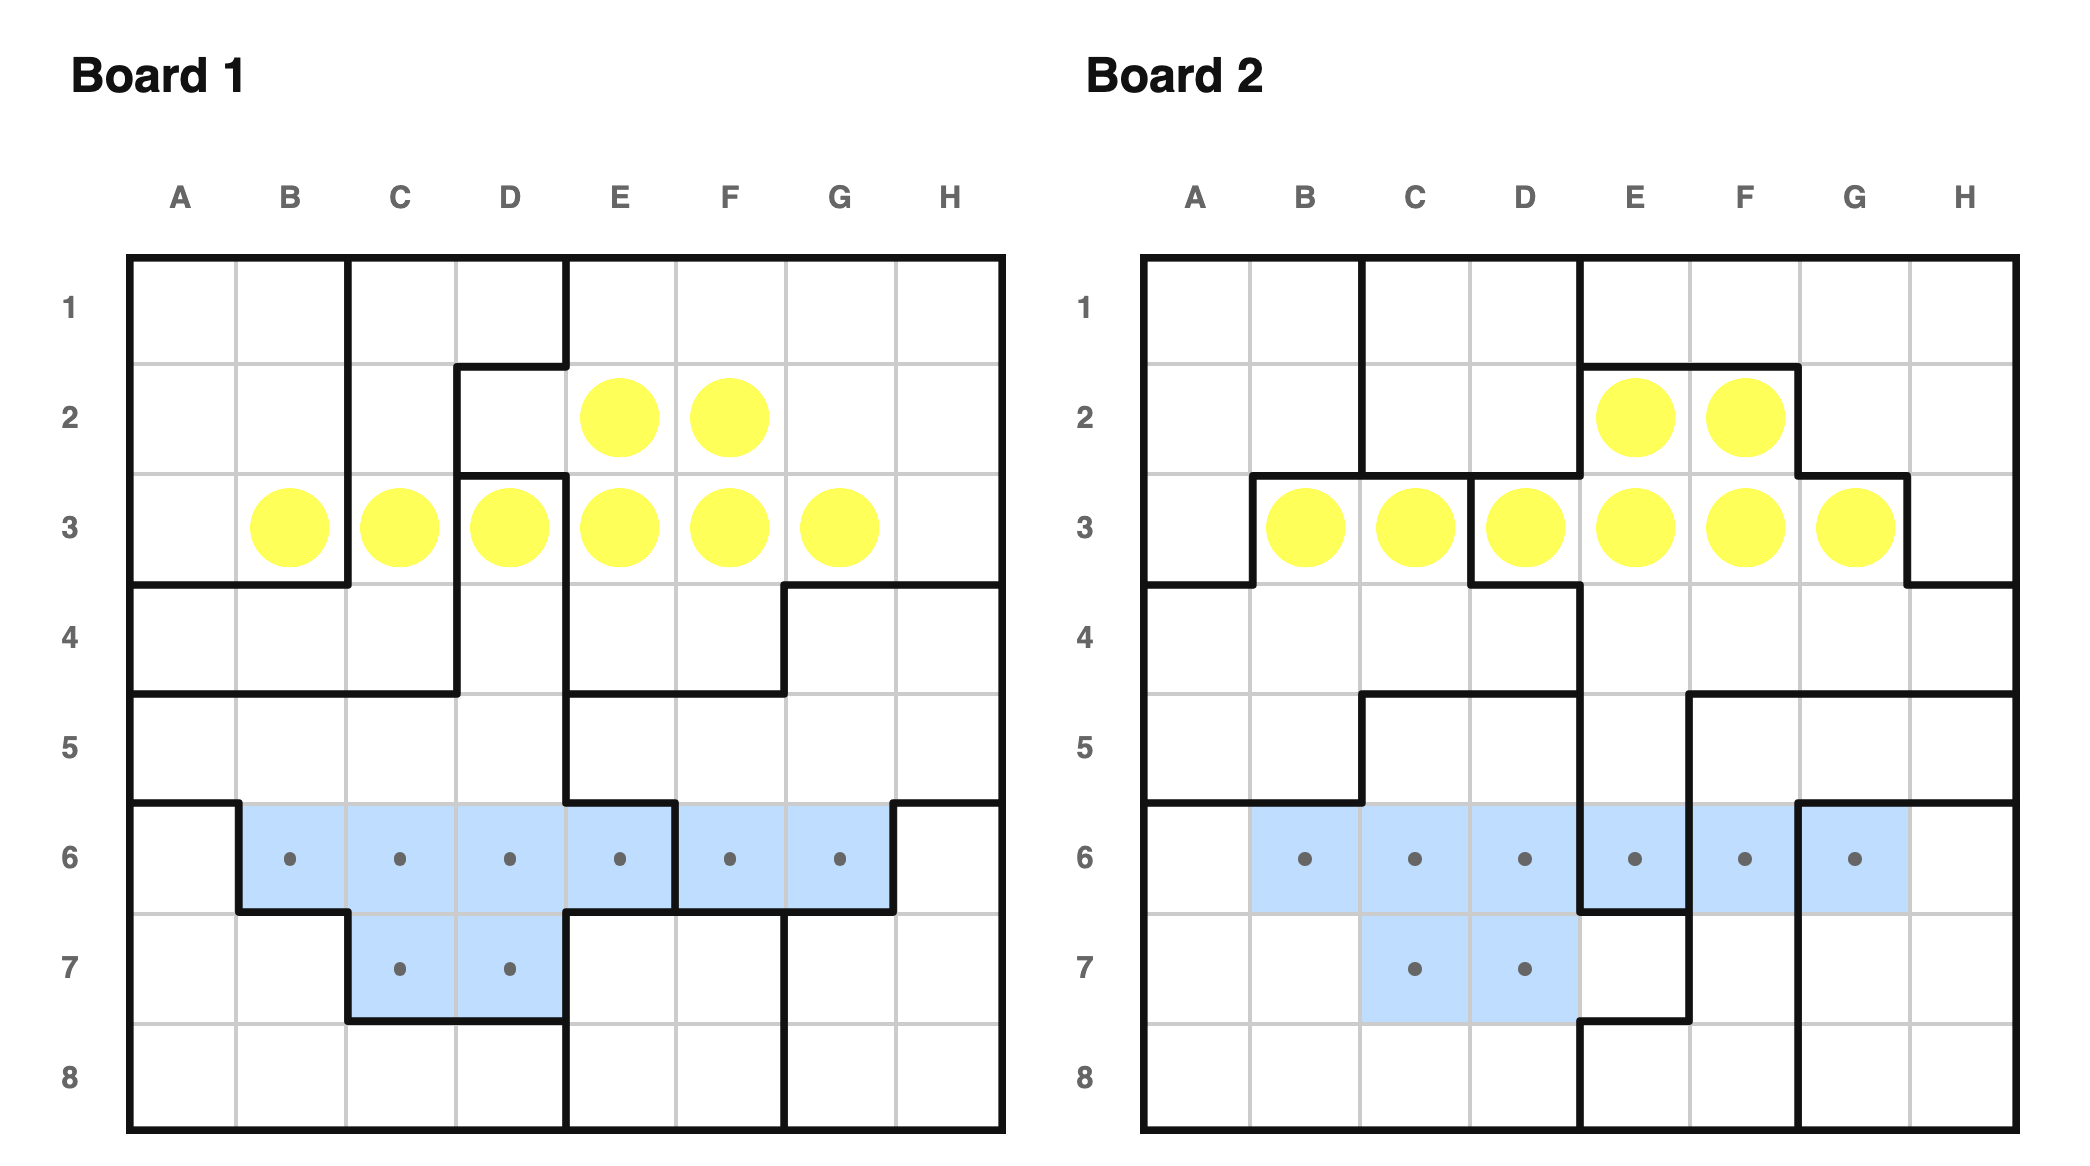 This puzzle has two boards that are 180-degree rotations of one another, so the
solution must be too. A Hard-tier deduction elsewhere on the board had already
placed some dots before this point; copying every one of them to its 180-degree
rotation fills in E2, F2, B3, C3, D3, E3, F3, and G3 all at once — the simplest
possible move once you know the symmetry holds, and it doesn't need to wait for
a single specific cell, it applies to everything already known simultaneously.
---
This puzzle has two boards that are 180-degree rotations of one another, so the
solution must be too. A Hard-tier deduction elsewhere on the board had already
placed some dots before this point; copying every one of them to its 180-degree
rotation fills in E2, F2, B3, C3, D3, E3, F3, and G3 all at once — the simplest
possible move once you know the symmetry holds, and it doesn't need to wait for
a single specific cell, it applies to everything already known simultaneously.
---
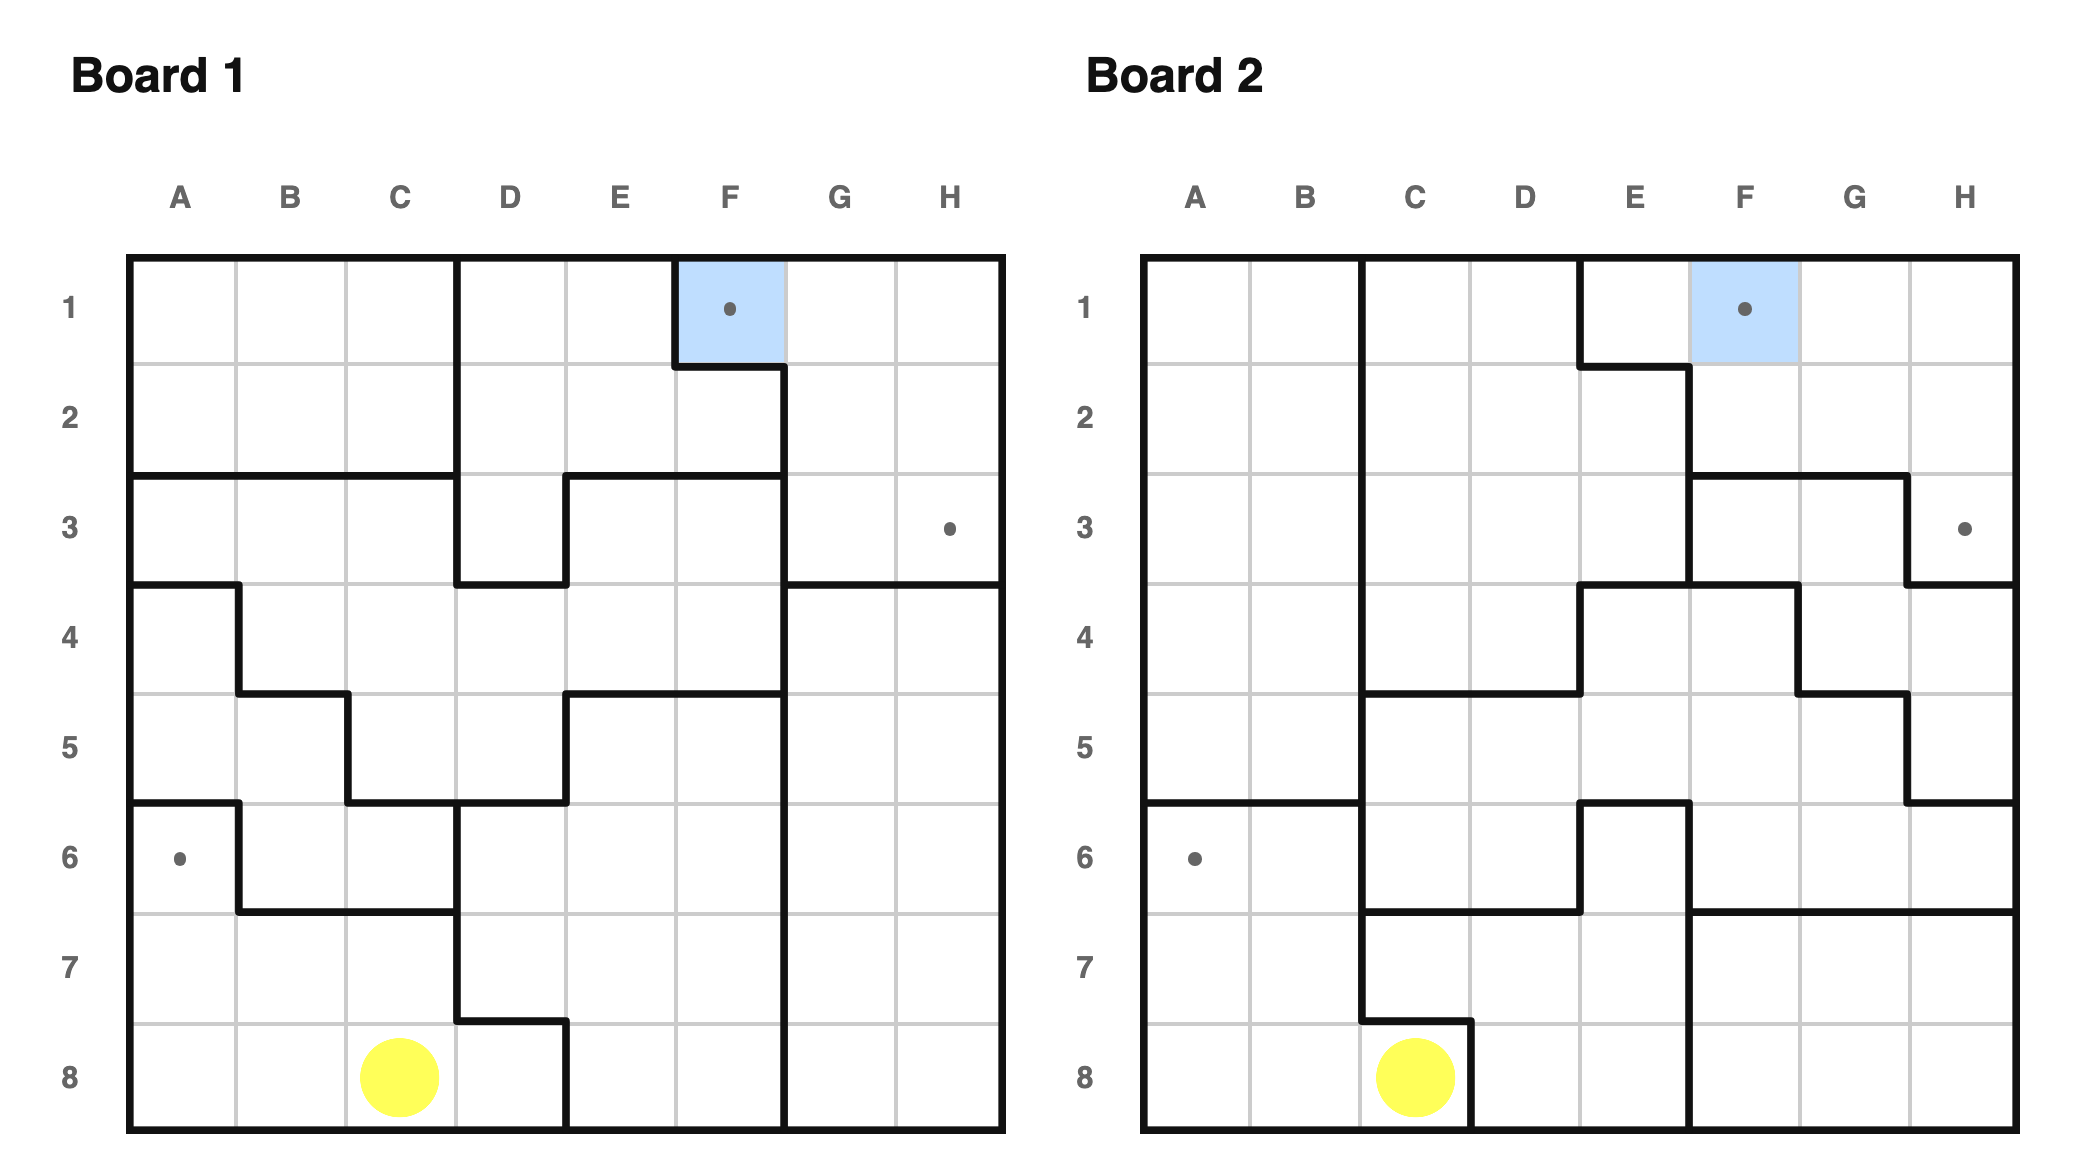 This puzzle has two boards that are 180 degree rotations of one another. The
solution must also have 180-degree symmetry, because otherwise we could rotate
the solution 180 degrees to get a second valid solution. So any time we place a
dot or star, we can also rotate that mark 180 degrees.
---
This puzzle has two boards that are 180 degree rotations of one another. The
solution must also have 180-degree symmetry, because otherwise we could rotate
the solution 180 degrees to get a second valid solution. So any time we place a
dot or star, we can also rotate that mark 180 degrees.
---
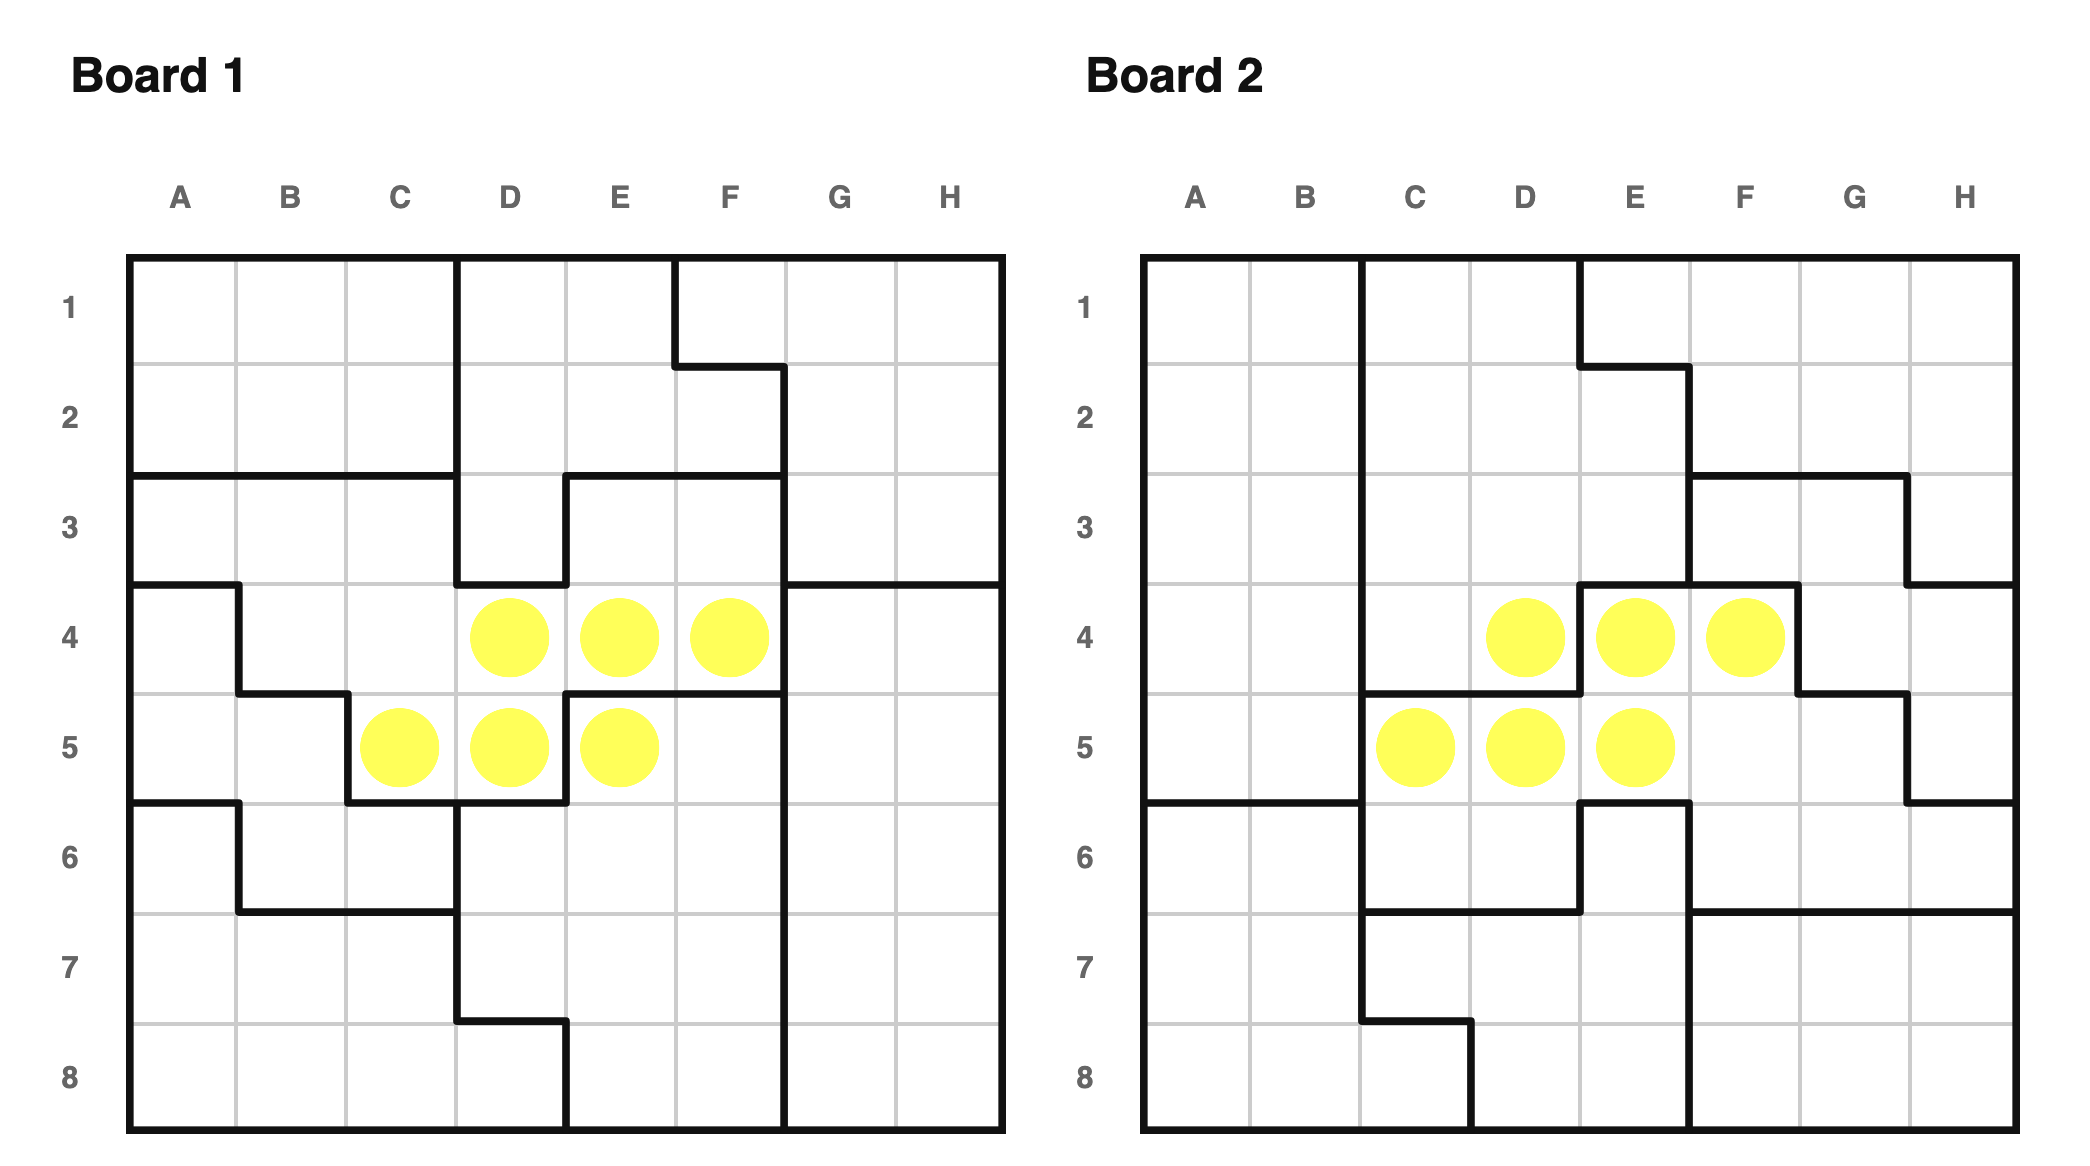 Again, we can take this further and consider every cell alongside its image
under 180 degree rotation. If the two "see" each other, including by being in
the same region, then they cannot be stars.
---
Again, we can take this further and consider every cell alongside its image
under 180 degree rotation. If the two "see" each other, including by being in
the same region, then they cannot be stars.
---
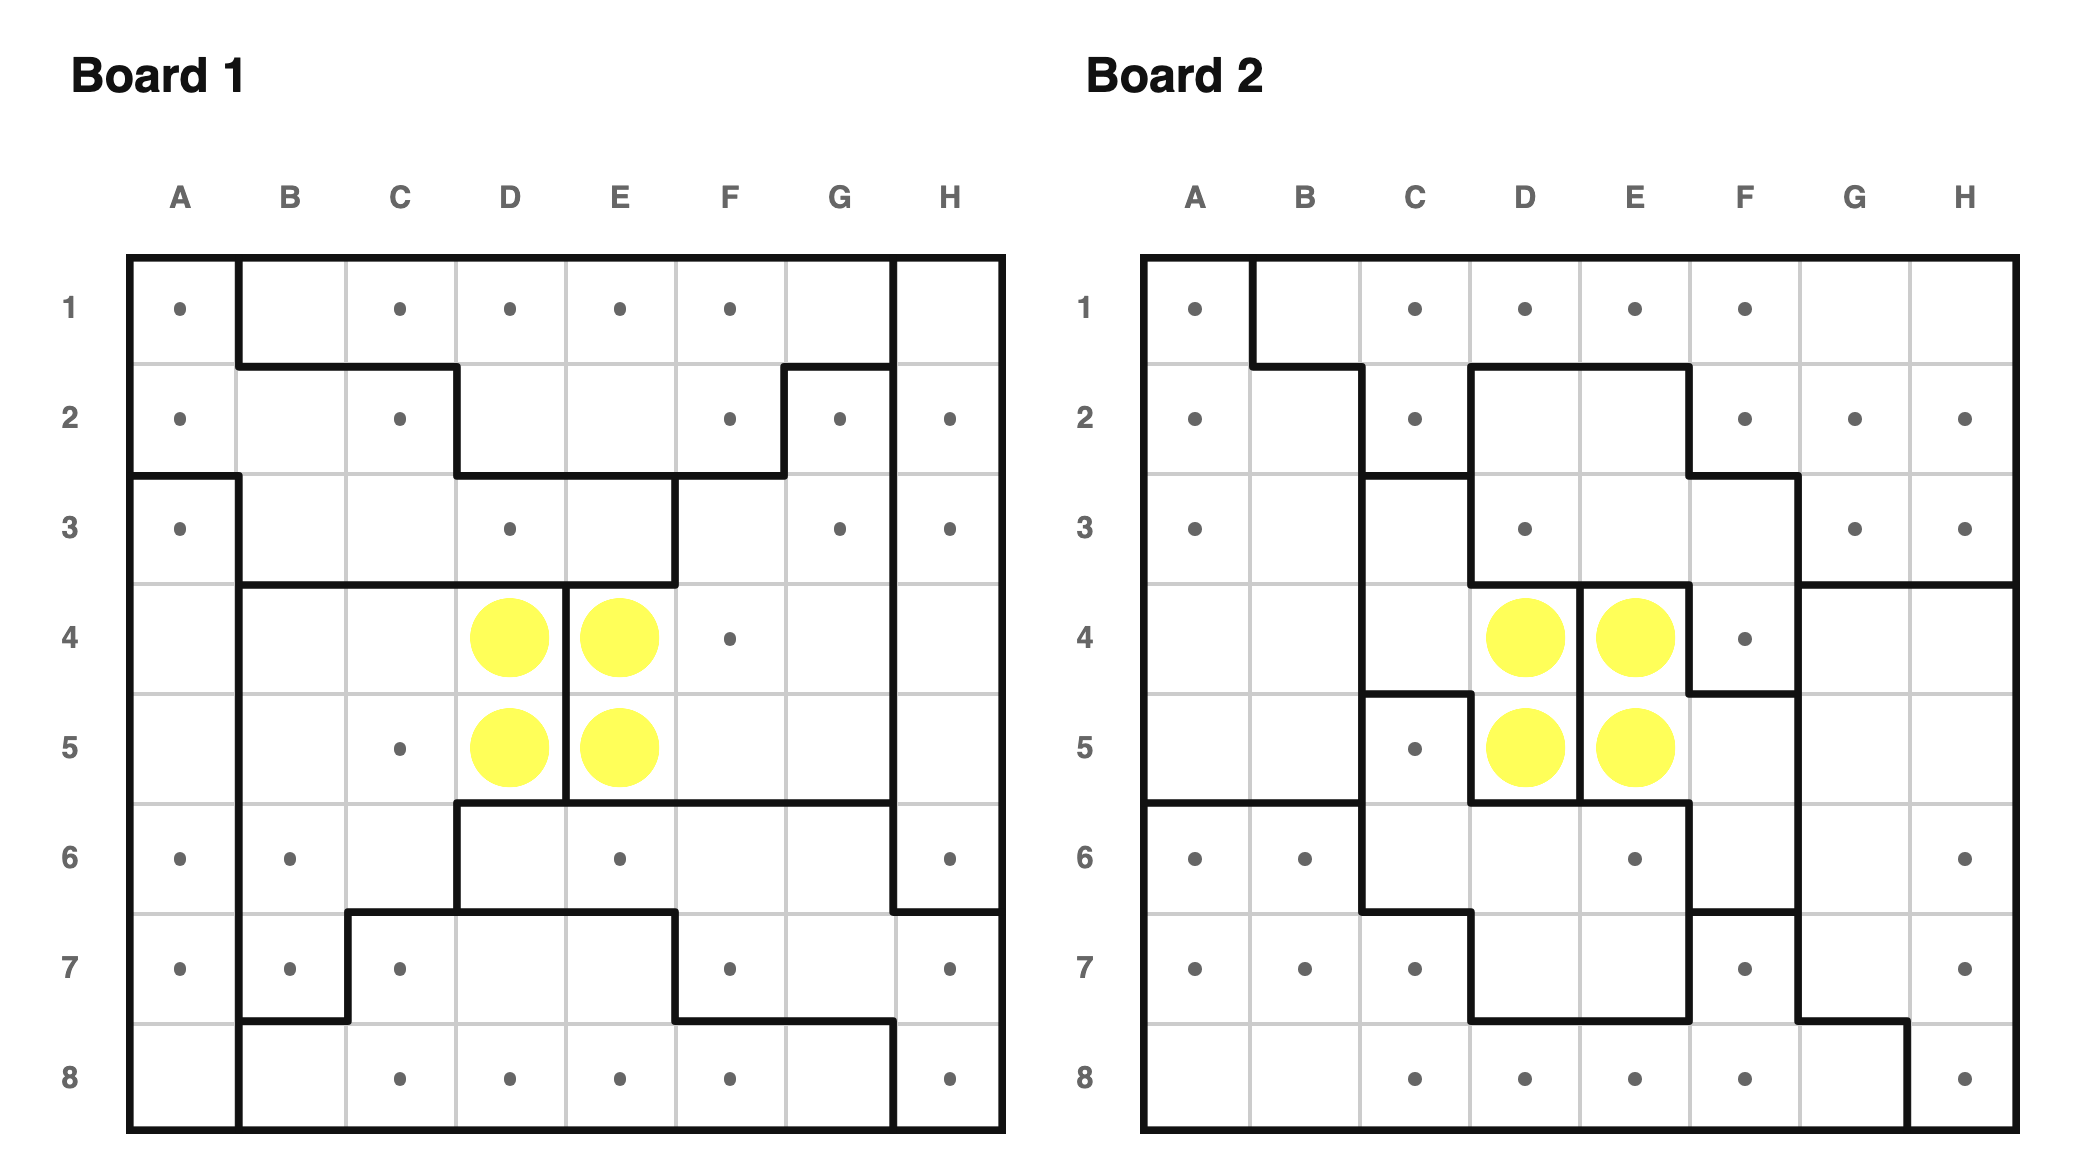 In this case, both boards have 180 degree self-symmetry, so the solution must
also have 180 degree symmetry. This means we can apply our 180 degree symmetry
rules here as well. The rotation of a dot is a dot, the rotation of a star is a
star, and any cell which "sees" itself under rotation must be a dot.
---
#### Rot 90
It feels like there ought to be a symmetry argument when one board is a 90
degree rotation of the other, but I haven't been able to think of one. If you
spot one, please let me know.
### Crossboard
In this case, both boards have 180 degree self-symmetry, so the solution must
also have 180 degree symmetry. This means we can apply our 180 degree symmetry
rules here as well. The rotation of a dot is a dot, the rotation of a star is a
star, and any cell which "sees" itself under rotation must be a dot.
---
#### Rot 90
It feels like there ought to be a symmetry argument when one board is a 90
degree rotation of the other, but I haven't been able to think of one. If you
spot one, please let me know.
### Crossboard
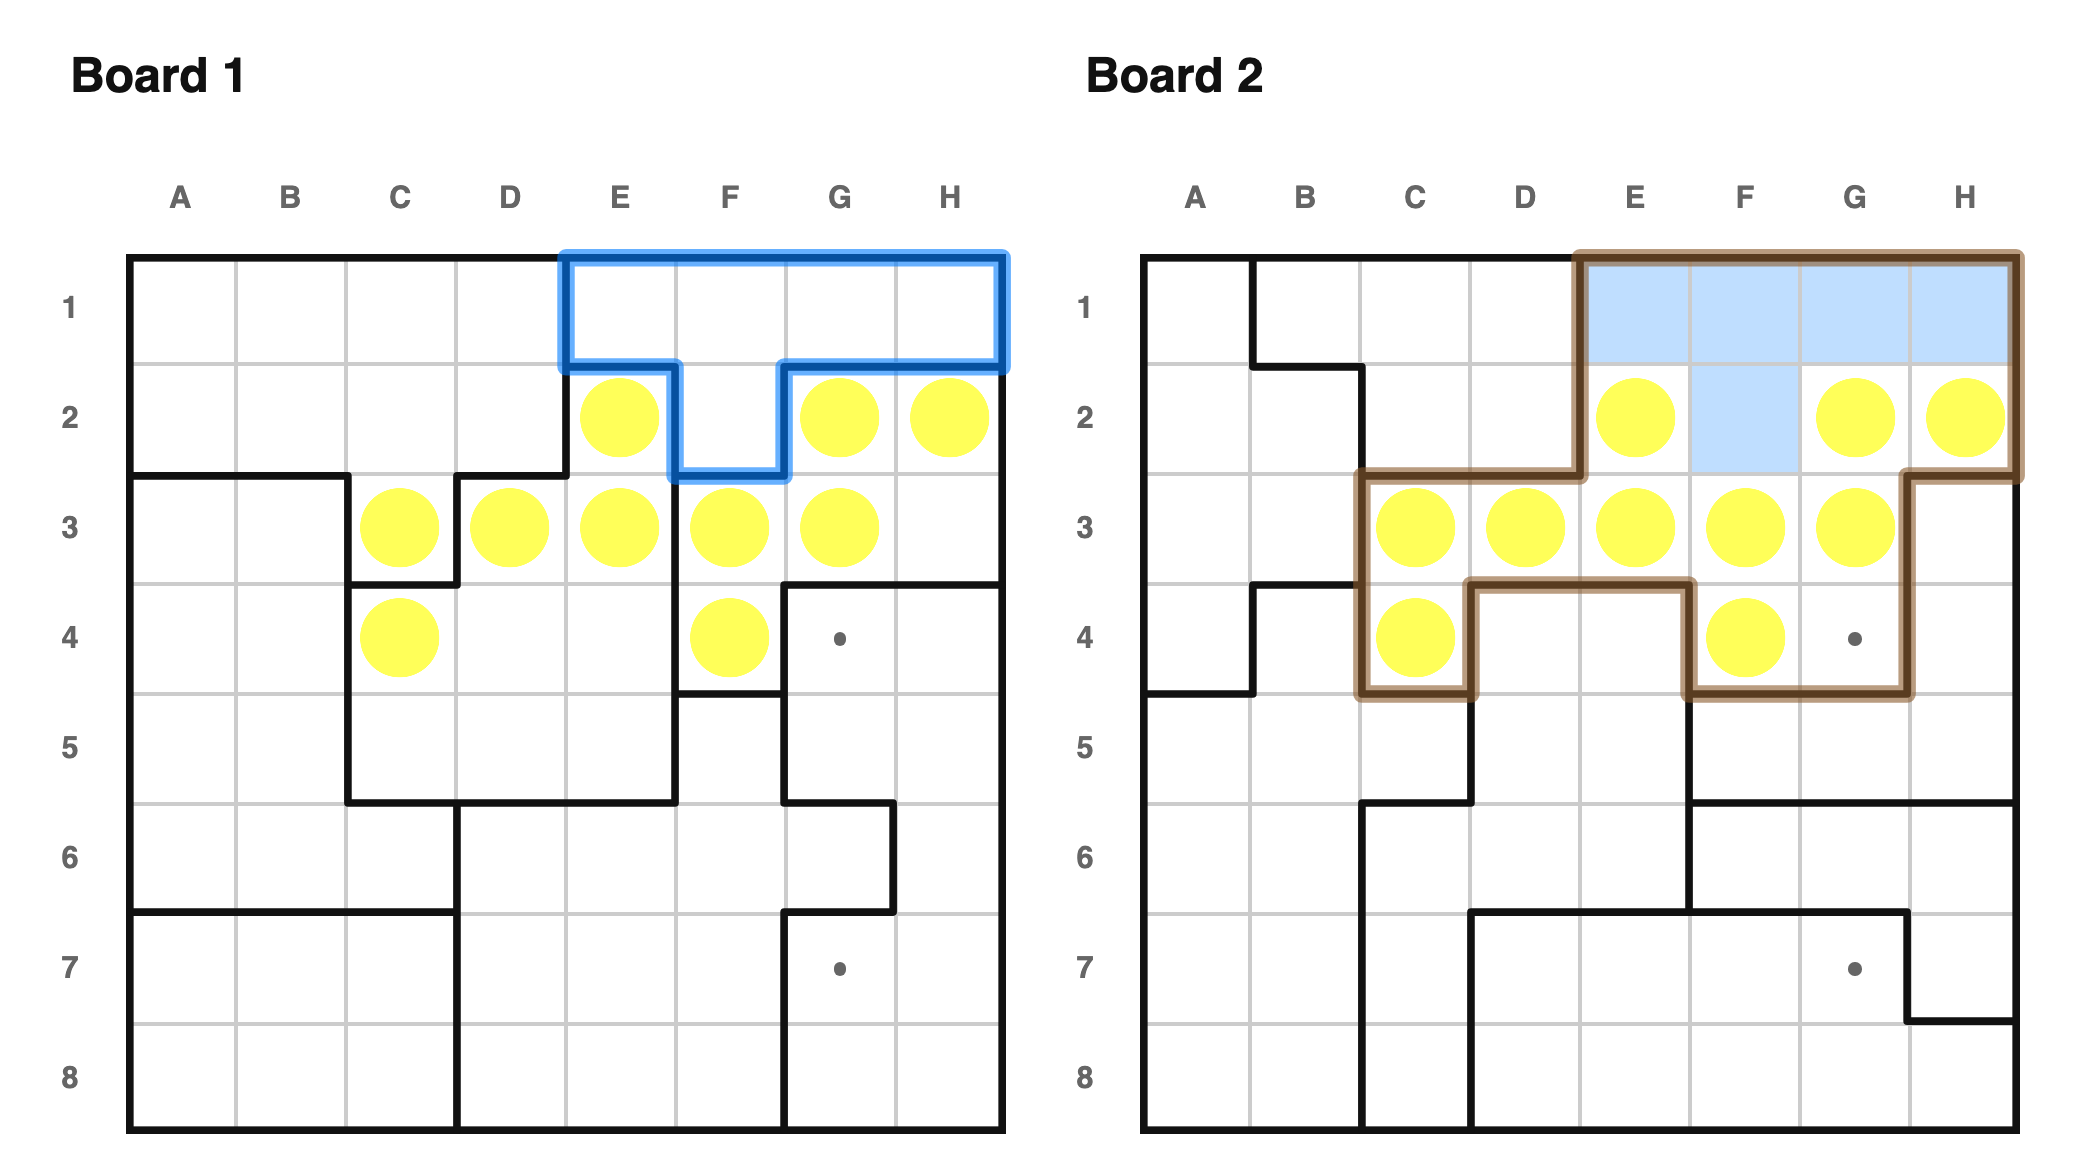 In this case, the top-right region of board 1 is a subset of the top-right
region of board 2. If we put a star in a non-shared cell of board 2, it would
make that region unsolvable on board 1. More generally, if any region is a
subset of another region, we can place dots in all cells of the larger region
which are not in the smaller region. This is my favorite technique.
---
In this case, the top-right region of board 1 is a subset of the top-right
region of board 2. If we put a star in a non-shared cell of board 2, it would
make that region unsolvable on board 1. More generally, if any region is a
subset of another region, we can place dots in all cells of the larger region
which are not in the smaller region. This is my favorite technique.
---
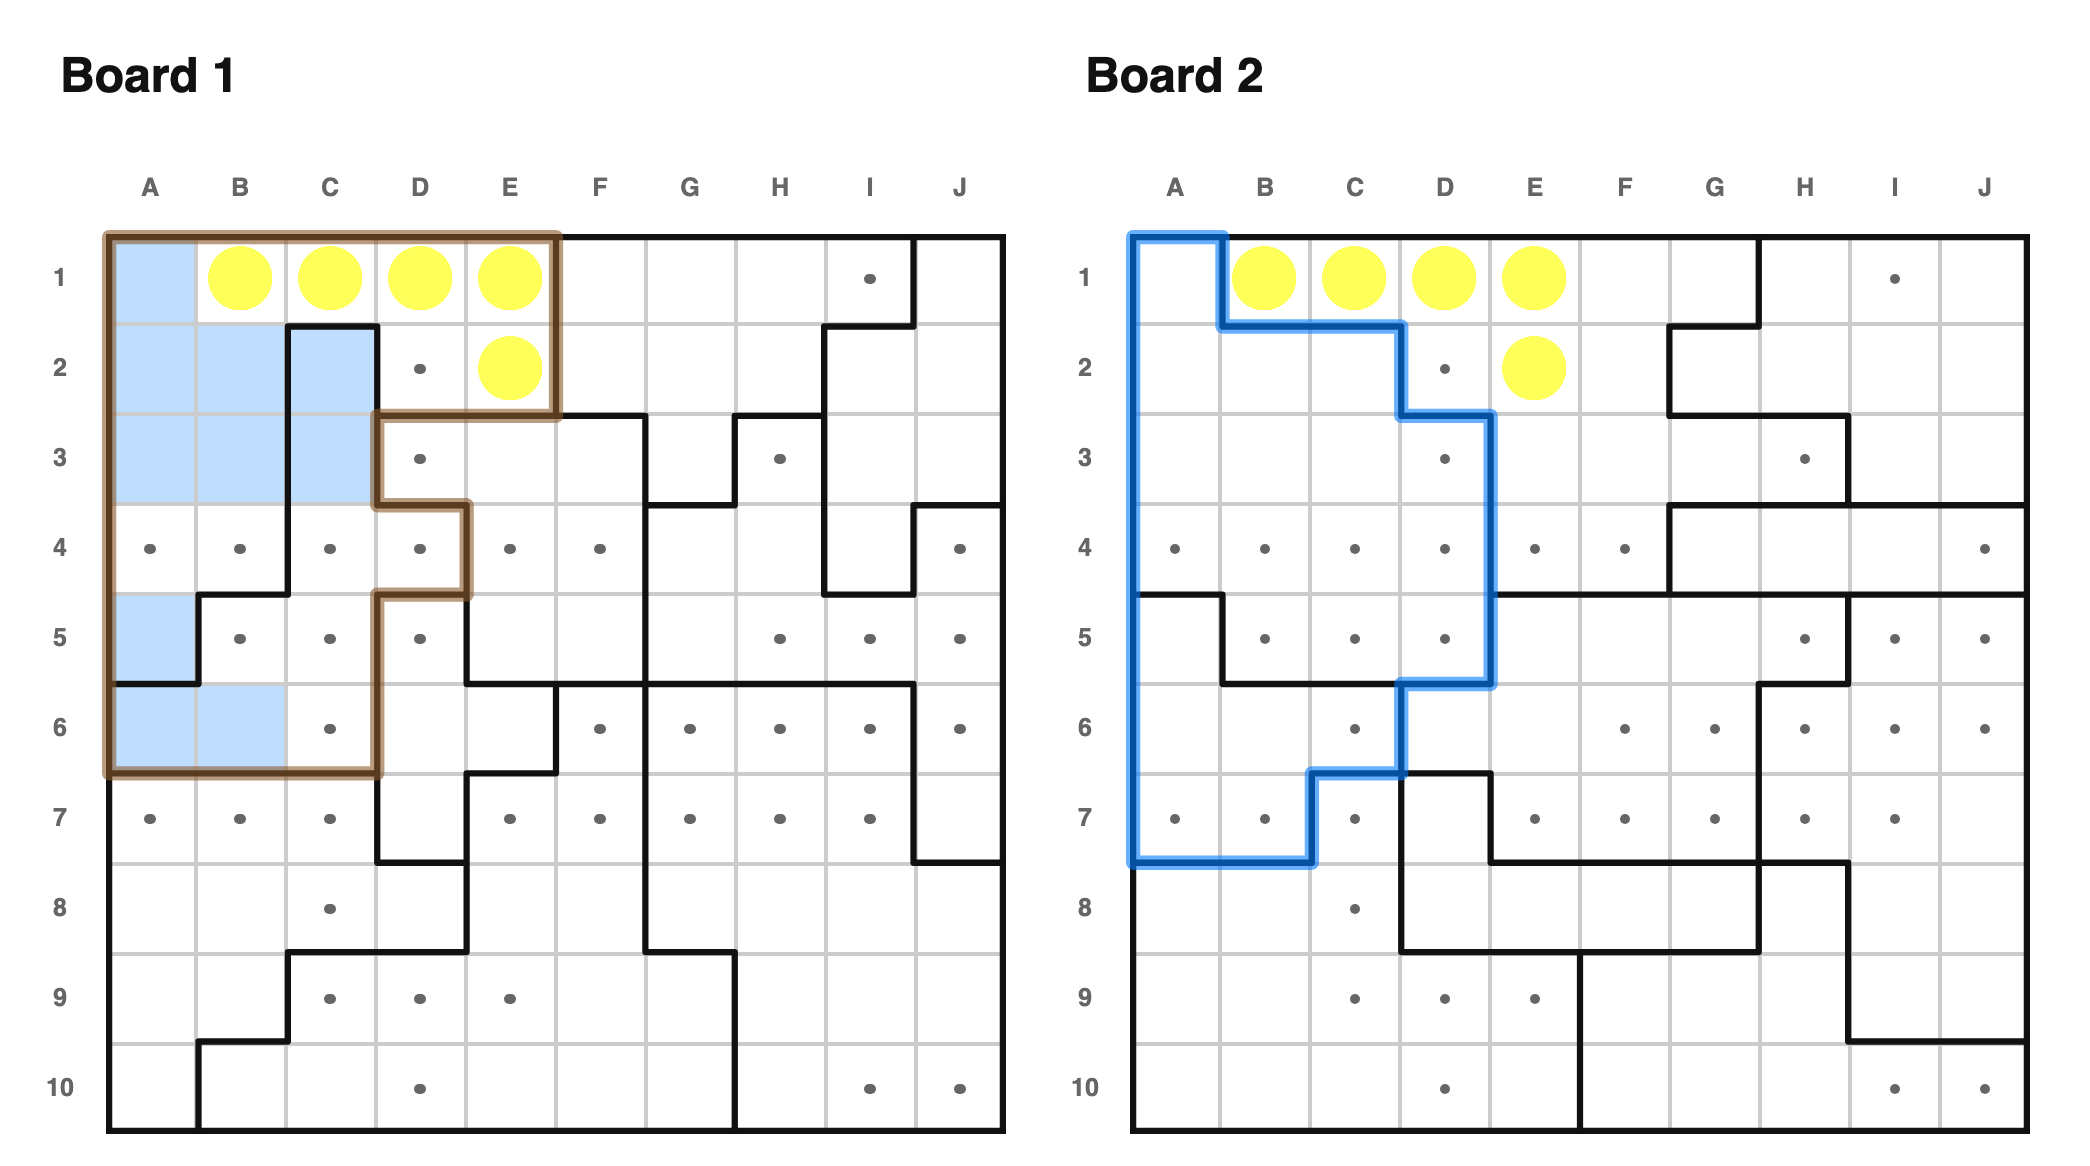 We can apply the same logic when one pair of regions is a subset of another
pair. This technique is quite rare, but I think it's really cool.
---
We can apply the same logic when one pair of regions is a subset of another
pair. This technique is quite rare, but I think it's really cool.
---
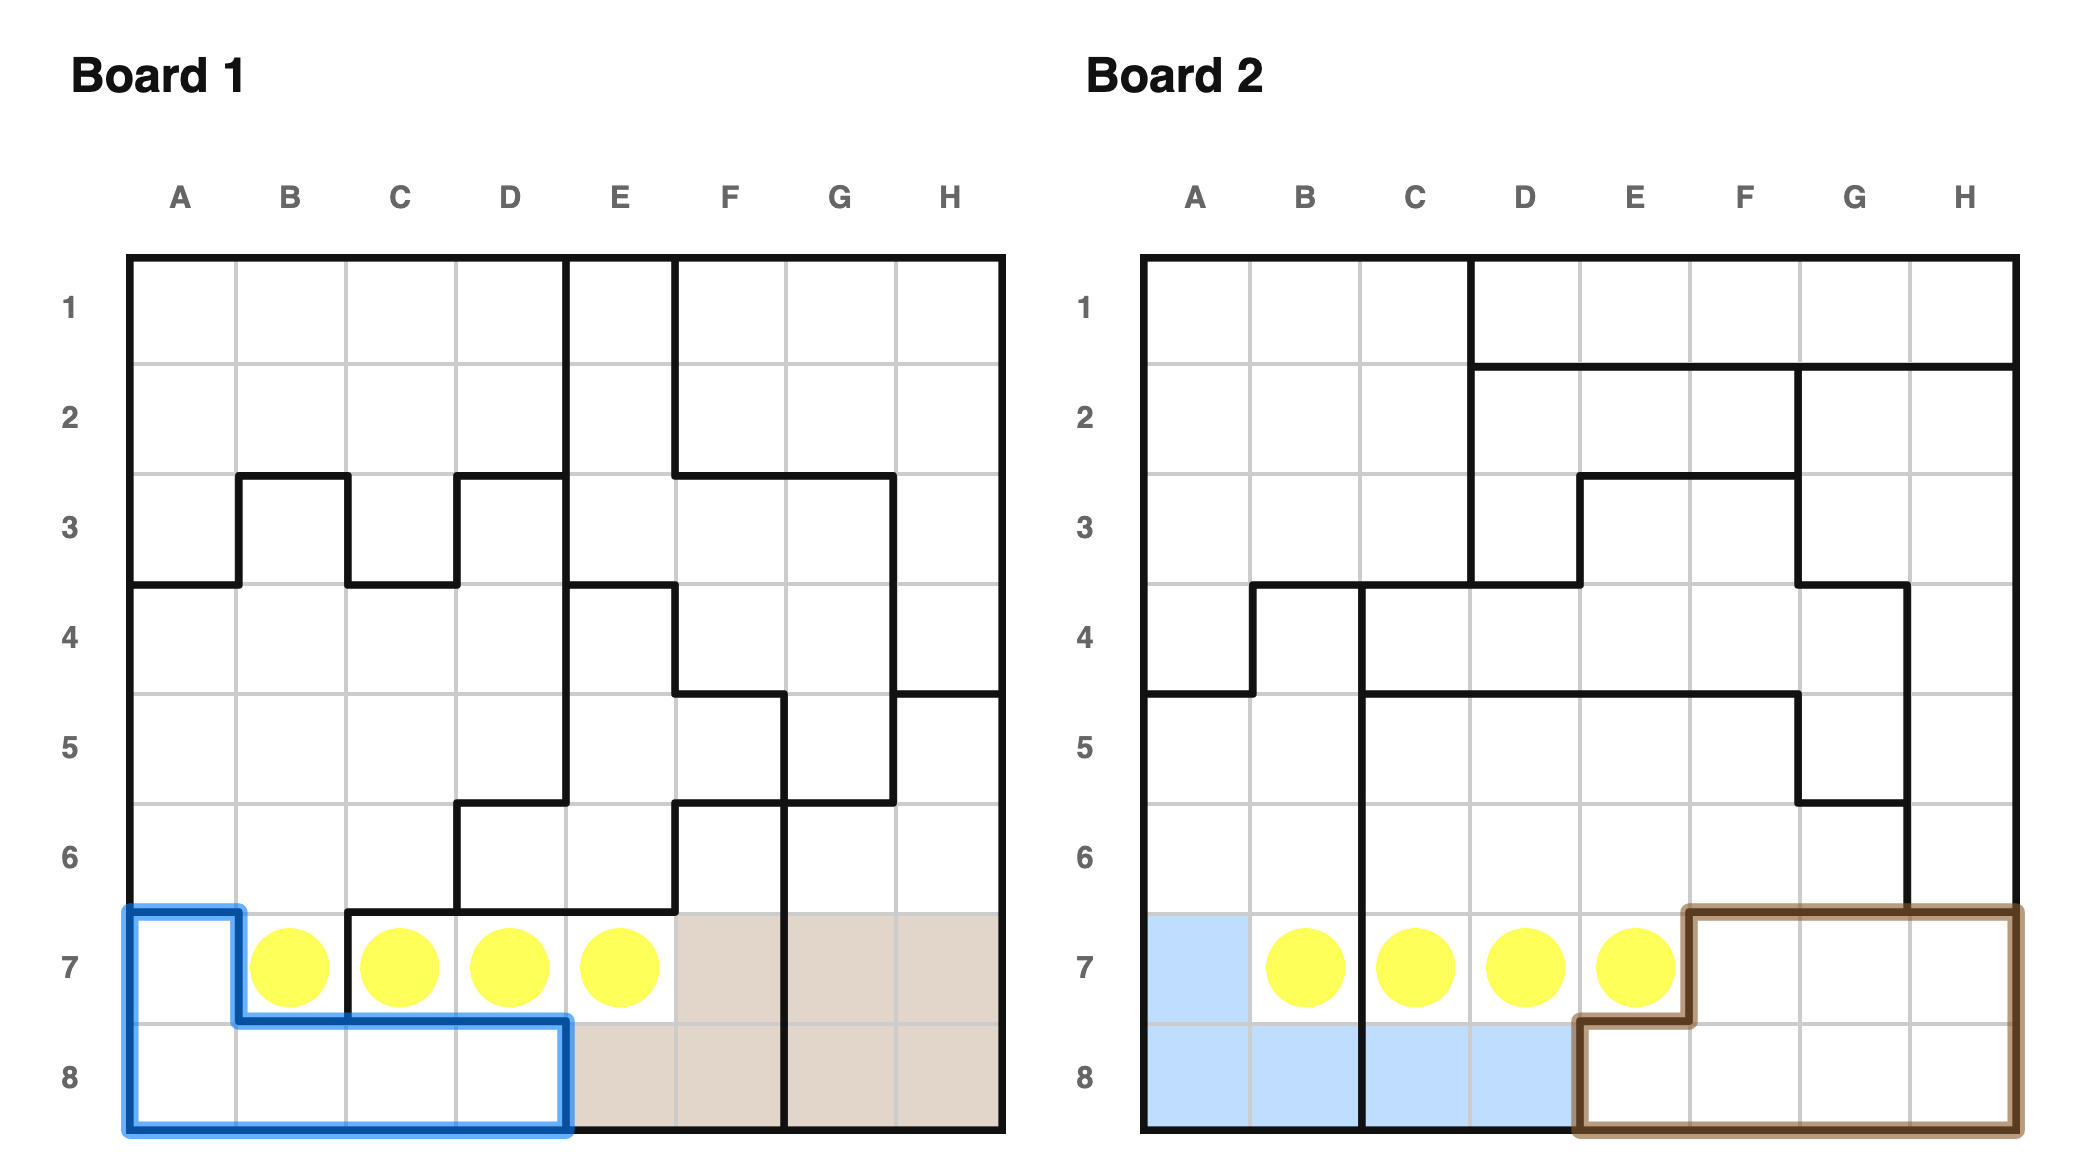 In this case, the bottom-left region of board 1 and the bottom-right region of
board 2 are disjoint, and are both contained in rows 7 and 8. No matter how we
place stars in those regions, we'll satisfy those rows, so we can mark the rest
of those rows with dots.
---
In this case, the bottom-left region of board 1 and the bottom-right region of
board 2 are disjoint, and are both contained in rows 7 and 8. No matter how we
place stars in those regions, we'll satisfy those rows, so we can mark the rest
of those rows with dots.
---
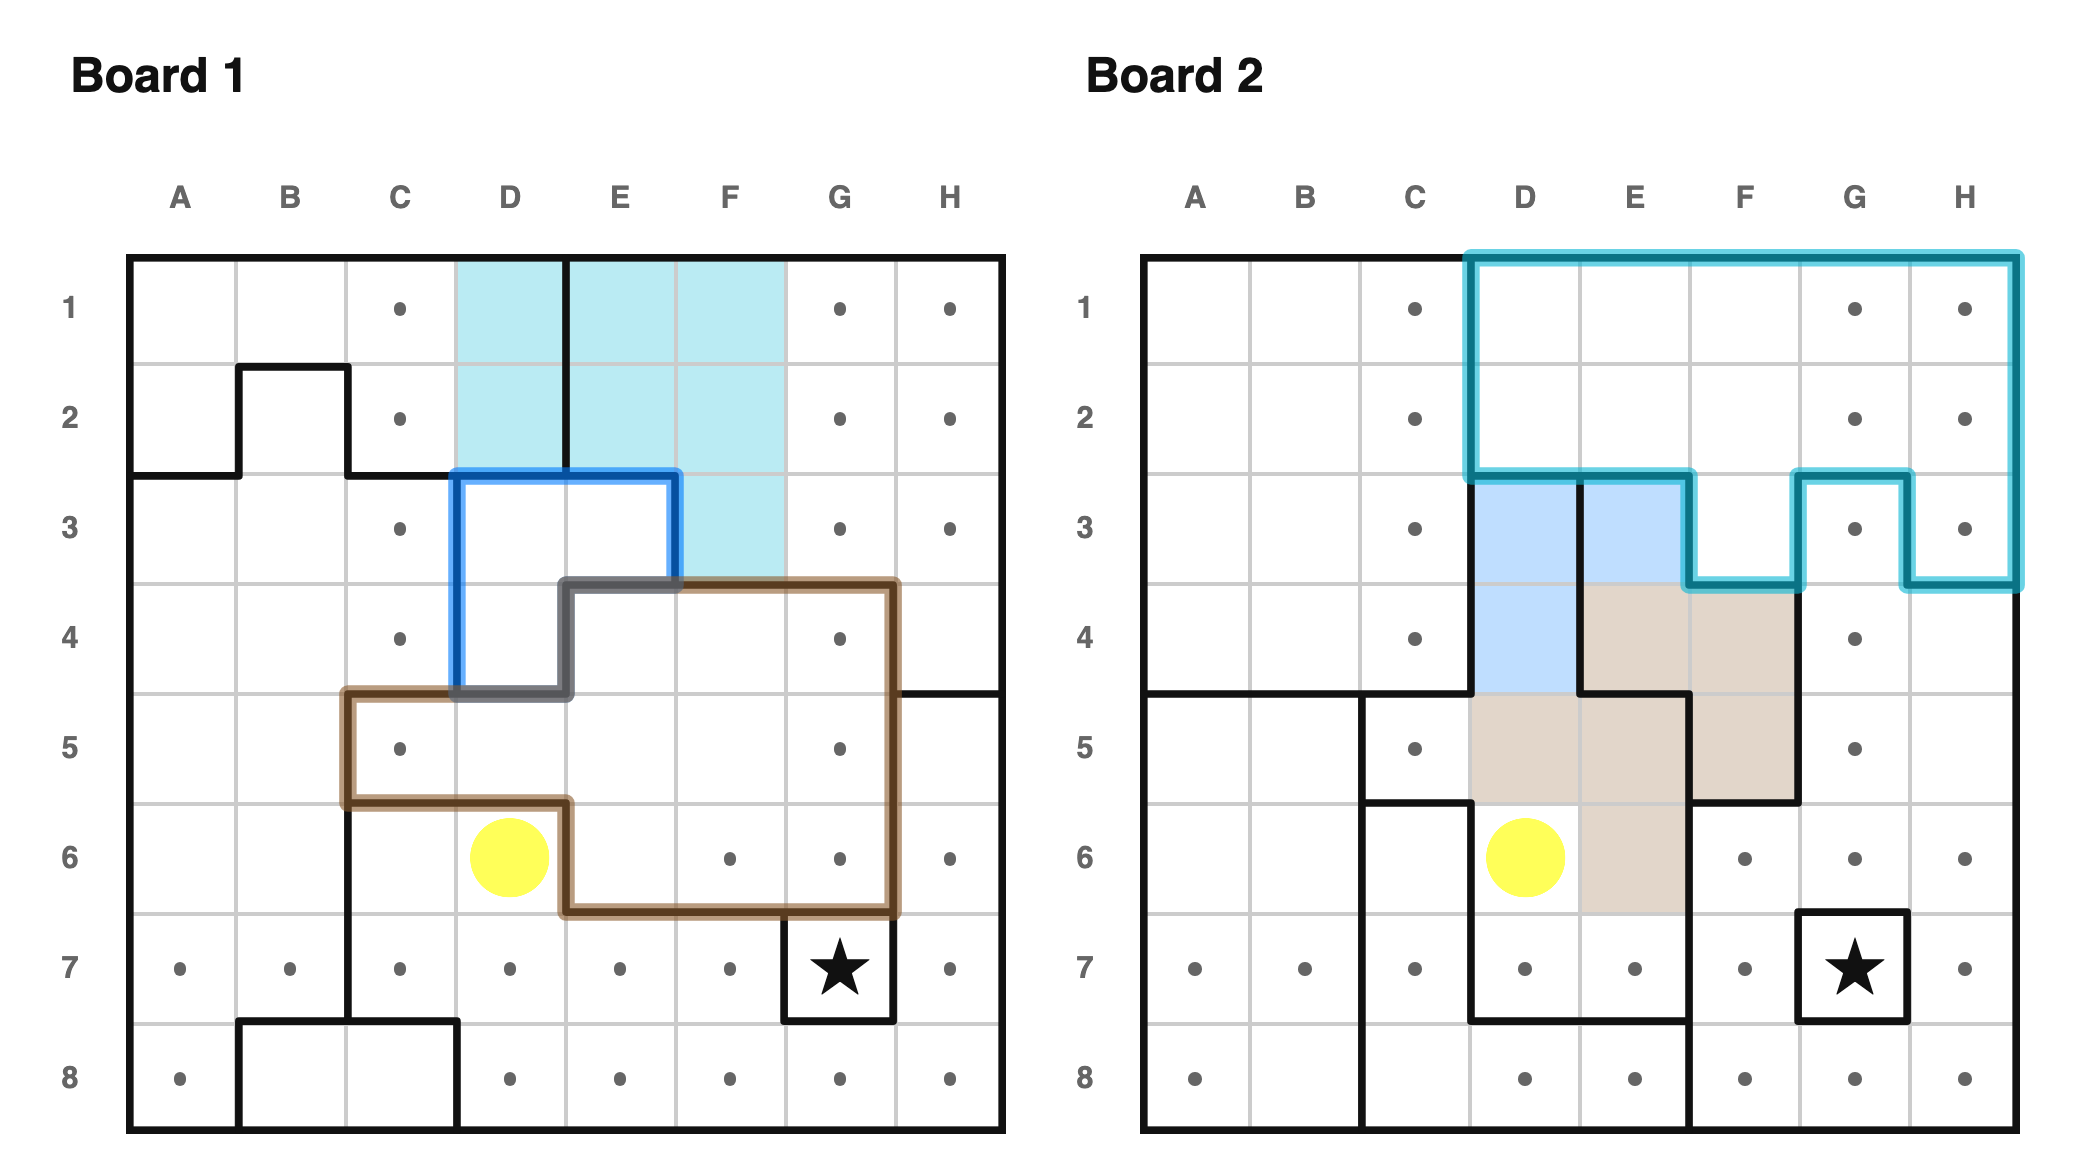 The same reasoning applies with >2 crossboard regions. In this case, the empty
cells of 3 regions (two from board 1, one from board 2) are all contained in
columns {D, E, F}. So the rest of those columns must contain only dots.
---
The same reasoning applies with >2 crossboard regions. In this case, the empty
cells of 3 regions (two from board 1, one from board 2) are all contained in
columns {D, E, F}. So the rest of those columns must contain only dots.
---
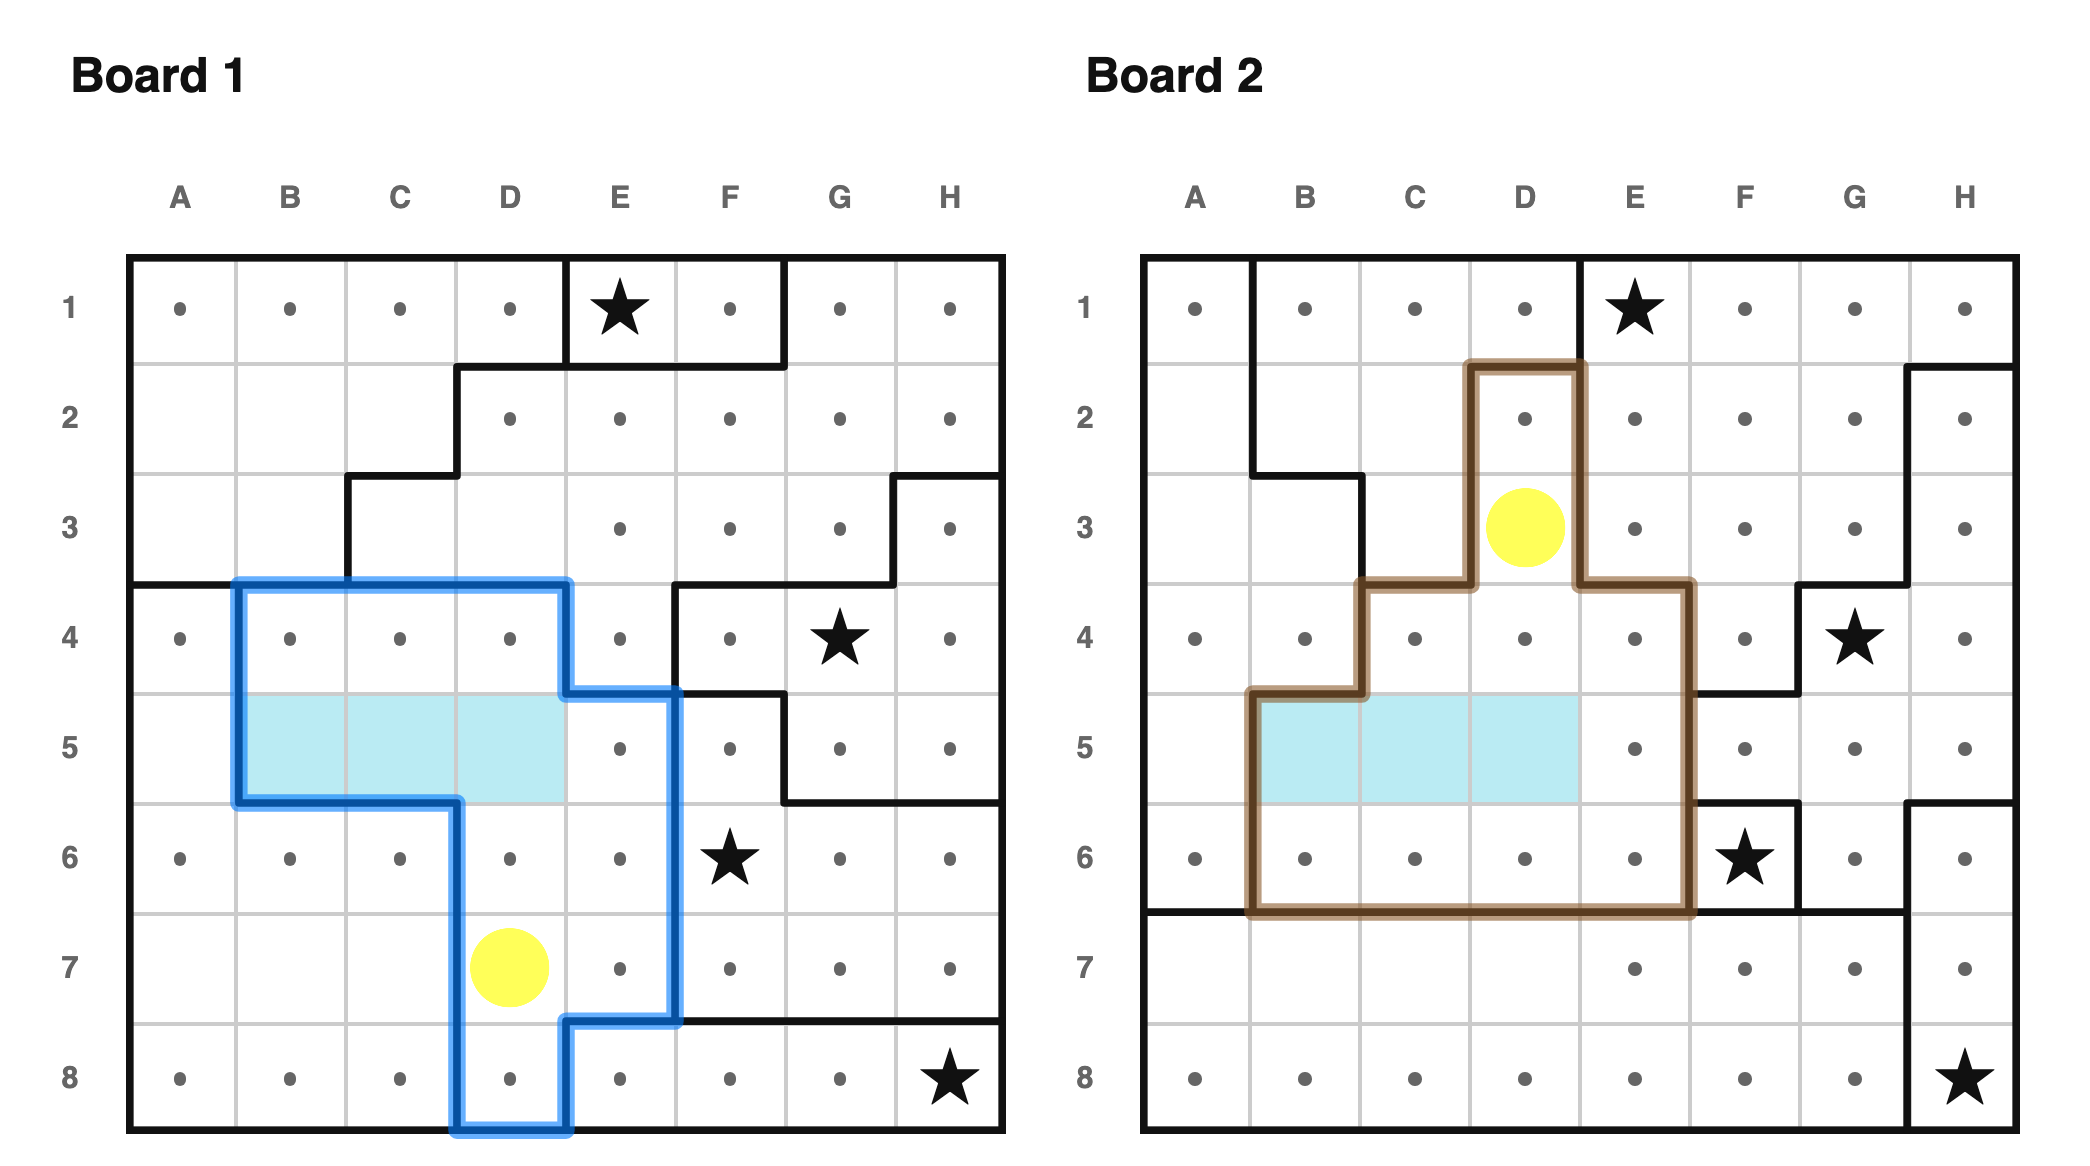 Focus on the blue-outlined region on board 1 and the brown-outlined region on
board 2. They share 3 cells {B5, C5, D5} (shaded cyan), and each have one cell which is not shared (D3 and D7). If we put
the star in the non-shared cell of one, then we'd put dots in all shared cells,
and be forced to put a dot in the non-shared cell of the other. But in this
case, D3 and D7 see each other, so we aren't allowed to put stars in both.
More generally, if the non-shared cells of two regions all mutually see each
other, then we can put dots in all of them.
### Region pairs
Focus on the blue-outlined region on board 1 and the brown-outlined region on
board 2. They share 3 cells {B5, C5, D5} (shaded cyan), and each have one cell which is not shared (D3 and D7). If we put
the star in the non-shared cell of one, then we'd put dots in all shared cells,
and be forced to put a dot in the non-shared cell of the other. But in this
case, D3 and D7 see each other, so we aren't allowed to put stars in both.
More generally, if the non-shared cells of two regions all mutually see each
other, then we can put dots in all of them.
### Region pairs
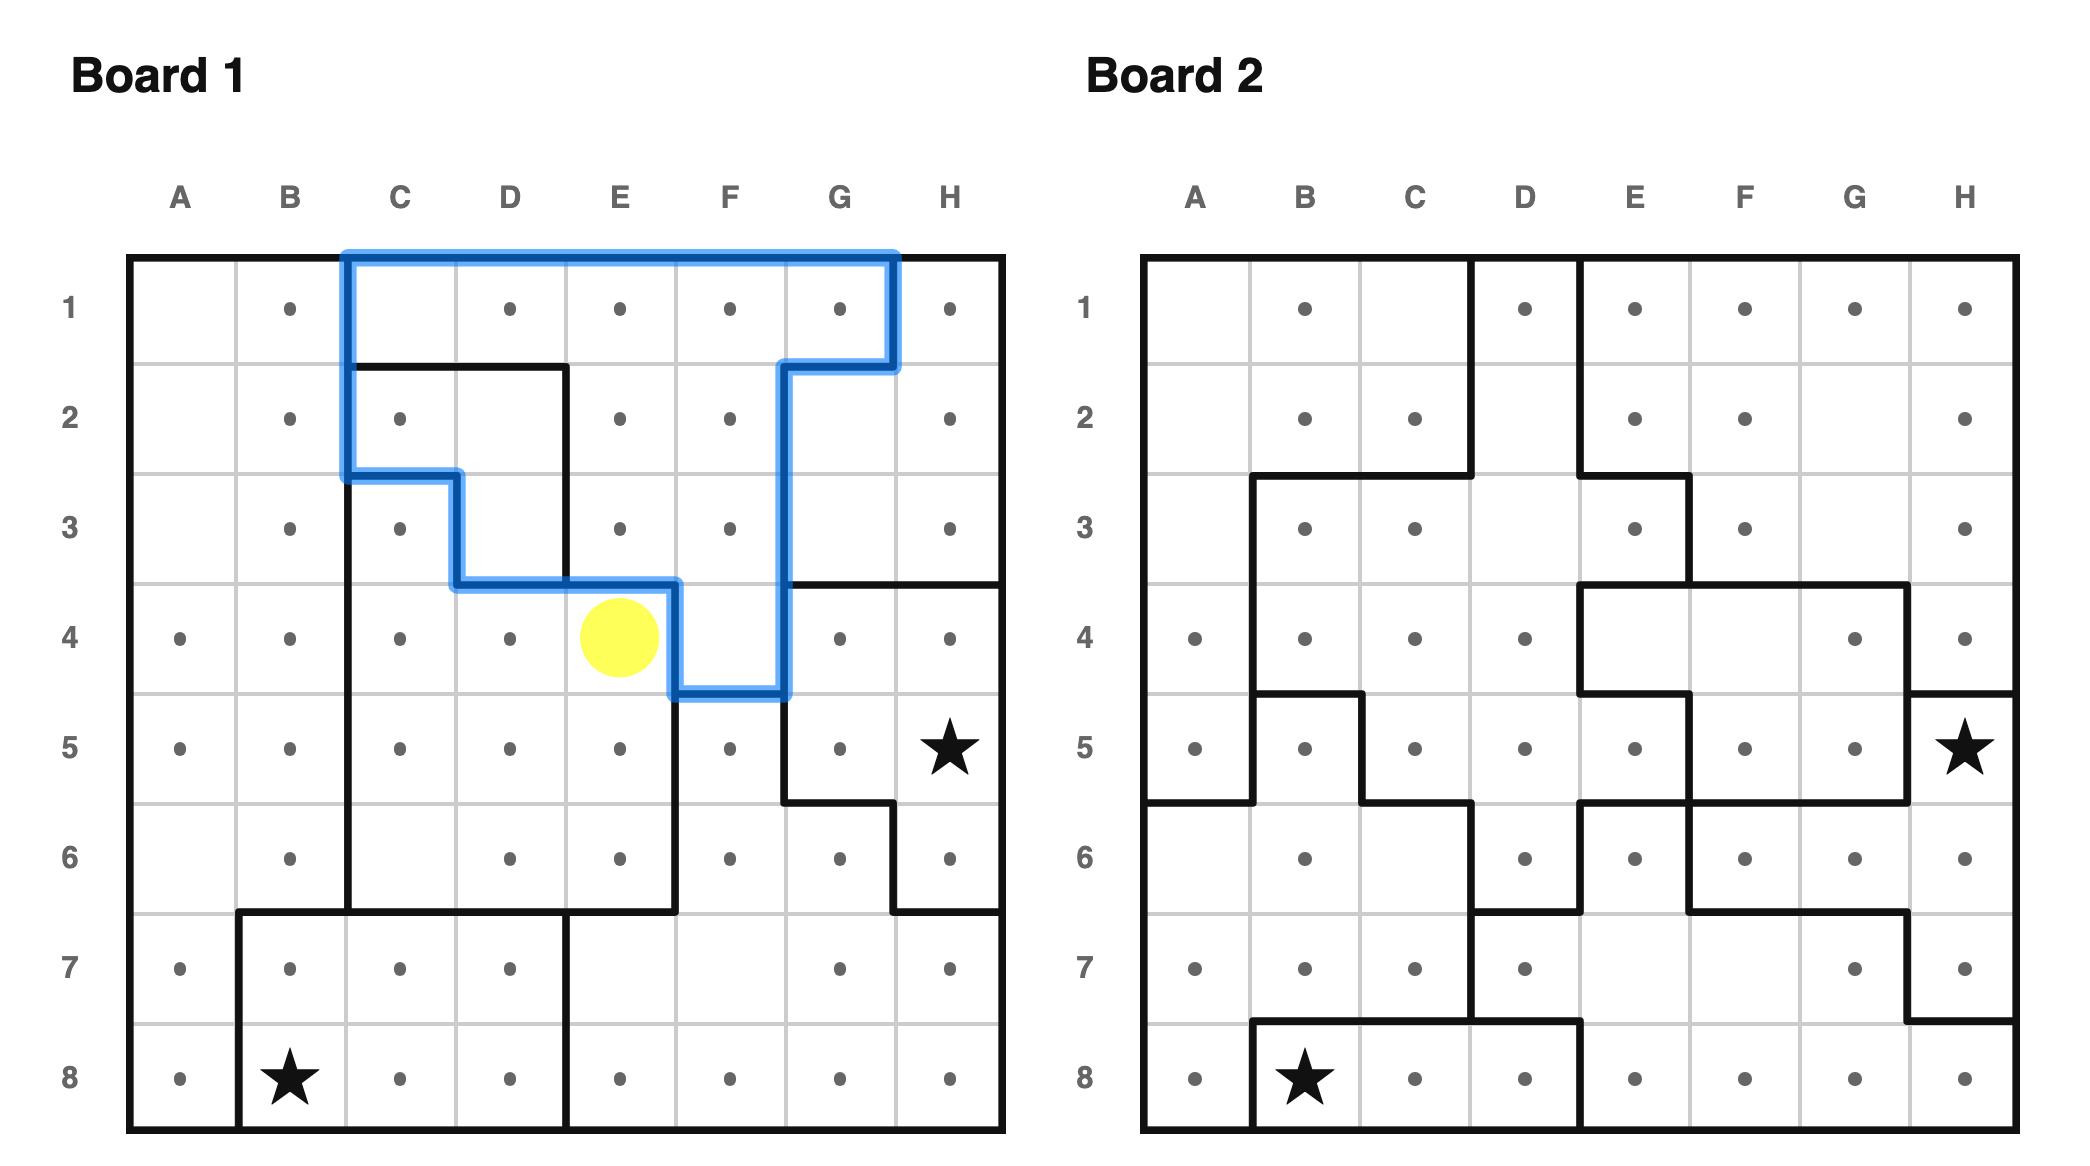 Two regions on the same board that touch along an edge can be treated as one
combined region: enumerate every way to place their *combined* remaining
stars anywhere in the union, ignoring which side of the boundary each star
ends up on (a placement is fine even if both stars land in the same region).
Here, the two touching regions shown in blue each still need one star, and
between them there are only 4 open cells. All 4 ways to place those 2 stars
happen to put one at F4, so E4 — just outside the union, next to F4 — would
always see a star. It must be a dot.
---
Two regions on the same board that touch along an edge can be treated as one
combined region: enumerate every way to place their *combined* remaining
stars anywhere in the union, ignoring which side of the boundary each star
ends up on (a placement is fine even if both stars land in the same region).
Here, the two touching regions shown in blue each still need one star, and
between them there are only 4 open cells. All 4 ways to place those 2 stars
happen to put one at F4, so E4 — just outside the union, next to F4 — would
always see a star. It must be a dot.
---
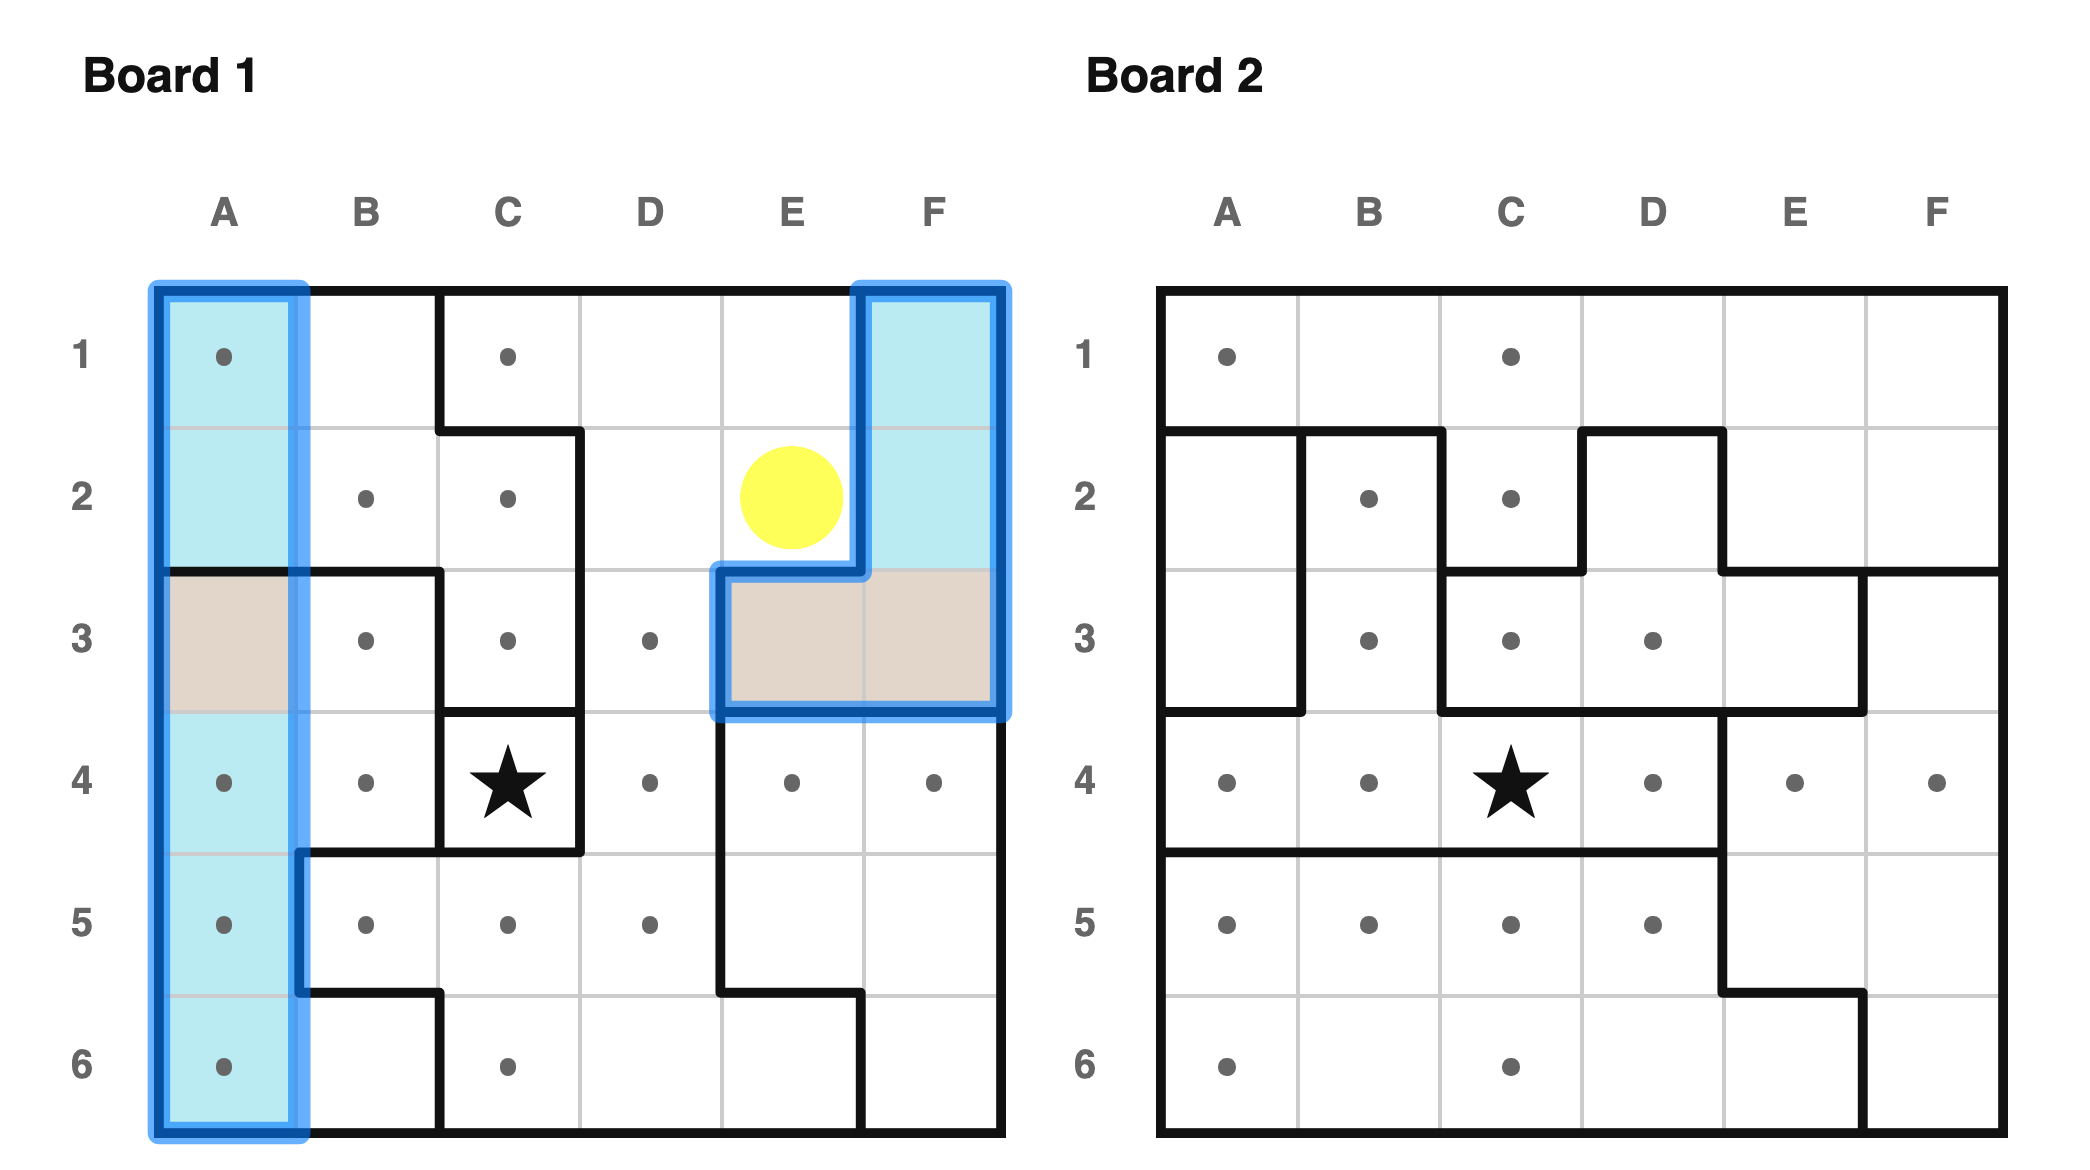 A different way to combine two regions. If two regions jointly hold 2 stars,
and some *other* row, column, or region already has all of its open cells
inside that pair (and reaches into both of them), then that other unit's star
must come from there — leaving exactly 1 star for the rest of the pair. Here,
Row 3's only two open cells already sit inside the blue pair, and Row 3 needs
its 1 star from somewhere — so the rest of the pair (outside Row 3) holds
exactly 1 star too. That leaves only F1 and B6 open. B1 sees both of them (F1
by row, B6 by column), so a star at B1 would leave neither available. B1 must
be a dot.
### Lookahead
A different way to combine two regions. If two regions jointly hold 2 stars,
and some *other* row, column, or region already has all of its open cells
inside that pair (and reaches into both of them), then that other unit's star
must come from there — leaving exactly 1 star for the rest of the pair. Here,
Row 3's only two open cells already sit inside the blue pair, and Row 3 needs
its 1 star from somewhere — so the rest of the pair (outside Row 3) holds
exactly 1 star too. That leaves only F1 and B6 open. B1 sees both of them (F1
by row, B6 by column), so a star at B1 would leave neither available. B1 must
be a dot.
### Lookahead
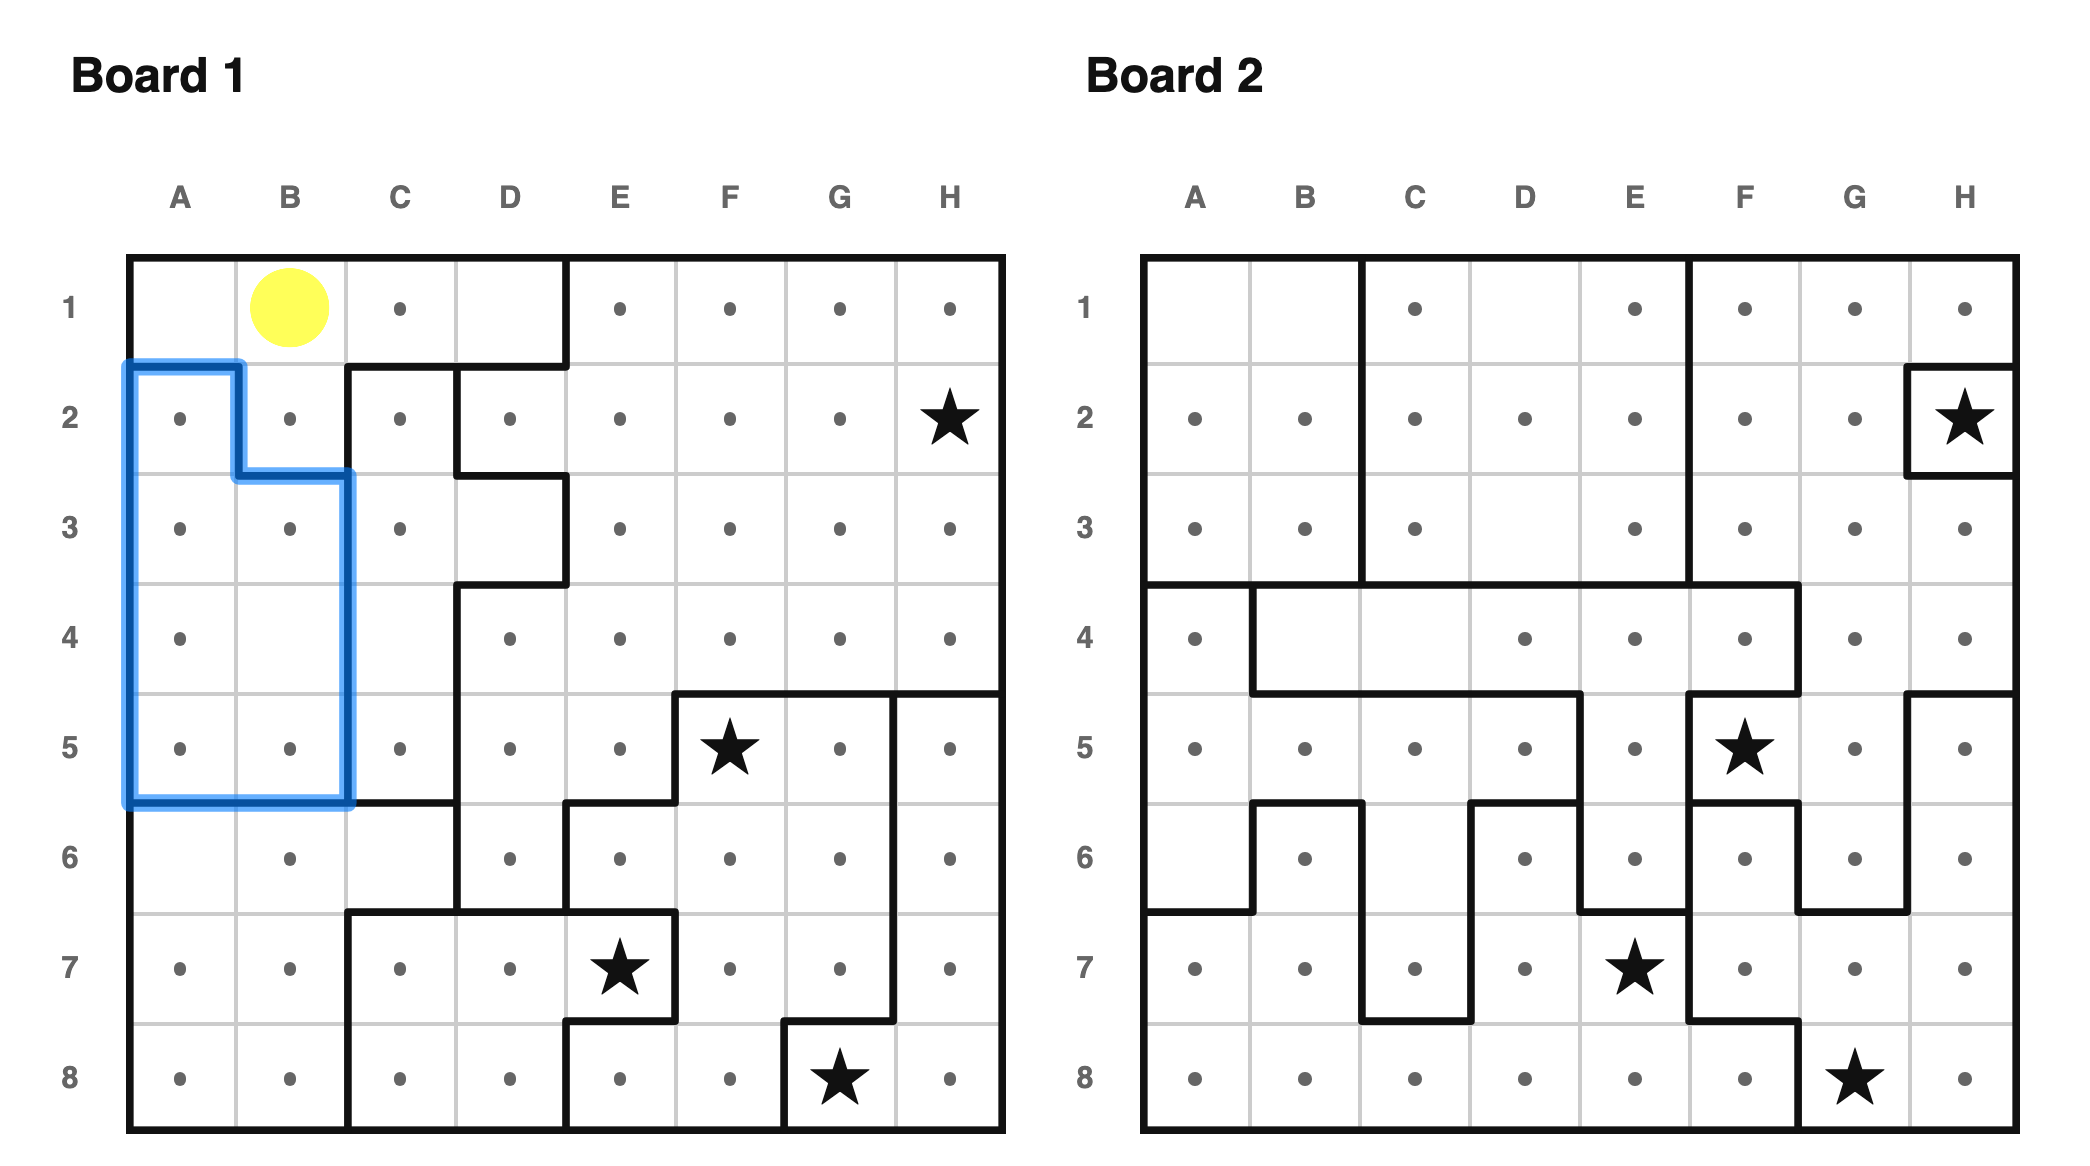 In this case, a star at B1 would see B4 (by column), and A3 (by region on board
2). This would make the middle-left region of board 1 unsolvable, so B1 cannot
contain a star. This is sorta like a generalized version of "sees too much", but
taking into account the region on the other board.
In this case, a star at B1 would see B4 (by column), and A3 (by region on board
2). This would make the middle-left region of board 1 unsolvable, so B1 cannot
contain a star. This is sorta like a generalized version of "sees too much", but
taking into account the region on the other board.
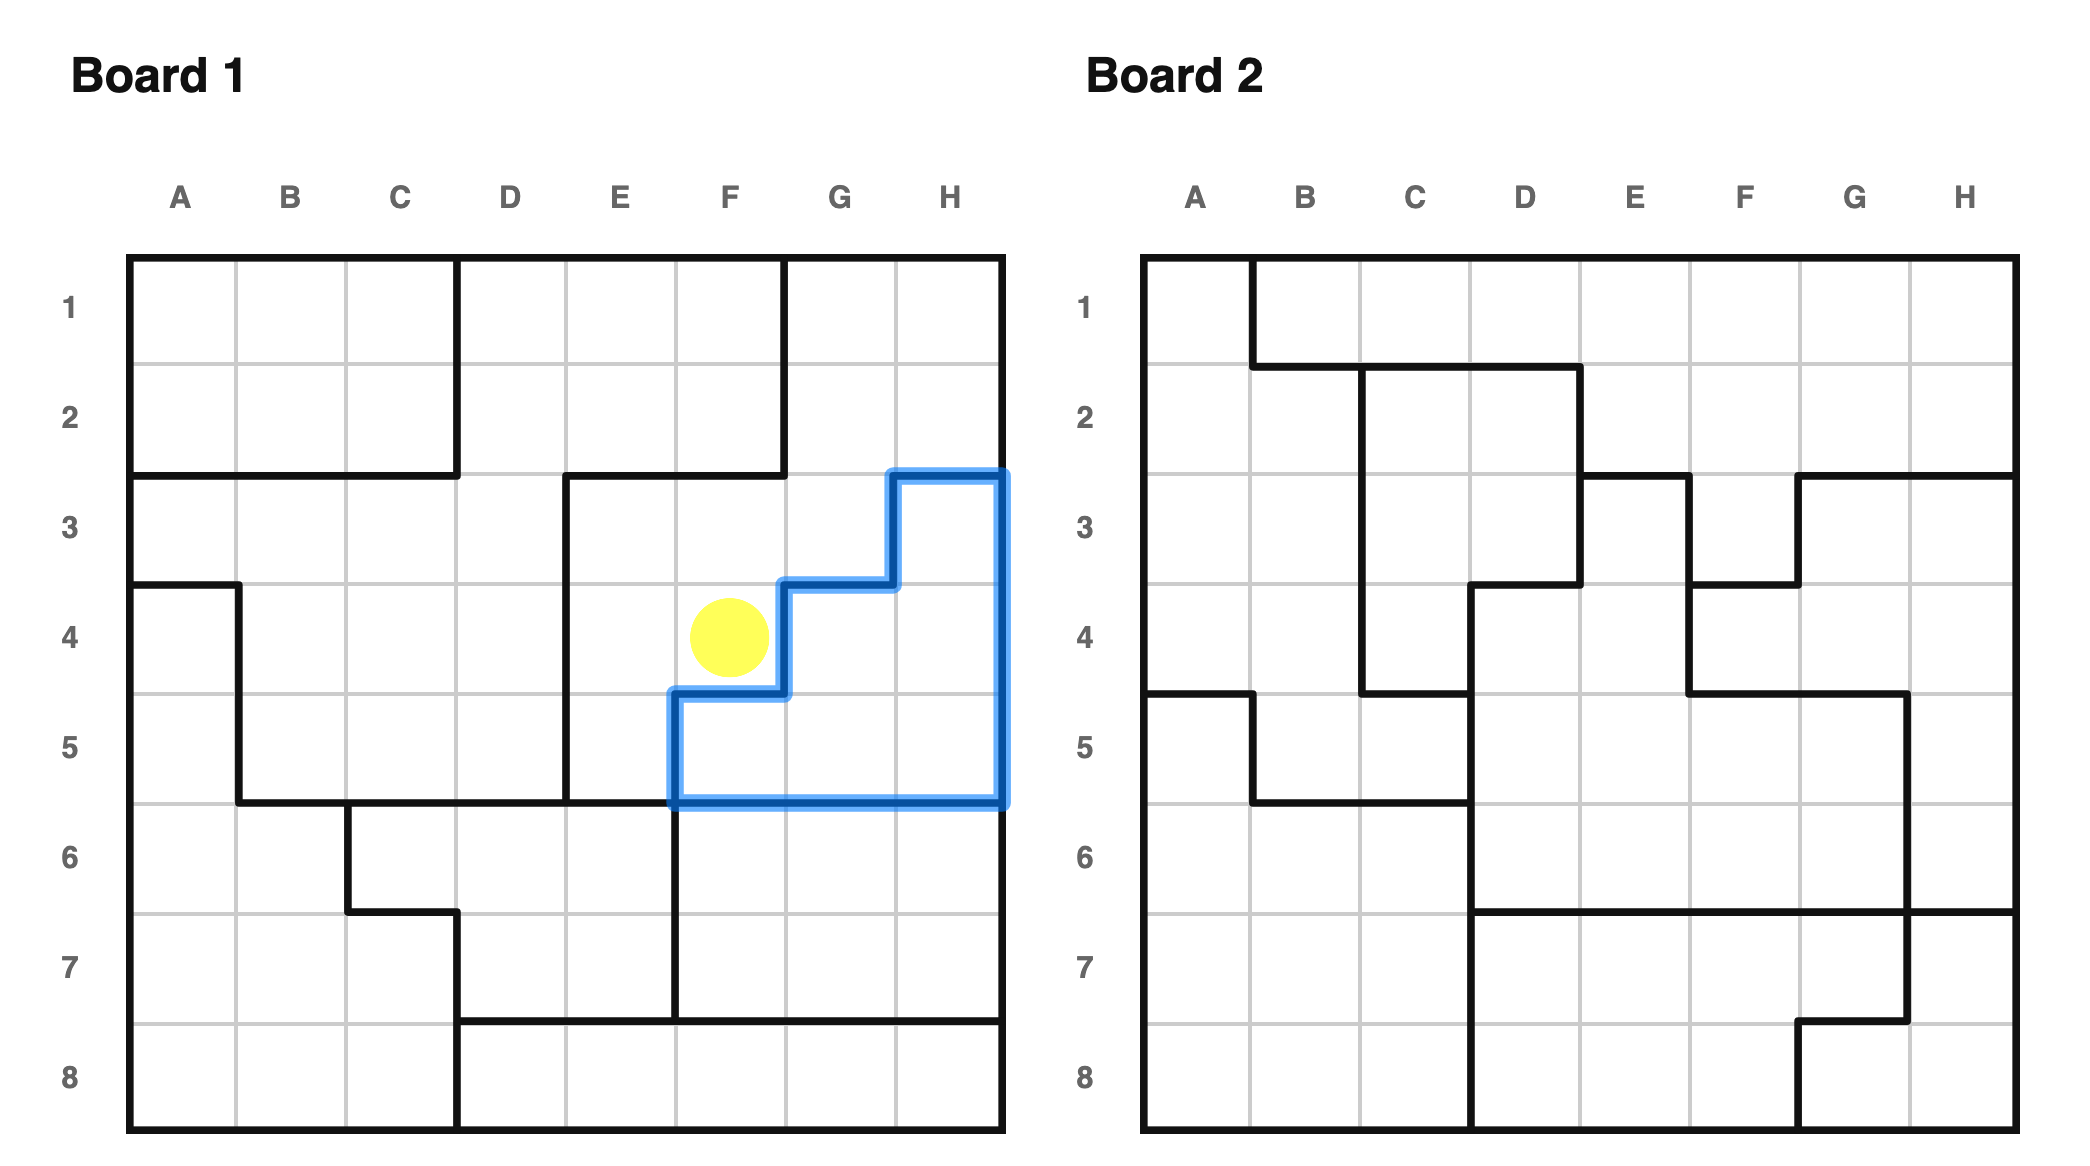 In this case, a star at F4 would force dots down the rest of column F, and at
G4, H3, H4, and H5 (because of a region on board 2). Between those two
consequences, every cell of a six-cell region on board 1 — F5, G4, G5, H3, H4,
and H5 — ends up dotted, leaving that region with nowhere to put its own
required star. So F4 must be a dot.
I call this "half-stage lookahead", because it's implemented in terms of the
multi-stage lookahead technique below. This is the hardest kind of inference
that I still think of as "human viable" in the general case. And even then, I
only allow it in "expert" tier puzzles.
#### Multi-stage lookahead
This is the technique of last resort, sort like a guess-and-test.
In this case, a star at F4 would force dots down the rest of column F, and at
G4, H3, H4, and H5 (because of a region on board 2). Between those two
consequences, every cell of a six-cell region on board 1 — F5, G4, G5, H3, H4,
and H5 — ends up dotted, leaving that region with nowhere to put its own
required star. So F4 must be a dot.
I call this "half-stage lookahead", because it's implemented in terms of the
multi-stage lookahead technique below. This is the hardest kind of inference
that I still think of as "human viable" in the general case. And even then, I
only allow it in "expert" tier puzzles.
#### Multi-stage lookahead
This is the technique of last resort, sort like a guess-and-test.
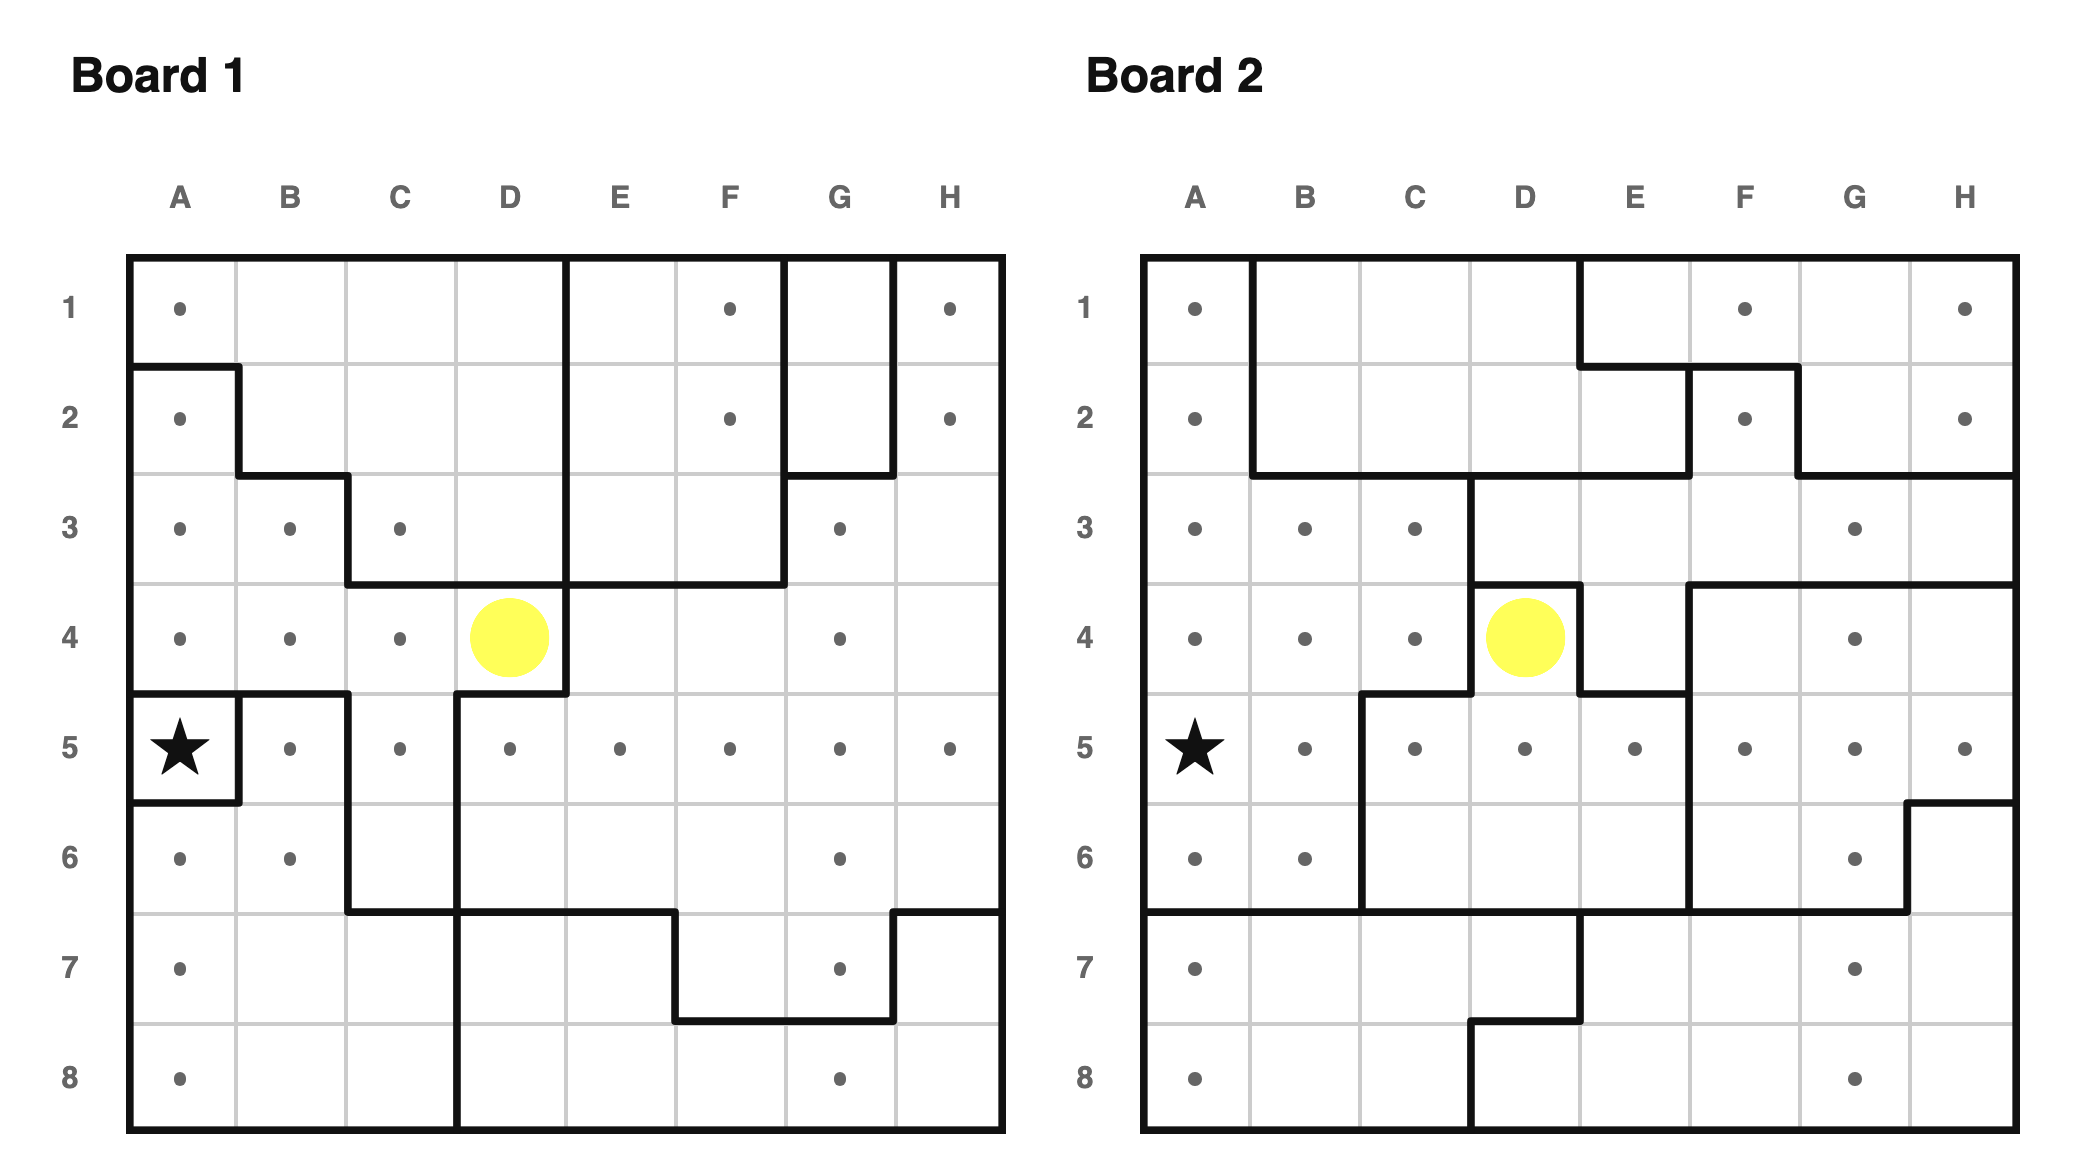 Consider a star at D4:
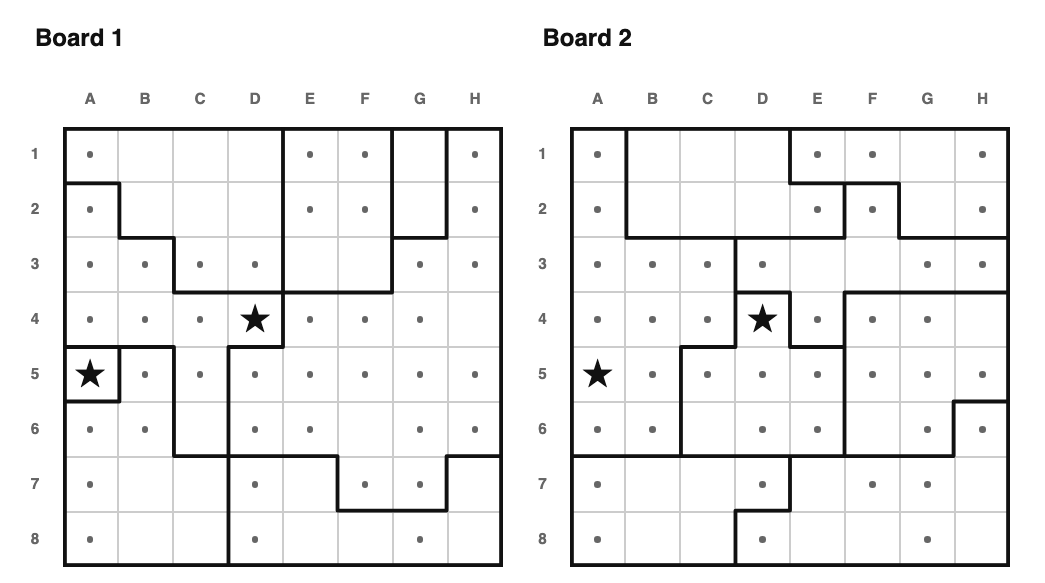 This forces the following dots: D1, D2, E3, H4, and C6. There are now two
regions with one empty cell apiece, so we need to place stars in F3 and F6.
But those two are in the same column, so D4 must contain a dot.
I think this technique is not viable for humans in the typical case, but can be
used in specialized cases.
## Unimplemented Techniques
(The "implied region" idea that used to be here — noticing that a group of cells
must hold exactly one star, even though it isn't drawn as a region, and reusing
region tools against it — is implemented now. See "Tiles" above.)
### Both-or-Neither
This forces the following dots: D1, D2, E3, H4, and C6. There are now two
regions with one empty cell apiece, so we need to place stars in F3 and F6.
But those two are in the same column, so D4 must contain a dot.
I think this technique is not viable for humans in the typical case, but can be
used in specialized cases.
## Unimplemented Techniques
(The "implied region" idea that used to be here — noticing that a group of cells
must hold exactly one star, even though it isn't drawn as a region, and reusing
region tools against it — is implemented now. See "Tiles" above.)
### Both-or-Neither
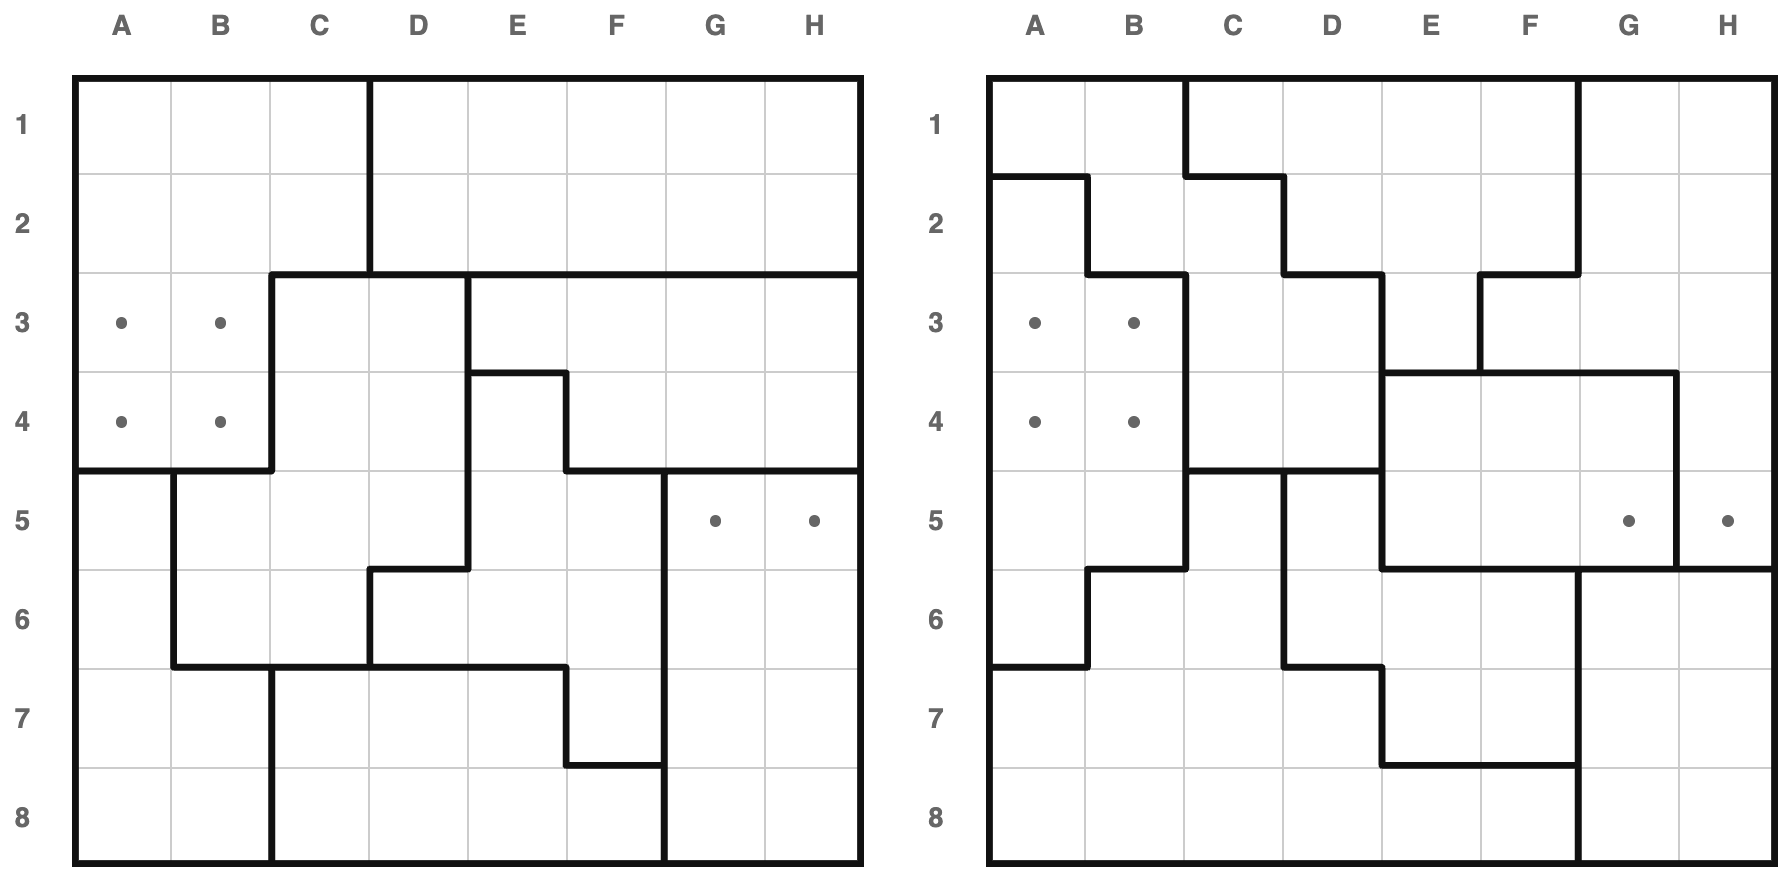 This is a technique I see a teammate use sometimes. He'll point out two cells
that must be equal, then say ~"oh, but if both are stars, then there's a
contradiction", and mark dots in both.
In this case, look at the two regions on the right of board 2. They almost fit
in columns G and H, but not quite. The exceptions are that G4 isn't covered and
F3 is covered. If we put a star at G4, then one of those region's stars would
need to spill outside of cols {G,H} and land in F3. Similarly, if we put at dot
at G4, then we can make a 2-col observation and also put a dot at F3.
But observe - F3 and G4 touch each other, so we can't put stars at both.
Therefore we must put stars at both. This instance is a lot like
partial-overlap; but the techinqe can be applied whenever placing both stars
would cause a contradiction.
---
I suspect that there are more human-viable rules that I don't know about. If you
think of one - please let me know!
## More philosophy
### Branching Paths
In many cases, the same technique can be applied to multiple places on the
puzzle. Which one you choose can dramatically impact the solver's view of the
puzzle. I think this is especially noticable with the lookahead rules, since
they are difficult and place only a sinlge dot. A lucky use of lookahead might
trivialize the rest of the puzzle. An unlucky use of lookahead might require
several more applications of lookahead before the path becomes clear.
So what is the difficulty of that puzzle?
Perhaps I should run the solver several times, randomizing at all decision
points, and then look at the mean/median of all difficulty scores.
### Which puzzles are actaully good
The output of my solver is a "score" which estimates puzzle difficulty, and a
"tier", which says which kinds of rules were required. On my corpus of 1 million
8x8 puzzles, "beginner" ranges from 12-174, "medium"
difficulty puzzles range from 25-311, "hard" ranges from 39-367, "expert" ranges
from 92-1236, and "grandmaster" ranges from 145-3548.
Notice how the [hardest
beginner](index.html?book=armory&puzzle=37)
puzzle (score 174) and the [easiest
grandmaster](index.html?book=armory&puzzle=38)
puzzle (score 177) end up with almost the same score - what's up with that?!
That beginner puzzle reqires a ton of applications of beginner tier
techniques, each one only placing a few dots at a time. That grandmaster
puzzle is trivial, except a single crux which requires a grandmaster tier
technique.
Personally, I don't consider either to be suitable for publication. I
think that a beginner solver doesn't want a beginner puzzle like that, and an
expert/grandmaster solver also doesn't want a puzzle like that.
When I'm choosing which puzzles to publish, I throw away the puzzles with the
highest and lowest scores within each tier.
### Symmetry rules
I also have trouble characterizing the difficulty of puzzles that are
trivialized by the symmetry techniques. My current thinking is that I consider
the "copy notation along symmetry" as a medium tier technique. This gives those
puzzles a slight score decrease, because they can someteimes use this instead of
a harder technique. I consider the "sees
self under symmetry" as somewhere between "hard" and "expert". If a puzzle falls
into this category, I don't serve it at all.
### Ideas for future improvement to scoring
- how early does the first hard rule appear?
- how early is the first star placed?
- N row/cols along an edge is easier to spot than mid-board?
- how often a solver of beginner/medium/... strength would need to switch
boards
- lookahead is expensive and not targeted. A good choice of lookahead might
prevent the need for others. The same is true more generally if you think
about it; maybe rules need to return a list of possible "Inference" objects
and then the solver randomly selects amongst them?
- split off a half-lookahead case which only requires looking at one board?
This is a technique I see a teammate use sometimes. He'll point out two cells
that must be equal, then say ~"oh, but if both are stars, then there's a
contradiction", and mark dots in both.
In this case, look at the two regions on the right of board 2. They almost fit
in columns G and H, but not quite. The exceptions are that G4 isn't covered and
F3 is covered. If we put a star at G4, then one of those region's stars would
need to spill outside of cols {G,H} and land in F3. Similarly, if we put at dot
at G4, then we can make a 2-col observation and also put a dot at F3.
But observe - F3 and G4 touch each other, so we can't put stars at both.
Therefore we must put stars at both. This instance is a lot like
partial-overlap; but the techinqe can be applied whenever placing both stars
would cause a contradiction.
---
I suspect that there are more human-viable rules that I don't know about. If you
think of one - please let me know!
## More philosophy
### Branching Paths
In many cases, the same technique can be applied to multiple places on the
puzzle. Which one you choose can dramatically impact the solver's view of the
puzzle. I think this is especially noticable with the lookahead rules, since
they are difficult and place only a sinlge dot. A lucky use of lookahead might
trivialize the rest of the puzzle. An unlucky use of lookahead might require
several more applications of lookahead before the path becomes clear.
So what is the difficulty of that puzzle?
Perhaps I should run the solver several times, randomizing at all decision
points, and then look at the mean/median of all difficulty scores.
### Which puzzles are actaully good
The output of my solver is a "score" which estimates puzzle difficulty, and a
"tier", which says which kinds of rules were required. On my corpus of 1 million
8x8 puzzles, "beginner" ranges from 12-174, "medium"
difficulty puzzles range from 25-311, "hard" ranges from 39-367, "expert" ranges
from 92-1236, and "grandmaster" ranges from 145-3548.
Notice how the [hardest
beginner](index.html?book=armory&puzzle=37)
puzzle (score 174) and the [easiest
grandmaster](index.html?book=armory&puzzle=38)
puzzle (score 177) end up with almost the same score - what's up with that?!
That beginner puzzle reqires a ton of applications of beginner tier
techniques, each one only placing a few dots at a time. That grandmaster
puzzle is trivial, except a single crux which requires a grandmaster tier
technique.
Personally, I don't consider either to be suitable for publication. I
think that a beginner solver doesn't want a beginner puzzle like that, and an
expert/grandmaster solver also doesn't want a puzzle like that.
When I'm choosing which puzzles to publish, I throw away the puzzles with the
highest and lowest scores within each tier.
### Symmetry rules
I also have trouble characterizing the difficulty of puzzles that are
trivialized by the symmetry techniques. My current thinking is that I consider
the "copy notation along symmetry" as a medium tier technique. This gives those
puzzles a slight score decrease, because they can someteimes use this instead of
a harder technique. I consider the "sees
self under symmetry" as somewhere between "hard" and "expert". If a puzzle falls
into this category, I don't serve it at all.
### Ideas for future improvement to scoring
- how early does the first hard rule appear?
- how early is the first star placed?
- N row/cols along an edge is easier to spot than mid-board?
- how often a solver of beginner/medium/... strength would need to switch
boards
- lookahead is expensive and not targeted. A good choice of lookahead might
prevent the need for others. The same is true more generally if you think
about it; maybe rules need to return a list of possible "Inference" objects
and then the solver randomly selects amongst them?
- split off a half-lookahead case which only requires looking at one board?